Ultra-Portable Data Center: Part Two
After over four years, I am simplifying the UPDC to make it more lightweight, more portable, and less in the way. This is a status update on the Ultra-Portable Data Center.
In 2019 I built my own portable, network-attached storage (NAS), which I audaciously dubbed the Ultra-Portable Data Center. Back at the time, I was coming from a Synology 4-bay system that was packed with 12TB of storage, but offered little more than a Samba share, a Plex media server, and a hacky implementation of Resilio Sync, which I used for file synchronization across multiple devices. While the Synology worked decently enough, I found it too limiting for my use cases, and I didn’t quite like the black box that was Synology’s cloud-connected software. The Synology felt like a Linux system that could not be used as such. And besides, with four 3.5" drives – each weighing 720g – it wasn’t exactly portable either.
I decided to build my own NAS, based on an off-the-shelf mITX board with a Ryzen CPU, two NVMe drives running in RAID1, and four 2.5" 4TB drives that would use part of the NVMe RAID1 as a cache. The device was water cooled sing an NZXT AIO – in retrospect not the best idea, considering the weight, but as I had all the parts available from a previous build, it was the most economical choice. A custom-designed and 3D-printed enclosure allowed me to structure everything so that the overall device footprint remained small enough for it to fit a suitcase, yet provided enough ventilation for the hardware inside to not suffocate right away. The PETg print also made it relatively lightweight – at least as lightweight as it gets when using an AIO and an SFX PSU.
For years the Ultra-Portable Data Center allowed me to store large amounts of data and run KVM virtual machines that would take care of various tasks, be it network services, data processing, or media encoding. Back then I was hoarding data. For example, I used to keep every raw photo and video that I produced with my camera, regardless of whether it was the tenth shot I took of the exact same thing. Similarly, I held on to random photos and videos shot on my phone. Photos weren’t the only thing I mindlessly dumped onto the device, though: I used to store things like downloads – most of which I only needed once and never again – and ridiculous amounts of movies that I would never re-watch, and music albums from which I would realistically only listen to a single song or two. I used the vast availability of space as an excuse to not go through files and properly organize them, and only keep what’s truly worth keeping.
Fast-forward a few years and my approach towards holding on to stuff – data included – has fundamentally changed. At some point, I became sick of having to deal with the excessive amount of baggage and started going through all my files and deleting everything that didn’t serve a purpose or that wasn’t worth keeping. I managed to shrink my overall data footprint from nearly 7TB to less than 3TB. Today, I could literally use a bunch of disks (e.g. random 2.5" external USB drives) and be done with it. Yet, I kept holding on to the UPDC, because I like to ride hardware until it’s dead, rather than replacing it every few years with new stuff.
When one of the four 2.5" disks of the UPDC failed earlier this year, however, it made me think. I didn’t feel like replacing the drive with the same slow SMR disk that I got nearly 5 years ago, and that was still selling for a whopping $140. Especially since I was expecting the other disks to die as well – spoiler: which they did shortly after, but more on that later. Ultimately these disks aren’t NAS drives. Even though I’m not running the UPDC 24/7, five years is a long time for a 2.5" spinning disk and in 2024 one has to have a good reason to spend money on 2.5" spinning disks. However, I nevertheless needed to fix the impending RAID failure and move my data to a safe place before it was too late. As a first step, I decided to offload the 3TB of data that was left on the UPDC onto multiple external 5TB 2.5" USB disks that I had around. Additionally, I identified nearly 1.5TB – approximately half of the data – that could totally go into cold storage at some point.
Iterating on the Ultra-Portable Data Center
With effectively a little over 1.5TB left to be brought back online on a rebuilt version of the UPDC, it begged the question of whether it makes sense to continue maintaining a device of that size in the first place. The four 2.5" 4TB drives consume space, and electricity and produce heat. Even accounting for the hot data to nearly double in size over the next years, two 4TB disks running in RAID1 should be sufficient for the foreseeable future.
Still driven by the intention to not purchase new hardware and instead use existing parts, the first thing that I did was to destroy the degraded RAID that was currently in place and rebuild the existing UPDC with only two 4TB disks running in RAID1.
While I was reconfiguring the UPDC, I not only removed two of the 2.5" HDDs but also replaced the heavy NZXT Kraken AIO with a slightly more lightweight Noctua NH-C14S that I had around, just to make the overall footprint of the device smaller. I was considering ordering a Noctua NH-L9a-AM4 chromax.Black for the UPDC to make it even more compact, so I went ahead a planned for that.
I fired up the CAD file of the UPDC design and began optimizing it. One day of work later, I ended up with a footprint that was smaller, yet still not Ultra-Portable by today’s standards.
The case would open in two parts that would gear into each other in a way in which the device would not require screws or tools to be dismantled, as this was one of my main gripes with the original design.
Aside from the motherboard, every part could be replaced without the use of tools. The computer could be lying sideways without the cover when requiring a PCI-E card. For normal operation, however, it would be standing up on its feet.

I uploaded the STLs on Hubs Protolabs for an instant quote of the PETg
print, just to get an idea of the cost. Even with the coarsest settings,
printing both parts would have cost nearly $300. Adding the materials needed for
finishing (sanding paper, primer, paint, coating) the case would easily exceed
the $400 mark, which would be out of proportion for a result that didn’t turn
out to be significantly smaller and more lightweight.
While I could have replaced the SFX PSU with a PicoPSU, the external power bricks of these things are enormous, leading to no benefit at all. For comparison, the current Corsair SF450 SFX PSU weighs 860 grams, and a 150W AC-DC power adapter for the PicoPSU is around 790g. Yes, the case would have an overall smaller footprint. However, it would still be cumbersome to travel with it, given that the power adapter alone is still around a kilo.
Single Board Computer
I came to realize that I needed a SBC, as it was the only way to have something truly compact that could be powered by a relatively lightweight USB-C charger. Back at the time when I initially built the UPDC it was running different VMs that would do various things, including computationally expensive tasks. Hence, a SBC wasn’t really something I could consider, especially with the SBC options that were available back then. These days, however, I have other means to run computationally expensive tasks and SBC options are plenty and powerful.
As the UPDC has always lacked a GPU, all of the workloads that would require one would end up either on my laptop, my workstation, or on a cloud service. It turns out that these days I don’t make as much use of the Ryzen CPU in the UPDC anymore. In fact, most of the time my UPDC is simply a gateway for moving things onto a RAID, either through Syncthing or SMB.
As for services, I already migrated most of them onto r0n1n, which is a Rock Pi 4A with a Rockchip RK3399 and 4GB LPDDR4 RAM. That SBC was more than sufficient for running everything from Grafana, over databases and own projects, to an internal ejabberd. Ideally, I could find a solution for the UPDC v2 that could consolidate the storage needs and the services into one, truly ultra-portable device.
I began researching different options, with the main requirements being a minimal footprint and enough performance to run Syncthing as well as Samba, and ideally all the services on r0n1n. Initially, I had 2 x SATA as a requirement, but with my 2.5" HDDs dying one after the other I figured that buying non-volatile memory and going for a 2 x M.2 NVMe solution would probably be the wiser choice moving forward.
Going through the ZimaBoard/ZimaBlade, the CWWK Magic Computer, the AOOSTAR R1, and many other SBC NAS solutions I came to realize that they were either overpriced for the hardware – looking at you, Icewhale – or that the community around these exotic boards was virtually inexistent. Considering the amounts of posts on Reddit and other forums, from people who bought into one of these devices only to end up with odd glitches that they couldn’t solve, I didn’t feel like this was a wise choice. I had already experienced how mediocre software support had been on boards like the Khadas VIM3 or the Rock Pi 4A, and I didn’t feel like dealing with such issues on a NAS.
Having mentioned that I was looking into options in one of my last update posts, a friendly reader – hey Lars! – reached out and pointed towards an interesting project: The QNASMINI. The project was apparently built around an Intel N100 board with 16GB DDR5 RAM, 2 x 2.5G LAN, and an M.2 SATA adapter with 6 slots. The specs were pretty solid and with the 3D-printed case, it appeared to be a relatively compact and tidy solution. However, this build requires a dedicated power supply for the SATA backplane, in addition to the board’s PSU. Also, it remained unclear to me how thermal performance was, especially as – from what I understood – the maker is using three regular 2.5" disks in this setup. I don’t see any way for the airflow to successfully pass the SATA backplane and provide enough ventilation for the drives to survive long-term. Even with SSDs the space and lack of direct airflow is probably troubling – especially in the environments that I’m usually in.
Another option that I came across was the FriendlyELEC CM3588. This SBC would have been attractive if I would have needed four NVMe sticks. However, given my previous experience with RockChip devices, I wasn’t particularly keen on trying yet another hardware that would mainly rely on a small community (e.g. Armbian) for software support.
As much as I hated the idea, I came to the conclusion that the Raspberry
unfortunately is still unbeaten in regard to its community and,
more importantly, its ecosystem. Heck, even
competitors that sell
their own SBCs continue to build add-ons for the Raspberry Pi.
None of the RaSpBeRrY kIlLeRs receive as much attention from vendors as well
as software developers as the Raspberry Pi does. Even though I would love the
performance of the RK3588, I was already envisioning the
PITA that is getting pre-built images that might include whoever knows what,
from Baidu or Google Drive links, or relying on efforts
provided by a rather small community, and accessing the GPIO
via a patched WiringPi package that
has to be downloaded from a
random Chinese IP address, or similar shenanigans.
Raspberry Pi 5
I ordered a Raspberry Pi 5 8GB and of course, a dedicated power adapter that can do the required 5.1V/5A. Especially with fans and HATs attached, I wasn’t sure whether my preferred option – see further down – would work, and I didn’t want to risk erratic behavior due to under-voltage. The Pi 5 is a notoriously whiny little b..oard in that regard, and Raspberry is to blame for it.
Another reason for the Raspberry Pi was upgradability. For the better or worse, Raspberry has managed to stick to more or less the same footprint for its B models over the years, introducing big changes only in the location of individual ports. This means that when the Raspberry Pi 6 B will eventually come out, I should be able to upgrade relatively hassle free. Even if I might need to adjust some of the port cutouts, it will hopefully only require me to re-print the center part of the case – if even necessary! – and change nothing else. This, however, is purely speculation based on the model B history.
For the actual drives I initially thought of using Radxa’s Penta SATA HAT, but as mentioned before, I didn’t feel like dealing with another set of 2.5" disks any longer. Also, after reading/seeing a couple of reviews on the Penta, it got pretty clear that heat management would be an issue, even with 2.5" SSDs attached to it. And again, as with the CM3588, I didn’t really need four drives to begin with.
Although reviews were mixed, I nevertheless went with the Geekworm X1004 dual NVMe PCIe HAT instead. The extension would allow me to connect two 4TB NVMe drives via PCIe Gen2 and use them in RAID1 (mirrored). And before you spit out your coffee shouting about how PCIe Gen 2 is only 5GT/s (approx. 500MB/s) and how theoretically you could upgrade the external PCIe Gen 2 lane of the Pi 5 to Gen 3 to squeeze out theoretical 8GT/s (approx. 985MB/s), which, when split across two NVMe drives would be 4GT/s (approx. 400MB/s) and thereby at least closer to having a dedicated Gen 2 line per NVMe instead of getting only about 2.5GT/s (approx. 250MB/s) per NVMe: Yeah, I know. I’d also like to have my cake and eat it, too. Unfortunately, we’re not there yet, especially not on the Pi 5.
Anyhow, with the Broadcom BCM2712 finally including ARMv8 Crypto extensions, the Raspberry Pi 5 at least allows me to encrypt the drives with LUKS, which is important for my use case. The PCIe Gen2 is a bottleneck, yes, however since my main use-case is data syncing via Syncthing and occasional file transfers via Samba, I’m fine.

As for the drives I went with the cheapest yet still okay-ish options I could find at that time, which are the Teamgroup MP34 PCIe Gen3 SSDs. The two 4TB 2280 M.2 drives would give me roughly 3.7TB of effective storage space, which is more than enough.
In addition, I added the Geekworm X1202 4-Cell 18650 UPS HAT, to make the whole device even more portable and the power management less of a headache. While it requires some searching to get genuine 65.3mm x 18.5mm 18650 batteries – especially without a built-in protection circuit, like the X1202 requires them – I thought that it might nevertheless be a good way to deal with power outages in the places that I’m usually in. Also, with the DC5521 jack that supports 6-18V DC input, I might be able to use a USB-C to DC5521 barrel cable and power the Raspberry Pi 5 using a universal power adapter. Maybe.
For cooling, I opted for the Argon THRML 30mm active cooler, as it would fit underneath the X1202 and appear to offer sufficient performance. I also added heatsinks onto the NVMe drives to optimize heat dissipation. I would have preferred a heatsink enclosure, however, with such little space between the two drives I was afraid that the enclosures wouldn’t fit.
Installation
I used Raspberry’s official 64-bit “minimal” distribution (based on Debian Bookworm) for the base system, as I didn’t want to fiddle around too much with getting Raspberry Pi specifics to work on other distros.
Linux h4nk4-m 6.6.20+rpt-rpi-2712 #1 SMP PREEMPT Debian 1:6.6.20-1+rpt1
(2024-03-07) aarch64 GNU/Linux
RAID & Encryption
In order to make use of the Geekworm hardware, I configured the following settings after the first boot:
root@h4nk4-m:~# cat /boot/firmware/config.txt
dtparam=pciex1
dtparam=i2c_arm=on
dtparam=spi=on
dtparam=audio=on
camera_auto_detect=1
display_auto_detect=1
auto_initramfs=1
dtoverlay=vc4-kms-v3d
max_framebuffers=2
disable_fw_kms_setup=1
arm_64bit=1
disable_overscan=1
arm_boost=1

[cm4]
otg_mode=1

[all]
Before installing anything I made sure to disable recommends and suggests
for apt install:
root@h4nk4-m:~# cat /etc/apt/apt.conf.d/99install
apt::install-recommends "false";
apt::install-suggests="false";
Then I went ahead to install and set up the RAID, as well as the LUKS encryption:
root@h4nk4-m:~# apt install cryptsetup mdadm
root@h4nk4-m:~# fdisk /dev/nvme0n1

Welcome to fdisk (util-linux 2.38.1).
Changes will remain in memory only, until you decide to write them.
Be careful before using the write command.

Device does not contain a recognized partition table.
The size of this disk is 3.7 TiB (4096805658624 bytes). DOS partition table format cannot be used on drives for volumes larger than 2199023255040 bytes for 512-byte sectors. Use GUID partition table format (GPT).

Created a new DOS (MBR) disklabel with disk identifier 0xf45d0494.
Command (m for help): g

Created a new GPT disklabel (GUID: 252E6466-A954-CA40-A3AA-A8C31CE36BF1).
The device contains 'dos' signature and it will be removed by a write command. See fdisk(8) man page and --wipe option for more details.

Command (m for help): n
Partition number (1-128, default 1):
First sector (2048-8001573518, default 2048):
Last sector, +/-sectors or +/-size{K,M,G,T,P} (2048-8001573518, default 8001572863):

Created a new partition 1 of type 'Linux filesystem' and of size 3.7 TiB.

Command (m for help): t
Selected partition 1
Partition type or alias (type L to list all): FD
Type of partition 1 is unchanged: Linux filesystem.

Command (m for help): w
The partition table has been altered.
Calling ioctl() to re-read partition table.
Syncing disks.

root@h4nk4-m:~# fdisk /dev/nvme1n1

Welcome to fdisk (util-linux 2.38.1).
Changes will remain in memory only, until you decide to write them.
Be careful before using the write command.

Device does not contain a recognized partition table.
The size of this disk is 3.7 TiB (4096805658624 bytes). DOS partition table format cannot be used on drives for volumes larger than 2199023255040 bytes for 512-byte sectors. Use GUID partition table format (GPT).

Created a new DOS (MBR) disklabel with disk identifier 0x252a35ed.

Command (m for help): g

Created a new GPT disklabel (GUID: E036FC71-378A-3848-9CBC-FC0E51C88806).
The device contains 'dos' signature and it will be removed by a write command. See fdisk(8) man page and --wipe option for more details.

Command (m for help): n
Partition number (1-128, default 1):
First sector (2048-8001573518, default 2048):
Last sector, +/-sectors or +/-size{K,M,G,T,P} (2048-8001573518, default 8001572863):

Created a new partition 1 of type 'Linux filesystem' and of size 3.7 TiB.

Command (m for help): t
Selected partition 1
Partition type or alias (type L to list all): FD
Type of partition 1 is unchanged: Linux filesystem.

Command (m for help): w
The partition table has been altered.
Calling ioctl() to re-read partition table.
Syncing disks.
root@h4nk4-m:~# mdadm --create --verbose /dev/md0 --level=1 --raid-devices=2 /dev/nvme0n1p1 /dev/nvme1n1p1
mdadm: Note: this array has metadata at the start and
    may not be suitable as a boot device.  If you plan to
    store '/boot' on this device please ensure that
    your boot-loader understands md/v1.x metadata, or use
    --metadata=0.90
mdadm: size set to 4000653312K
mdadm: automatically enabling write-intent bitmap on large array
Continue creating array? yes
mdadm: Defaulting to version 1.2 metadata
mdadm: array /dev/md0 started.

root@h4nk4-m:~# mdadm --detail /dev/md0
/dev/md0:
           Version : 1.2
     Creation Time : Mon Apr  8 19:19:34 2024
        Raid Level : raid1
        Array Size : 4000653312 (3.73 TiB 4.10 TB)
     Used Dev Size : 4000653312 (3.73 TiB 4.10 TB)
      Raid Devices : 2
     Total Devices : 2
       Persistence : Superblock is persistent

     Intent Bitmap : Internal

       Update Time : Mon Apr  8 19:20:30 2024
             State : clean, resyncing
    Active Devices : 2
   Working Devices : 2
    Failed Devices : 0
     Spare Devices : 0

Consistency Policy : bitmap

     Resync Status : 0% complete

              Name : h4nk4-m:0  (local to host h4nk4-m)
              UUID : bd0e5863:2609bd4b:fad3ba14:1ff6064b
            Events : 12

    Number   Major   Minor   RaidDevice State
       0     259        2        0      active sync   /dev/nvme0n1p1
       1     259        4        1      active sync   /dev/nvme1n1p1
root@h4nk4-m:~# cryptsetup benchmark
# Tests are approximate using memory only (no storage IO).
PBKDF2-sha1       981812 iterations per second for 256-bit key
PBKDF2-sha256    1882542 iterations per second for 256-bit key
PBKDF2-sha512     902388 iterations per second for 256-bit key
PBKDF2-ripemd160  572992 iterations per second for 256-bit key
PBKDF2-whirlpool  292898 iterations per second for 256-bit key
argon2i       4 iterations, 588946 memory, 4 parallel threads (CPUs) for 256-bit key (requested 2000 ms time)
argon2id      4 iterations, 596179 memory, 4 parallel threads (CPUs) for 256-bit key (requested 2000 ms time)
#     Algorithm |       Key |      Encryption |      Decryption
        aes-cbc        128b      1206.4 MiB/s      2337.0 MiB/s
    serpent-cbc        128b               N/A               N/A
    twofish-cbc        128b       122.2 MiB/s       129.2 MiB/s
        aes-cbc        256b       956.1 MiB/s      1876.1 MiB/s
    serpent-cbc        256b               N/A               N/A
    twofish-cbc        256b       123.7 MiB/s       129.1 MiB/s
        aes-xts        256b      1816.1 MiB/s      1818.0 MiB/s
    serpent-xts        256b               N/A               N/A
    twofish-xts        256b       126.3 MiB/s       130.7 MiB/s
        aes-xts        512b      1555.0 MiB/s      1556.0 MiB/s
    serpent-xts        512b               N/A               N/A
    twofish-xts        512b       128.0 MiB/s       130.6 MiB/s
root@h4nk4-m:~#
root@h4nk4-m:~# dd bs=512 count=4 if=/dev/random of=/etc/keyfile
4+0 records in
4+0 records out
2048 bytes (2.0 kB, 2.0 KiB) copied, 0.000145852 s, 14.0 MB/s
root@h4nk4-m:~# chmod 640 /etc/keyfile
root@h4nk4-m:~# cryptsetup --type luks2 --pbkdf argon2id --key-file /etc/keyfile
luksFormat /dev/md0

WARNING!
========
This will overwrite data on /dev/md0 irrevocably.

Are you sure? (Type 'yes' in capital letters): YES
root@h4nk4-m:~# cryptsetup luksDump /dev/md0
LUKS header information
Version:       	2
Epoch:         	3
Metadata area: 	16384 [bytes]
Keyslots area: 	16744448 [bytes]
UUID:          	f0463afa-5cec-4f3f-a935-caee4a757515
Label:         	(no label)
Subsystem:     	(no subsystem)
Flags:       	(no flags)

Data segments:
  0: crypt
	offset: 16777216 [bytes]
	length: (whole device)
	cipher: aes-xts-plain64
	sector: 512 [bytes]

Keyslots:
  0: luks2
	Key:        512 bits
	Priority:   normal
	Cipher:     aes-xts-plain64
	Cipher key: 512 bits
	PBKDF:      argon2id
	Time cost:  4
	Memory:     663296
	Threads:    4
  Salt:       aa aa aa aa aa aa aa aa aa aa aa aa aa aa aa aa
              aa aa aa aa aa aa aa aa aa aa aa aa aa aa aa aa
	AF stripes: 4000
	AF hash:    sha256
	Area offset:32768 [bytes]
	Area length:258048 [bytes]
	Digest ID:  0
Tokens:
Digests:
  0: pbkdf2
	Hash:       sha256
	Iterations: 112027
  Salt:       aa aa aa aa aa aa aa aa aa aa aa aa aa aa aa aa
              aa aa aa aa aa aa aa aa aa aa aa aa aa aa aa aa
  Digest:     aa aa aa aa aa aa aa aa aa aa aa aa aa aa aa aa
              aa aa aa aa aa aa aa aa aa aa aa aa aa aa aa aa
root@h4nk4-m:~# mkdir /mnt/storage
To configure the crypttab, which opens the LUKS device, I needed to get the
UUID of the storage:
root@h4nk4-m:~# ls -la /dev/disk/by-uuid/
Alternatively, it’s possible to use the blkid command for that.
Next, I set up the crypttab, formatted the device, and set up the fstab:
root@h4nk4-m:~# cat /etc/crypttab
# <target name>	<source device>		<key file>	<options>
storage	UUID=f0463afa-5cec-4f3f-a935-caee4a757515	/etc/keyfile	luks,discard
You can relax your forehead muscles in regard to the keyfile location, btw.
root@h4nk4-m:~# systemctl daemon-reload
root@h4nk4-m:~# systemctl list-unit-files| grep systemd-cryptsetup
systemd-cryptsetup@storage.service         generated       -
root@h4nk4-m:~# systemctl start systemd-cryptsetup@storage
root@h4nk4-m:~# systemctl status systemd-cryptsetup@storage.service
● systemd-cryptsetup@storage.service - Cryptography Setup for storage
     Loaded: loaded (/etc/crypttab; generated)
     Active: active (exited) since Mon 2024-04-08 20:00:24 EST; 1min 1s ago
       Docs: man:crypttab(5)
             man:systemd-cryptsetup-generator(8)
             man:systemd-cryptsetup@.service(8)
    Process: 9064 ExecStart=/lib/systemd/systemd-cryptsetup attach storage /dev/disk/by-uuid/f0463afa-5cec-4f3f-a935-caee4a757515 /etc/key>
   Main PID: 9064 (code=exited, status=0/SUCCESS)
        CPU: 8.302s

Apr 08 20:00:21 h4nk4-m systemd[1]: Starting systemd-cryptsetup@storage.service - Cryptography Setup for storage...
Apr 08 20:00:21 h4nk4-m systemd-cryptsetup[9064]: Set cipher aes, mode xts-plain64, key size 512 bits for device /dev/disk/by-uuid/f0463af>
Apr 08 20:00:24 h4nk4-m systemd[1]: Finished systemd-cryptsetup@storage.service - Cryptography Setup for storage.
root@h4nk4-m:~# mkfs.ext4 -m 0 -L storage /dev/mapper/storage
mke2fs 1.47.0 (5-Feb-2023)
Discarding device blocks: done
Creating filesystem with 1000159232 4k blocks and 250044416 inodes
Filesystem UUID: cd01af3a-c50d-4ba2-b7d2-01ab6c712be2
Superblock backups stored on blocks:
	32768, 98304, 163840, 229376, 294912, 819200, 884736, 1605632, 2654208,
	4096000, 7962624, 11239424, 20480000, 23887872, 71663616, 78675968,
	102400000, 214990848, 512000000, 550731776, 644972544

Allocating group tables: done
Writing inode tables: done
Creating journal (262144 blocks): done
Writing superblocks and filesystem accounting information: done
root@h4nk4-m:~# cat /etc/fstab
proc            /proc           proc    defaults          0       0
PARTUUID=e5d7f358-01  /boot/firmware  vfat    defaults          0       2
PARTUUID=e5d7f358-02  /               ext4    defaults,noatime  0       1
/dev/mapper/storage	/mnt/storage	ext4	defaults	0	2

root@h4nk4-m:~# systemctl daemon-reload
root@h4nk4-m:~# mount /mnt/storage
Syncthing
Since Raspberry Pi OS is Debian stable by default and I didn’t feel like
upgrading to testing, but nevertheless wanted to use a more recent version of
Syncthing for my own decentralized Dropbox setup, I added
the testing repository and pinned the syncthing package to testing:
root@h4nk4-m:~# cat /etc/apt/sources.list
deb http://deb.debian.org/debian bookworm main contrib non-free non-free-firmware
deb http://deb.debian.org/debian-security/ bookworm-security main contrib non-free non-free-firmware
deb http://deb.debian.org/debian bookworm-updates main contrib non-free non-free-firmware
deb http://deb.debian.org/debian testing main contrib
root@h4nk4-m:~# cat /etc/apt/preferences.d/testing
Package: syncthing
Pin: release a=testing
Pin-Priority: 900

Package: *
Pin: release a=testing
Pin-Priority: 50
root@h4nk4-m:~# apt install syncthing
Reading package lists... Done
Building dependency tree... Done
Reading state information... Done
Recommended packages:
  xdg-utils
The following NEW packages will be installed:
  syncthing
0 upgraded, 1 newly installed, 0 to remove and 0 not upgraded.
Need to get 7,283 kB of archives.
After this operation, 22.8 MB of additional disk space will be used.
Get:1 http://deb.debian.org/debian testing/main arm64 syncthing arm64 1.27.2~ds4-1 [7,283 kB]
Fetched 7,283 kB in 2s (4,803 kB/s)
Selecting previously unselected package syncthing.
(Reading database ... 58041 files and directories currently installed.)
Preparing to unpack .../syncthing_1.27.2~ds4-1_arm64.deb ...
Unpacking syncthing (1.27.2~ds4-1) ...
Setting up syncthing (1.27.2~ds4-1) ...
Created symlink /etc/systemd/system/sleep.target.wants/syncthing-resume.service → /lib/systemd/system/syncthing-resume.service.
Processing triggers for man-db (2.11.2-2) ...
Hint
An alternative to this would be to get the package from apt.syncthing.net,
which is being maintained by the Syncthing project.
Then I enabled the syncthing.service for my user:
root@h4nk4-m:~# systemctl enable syncthing@mrus.service
As I still needed to prepare the storage by rsync-ing all my data onto it, I
didn’t systemctl start syncthing@mrus.service at that point. Instead, while
the data was copied, I would continue to set up Samba.
Hint
Syncthing will run on 127.0.0.1 by default. You could fiddle around with its
config files and change that, or instead, you can
ssh -L8384:127.0.0.1:8384 admin@h4nk4-m and connect to the remote Syncthing
web UI through that SSH tunnel on your local host (http://localhost:8384)
Samba
I mainly use Samba for photography and video footage. Syncthing is great for replicating data across devices, however, for photo and video editing it’s a PITA to first have to replicate the required files onto a device, then edit them, and afterward remove them again when finished to free up space on the device. Instead, I use SMB to simply mount a media folder that contains all the raw DNGs and MP4s and edit the files on-the-fly, without having to manually transfer data around all the time.
root@h4nk4-m:~# apt install samba samba-vfs-modules
root@h4nk4-m:~# cat /etc/samba/smb.conf | grep -v '^[#;]' | awk NF
[global]
   server string = "h4nk4-m"
   workgroup = WACKENHUT
   log file = /var/log/samba/log.%m
   max log size = 1000
   logging = file
   panic action = /usr/share/samba/panic-action %d
   server role = standalone server
   obey pam restrictions = yes
   unix password sync = yes
   passwd program = /usr/bin/passwd %u
   passwd chat = *Enter\snew\s*\spassword:* %n\n *Retype\snew\s*\spassword:* %n\n *password\supdated\ssuccessfully* .
   pam password change = yes
   map to guest = bad user
   usershare allow guests = no
   ea support = yes
   vfs objects = fruit streams_xattr
   fruit:aapl = yes
   fruit:advertise_fullsync = true
   fruit:metadata = stream
   fruit:model = MacPro6,1
   fruit:posix_rename = yes
   fruit:veto_appledouble = no
   fruit:zero_file_id = yes
   fruit:nfs_aces = no
   fruit:wipe_intentionally_left_blank_rfork = yes
   fruit:delete_empty_adfiles = yes
[homes]
   comment = Homes
   browseable = no
   read only = no
   create mask = 0700
   directory mask = 0700
   valid users = %S
root@h4nk4-m:~# systemctl restart smbd.service
root@h4nk4-m:~# smbpasswd -a mrus
New SMB password:
Retype new SMB password:
Added user mrus.
Podman
As with Syncthing, the Podman version available in Debian Bookworm is old enough
to grow a beard, so I decided to get the packages from testing. Here’s the
extended testing file from previously:
root@h4nk4-m:~# cat /etc/apt/preferences.d/testing
Package:libslirp0
Pin: release a=testing
Pin-Priority: 900

Package:slirp4netns
Pin: release a=testing
Pin-Priority: 900

Package:uidmap
Pin: release a=testing
Pin-Priority: 900

Package:libyajl2
Pin: release a=testing
Pin-Priority: 900

Package: libsubid4
Pin: release a=testing
Pin-Priority: 900

Package: libip6tc2
Pin: release a=testing
Pin-Priority: 900

Package: golang-github-containers-image
Pin: release a=testing
Pin-Priority: 900

Package: golang-github-containers-common
Pin: release a=testing
Pin-Priority: 900

Package: crun
Pin: release a=testing
Pin-Priority: 900

Package: containernetworking-plugins
Pin: release a=testing
Pin-Priority: 900

Package: containers-storage
Pin: release a=testing
Pin-Priority: 900

Package: fuse-overlayfs
Pin: release a=testing
Pin-Priority: 900

Package: podman
Pin: release a=testing
Pin-Priority: 900

Package: syncthing
Pin: release a=testing
Pin-Priority: 900

Package: *
Pin: release a=testing
Pin-Priority: 50
root@h4nk4-m:~# apt install podman containers-storage
Afterward, I logged back in as a user and created a dedicated network for my Podman containers:
mrus@h4nk4-m:~$ podman network create birdsarentrealcc
Grafana
As mentioned before, I was looking to get rid of r0n1n and ideally have its services running on the UPDC v2 as well, with Grafana being the first and foremost.
I’m going to explain the details of running a container on Podman with Grafana.
The subsequent containers are going to require virtually the same setup
procedure, so I’m going to list their .container files.
To run Grafana, I first wrote a Quadlet unit file:
mrus@h4nk4-m:~$ cat ~/.config/containers/systemd/grafana.container
[Unit]
Description=Grafana
After=local-fs.target
RequiresMountsFor=/mnt/storage

[Container]
Image=docker.io/grafana/grafana-oss:latest
AutoUpdate=registry
ContainerName=grafana
User=1001:1001
UserNS=keep-id
SecurityLabelDisable=true
Volume=/mnt/storage/home/mrus/containers/grafana/grafana.ini:/etc/grafana/grafana.ini
Volume=/mnt/storage/home/mrus/containers/grafana/data:/var/lib/grafana
Network=birdsarentrealcc
IP=10.89.0.2
PublishPort=127.0.0.1:3000:3000/tcp

[Install]
WantedBy=multi-user.target default.target

[Service]
Restart=always
I then created the directory for the grafana volume mounts and went ahead to
reload systemd for my user, so I could test the unit file and enable it:
mrus@h4nk4-m:~$ systemctl --user daemon-reload
mrus@h4nk4-m:~$ /usr/libexec/podman/quadlet -dryrun -user
mrus@h4nk4-m:~$ systemctl --user start grafana.service
Grafana on r0n1n was using InfluxDB as a backend. Unfortunately, InfluxDB became a mess, so I decided to use the situation to switch to Prometheus.
Prometheus
mrus@h4nk4-m:~$ cat ~/.config/containers/systemd/prom.container
[Unit]
Description=Prom
After=local-fs.target
RequiresMountsFor=/mnt/storage

[Container]
Image=docker.io/prom/prometheus:latest
AutoUpdate=registry
ContainerName=prom
User=1001:1001
UserNS=keep-id
SecurityLabelDisable=true
Volume=/mnt/storage/home/mrus/containers/prom/prom.yml:/etc/prometheus/prometheus.yml
Volume=/mnt/storage/home/mrus/containers/prom/data:/prometheus
Network=birdsarentrealcc
IP=10.89.0.3
PublishPort=127.0.0.1:9090:9090/tcp

[Install]
WantedBy=multi-user.target default.target

[Service]
Restart=always
Jellyfin
Because I still maintain a relatively large (~20GB) collection of music, I run Jellyfin to be able to stream it to other devices. Even though it’s slightly over-engineered to run a C# .NET application solely for the purpose of streaming music, I found that the Jellyfin server container is super easy to set up and maintain, and its Android client is one of the best in that regard.
While I would love to try Funkwhale, its server-side is cumbersome to handle, and its official client doesn’t look too appealing either. With the Funkwhale blog writing about 2.0 a lot it also appears that they’re in the middle of a big change. Hopefully, that change will also introduce an easier way to set up and run Funkwhale.
mrus@h4nk4-m:~$ cat ~/.config/containers/systemd/jellyfin.container
[Unit]
Description=Jellyfin
After=local-fs.target
RequiresMountsFor=/mnt/storage

[Container]
Image=docker.io/jellyfin/jellyfin:latest
AutoUpdate=registry
ContainerName=jellyfin
User=1001:1001
UserNS=keep-id
SecurityLabelDisable=true
AddDevice=/dev/dri/:/dev/dri/
Volume=/mnt/storage/home/mrus/containers/jellyfin/cache:/cache
Volume=/mnt/storage/home/mrus/containers/jellyfin/config:/config
Mount=type=bind,source=/mnt/storage/home/mrus/cloud/music,destination=/media,ro=false,relabel=private
Network=birdsarentrealcc
IP=10.89.0.4
PublishPort=127.0.0.1:8096:8096/tcp

[Install]
WantedBy=multi-user.target default.target

[Service]
Restart=always
Vaultwarden
Let’s get rid of another Raspberry Pi on the network and set up Vaultwarden as well:
mrus@h4nk4-m:~$ cat ~/.config/containers/systemd/vault.container
[Unit]
Description=Vault
After=local-fs.target
RequiresMountsFor=/mnt/storage

[Container]
Image=docker.io/vaultwarden/server:latest
AutoUpdate=registry
ContainerName=vault
User=1001:1001
UserNS=keep-id
SecurityLabelDisable=true
Volume=/mnt/storage/home/mrus/containers/vault/data:/data/
Environment=ROCKET_PORT=8080
Environment=DOMAIN="https://vault.birdsarentreal.cc/"
Network=birdsarentrealcc
IP=10.89.0.5
PublishPort=127.0.0.1:8080:8080/tcp

[Install]
WantedBy=multi-user.target default.target

[Service]
Restart=always
Git
mrus@h4nk4-m:~$ cat ~/.config/containers/systemd/git.container
[Unit]
Description=Git
After=local-fs.target
RequiresMountsFor=/mnt/storage

[Container]
Image=docker.io/gitea/gitea:latest-rootless
AutoUpdate=registry
ContainerName=git
User=1001:1001
UserNS=keep-id
SecurityLabelDisable=true
Volume=/mnt/storage/home/mrus/containers/git/data:/var/lib/gitea
Volume=/mnt/storage/home/mrus/containers/git/config:/etc/gitea
Volume=/etc/timezone:/etc/timezone:ro
Volume=/etc/localtime:/etc/localtime:ro
Environment=USER_UID=1001
Environment=USER_GID=1001
Network=birdsarentrealcc
IP=10.89.0.6
PublishPort=127.0.0.1:3002:3000/tcp
PublishPort=0.0.0.0:2222:2222/tcp

[Install]
WantedBy=multi-user.target default.target

[Service]
Restart=always
Starlink
mrus@h4nk4-m:~$ cat ~/.config/containers/systemd/starlink.container
[Unit]
Description=Starlink
After=local-fs.target
RequiresMountsFor=/mnt/storage

[Container]
Image=ghcr.io/danopstech/starlink_exporter:latest
AutoUpdate=registry
ContainerName=starlink
User=1001:1001
UserNS=keep-id
SecurityLabelDisable=true
Network=birdsarentrealcc
IP=10.89.0.8

[Install]
WantedBy=multi-user.target default.target

[Service]
Restart=always
Homepage
mrus@h4nk4-m:~$ cat ~/.config/containers/systemd/homepage.container
[Unit]
Description=Homepage
After=local-fs.target
RequiresMountsFor=/mnt/storage

[Container]
Image=ghcr.io/gethomepage/homepage:latest
AutoUpdate=registry
ContainerName=homepage
User=1001:1001
UserNS=keep-id
SecurityLabelDisable=true
Volume=/mnt/storage/home/mrus/containers/homepage/config:/app/config/
Volume=/run/user/1001/podman/podman.sock:/var/run/docker.sock
Network=birdsarentrealcc
IP=10.89.0.10
PublishPort=127.0.0.1:3001:3000/tcp

[Install]
WantedBy=multi-user.target default.target

[Service]
Restart=always
Backups
Backing up the Raspberry Pi system is actually fairly easy. First, for a full
backup, I can simply turn off the device, take out the microSD and dd it onto
another one.
In addition, I’m using rsync to backup configuration and important system
files on a nightly basis:
root@h4nk4-m:~# mkdir -p /mnt/storage/backup/h4nk4-m
root@h4nk4-m:~# cat /mnt/storage/backup/backup.sh
#/bin/sh
rsync	-aAXx \
	--delete \
	--exclude={/dev/*,/proc/*,/sys/*,/tmp/*,/run/*,/mnt/*,/media/*,/usr/*,/var/cache/*,/var/lib/*,/var/tmp/*,/var/log/*,/cdrom/*,/home/admin/.cache/*,/lost+found} \
	/ \
  /mnt/storage/backup/h4nk4-m/.

root@h4nk4-m:~# crontab -l
# m h  dom mon dow   command

0	3	*	*	*	/mnt/storage/backup/backup.sh
The script is intentionally placed within /mnt/storage/, so in case the
storage should not be mounted for whatever reason, the cron job would error
right away (due to not finding the script to run) instead of running the script
without the mount being present. It saves me from adding a check for the mount
point inside the script.
However, backing up the actual storage is a little bit more complicated. With the Raspberry Pi being the little b…oard that it is, one cannot simply connect an external 2.5" HDD and run backups onto it, because it doesn’t provide enough power to spin up the disk. I tried using an externally powered USB hub, even though that’s not something the USB specification approves of afaik, but that resulted in weird issues:
[1275932.983842] usb 1-1: new high-speed USB device number 8 using xhci-hcd
[1275933.137202] usb 1-1: New USB device found, idVendor=05e3, idProduct=0610, bcdDevice= 6.63
[1275933.137210] usb 1-1: New USB device strings: Mfr=1, Product=2, SerialNumber=0
[1275933.137213] usb 1-1: Product: USB2.1 Hub
[1275933.137216] usb 1-1: Manufacturer: GenesysLogic
[1275933.175496] hub 1-1:1.0: USB hub found
[1275933.176083] hub 1-1:1.0: 4 ports detected
[1275933.263960] usb 2-1: new SuperSpeed USB device number 9 using xhci-hcd
[1275933.292833] usb 2-1: New USB device found, idVendor=05e3, idProduct=0626, bcdDevice= 6.63
[1275933.292839] usb 2-1: New USB device strings: Mfr=1, Product=2, SerialNumber=0
[1275933.292841] usb 2-1: Product: USB3.1 Hub
[1275933.292844] usb 2-1: Manufacturer: GenesysLogic
[1275933.352248] hub 2-1:1.0: USB hub found
[1275933.353211] hub 2-1:1.0: 4 ports detected
[1275933.639885] usb 2-1.1: new SuperSpeed USB device number 10 using xhci-hcd
[1275933.666971] usb 2-1.1: New USB device found, idVendor=1058, idProduct=262f, bcdDevice=50.02
[1275933.666976] usb 2-1.1: New USB device strings: Mfr=2, Product=3, SerialNumber=1
[1275933.666980] usb 2-1.1: Product: Game Drive
[1275933.666982] usb 2-1.1: Manufacturer: Western Digital
[1275933.666984] usb 2-1.1: SerialNumber: 57584D31453539343541434C
[1275933.669163] usb-storage 2-1.1:1.0: USB Mass Storage device detected
[1275933.669302] scsi host0: usb-storage 2-1.1:1.0
[1275934.688636] scsi 0:0:0:0: Direct-Access     WD       Game Drive       5002 PQ: 0 ANSI: 6
[1275934.688929] sd 0:0:0:0: Attached scsi generic sg0 type 0
[1275934.689136] sd 0:0:0:0: [sda] Very big device. Trying to use READ CAPACITY(16).
[1275936.774125] sd 0:0:0:0: [sda] 9767475200 512-byte logical blocks: (5.00 TB/4.55 TiB)
[1275936.774133] sd 0:0:0:0: [sda] 4096-byte physical blocks
[1275936.774530] sd 0:0:0:0: [sda] Write Protect is off
[1275936.774533] sd 0:0:0:0: [sda] Mode Sense: 47 00 10 08
[1275936.774901] sd 0:0:0:0: [sda] No Caching mode page found
[1275936.774904] sd 0:0:0:0: [sda] Assuming drive cache: write through
[1275936.780877]  sda: sda1
[1275936.781042] sd 0:0:0:0: [sda] Attached SCSI disk
[1275945.792082] usb usb2-port1: over-current change #68
[1275945.792121] usb usb3-port1: over-current change #64
[1275945.819904] usb usb4-port1: over-current change #65
[1275945.903935] usb usb1-port1: over-current change #68
[1275945.931893] usb usb3-port2: over-current change #56
[1275946.011866] usb 2-1: USB disconnect, device number 9
[1275946.011870] usb 2-1.1: USB disconnect, device number 10
[1275946.039891] usb 1-1: USB disconnect, device number 8
[1275946.072064] usb usb1-port2: over-current change #62
[1275946.359964] usb 2-1: new SuperSpeed USB device number 11 using xhci-hcd
[1275946.391071] usb 2-1: New USB device found, idVendor=05e3, idProduct=0626, bcdDevice= 6.63
[1275946.391074] usb 2-1: New USB device strings: Mfr=1, Product=2, SerialNumber=0
[1275946.391076] usb 2-1: Product: USB3.1 Hub
[1275946.391078] usb 2-1: Manufacturer: GenesysLogic
[1275946.440849] hub 2-1:1.0: USB hub found
[1275946.441825] hub 2-1:1.0: 4 ports detected
[1275946.511846] usb 1-1: new high-speed USB device number 9 using xhci-hcd
[1275946.665210] usb 1-1: New USB device found, idVendor=05e3, idProduct=0610, bcdDevice= 6.63
[1275946.665214] usb 1-1: New USB device strings: Mfr=1, Product=2, SerialNumber=0
[1275946.665217] usb 1-1: Product: USB2.1 Hub
[1275946.665218] usb 1-1: Manufacturer: GenesysLogic
[1275946.712125] hub 1-1:1.0: USB hub found
[1275946.712713] hub 1-1:1.0: 4 ports detected
[1275946.739892] usb 2-1.1: new SuperSpeed USB device number 12 using xhci-hcd
[1275946.770958] usb 2-1.1: New USB device found, idVendor=1058, idProduct=262f, bcdDevice=50.02
[1275946.770963] usb 2-1.1: New USB device strings: Mfr=2, Product=3, SerialNumber=1
[1275946.770965] usb 2-1.1: Product: Game Drive
[1275946.770967] usb 2-1.1: Manufacturer: Western Digital
[1275946.770969] usb 2-1.1: SerialNumber: 57584D31453539343541434C
[1275946.772384] usb-storage 2-1.1:1.0: USB Mass Storage device detected
[1275946.772541] scsi host0: usb-storage 2-1.1:1.0
[1275947.776697] scsi 0:0:0:0: Direct-Access     WD       Game Drive       5002 PQ: 0 ANSI: 6
[1275947.777088] sd 0:0:0:0: Attached scsi generic sg0 type 0
[1275947.777201] sd 0:0:0:0: [sda] Very big device. Trying to use READ CAPACITY(16).
[1275947.922072] sd 0:0:0:0: [sda] 9767475200 512-byte logical blocks: (5.00 TB/4.55 TiB)
[1275947.922077] sd 0:0:0:0: [sda] 4096-byte physical blocks
[1275947.922546] sd 0:0:0:0: [sda] Write Protect is off
[1275947.922548] sd 0:0:0:0: [sda] Mode Sense: 47 00 10 08
[1275947.922919] sd 0:0:0:0: [sda] No Caching mode page found
[1275947.922921] sd 0:0:0:0: [sda] Assuming drive cache: write through
[1275947.947229]  sda: sda1
[1275947.947331] sd 0:0:0:0: [sda] Attached SCSI disk
[1275951.292828] usb usb2-port1: over-current change #69
[1275951.295187] usb usb3-port1: over-current change #65
[1275951.319939] usb usb4-port1: over-current change #66
[1275951.399934] usb usb1-port1: over-current change #69
[1275951.427916] usb usb3-port2: over-current change #57
[1275951.507868] usb 2-1: USB disconnect, device number 11
[1275951.507874] usb 2-1.1: USB disconnect, device number 12
[1275951.535950] usb 1-1: USB disconnect, device number 9
[1275951.544260] usb usb1-port2: over-current change #63
I decided to set up rsyncd on the Raspberry Pi and do the backup over the
network, from a system that can handle the 2.5" drives. The configuration in
/etc/rsyncd.conf looks as follows:
uid = root
gid = root
use chroot = yes
max connections = 10
syslog facility = daemon
pid file = /var/run/rsyncd.pid
lock file = /var/run/rsync.lock
log file = /var/log/rsync.log
port = 873

[storage]
  path = /mnt/storage
  comment = Storage
  read only = true
  auth users = backup
  secrets file = /etc/rsyncd.secrets
The secrets file is a plain-text file that contains one username:password
combination per line. It has to be chmod 600 and owned by root. With the
configuration in place systemctl enable rsync.service and
systemctl start rsync.service will start rsyncd, allowing backups from
another machine using e.g.
rsync -avH rsync://user@h4nk4-m:storage/ local/destination/dir/.. With around
2TB of data a backup run takes roughly one night, which is totally fine for my
use-case.
However, with another 2.5" HDD dying, I ultimately bought 3.5" internal SATA disks and a USB SATA dock, that is powered by a dedicated power supply and allows me to connect the drive directly to the Raspberry Pi. With that I’m able to run the backups directly over USB. Hopefully, the 3.5" drives will last longer the 2.5" HDDs.
Unfortunately the Sabrent USB-HDD dock that I have didn’t play nicely with
neither of my Linux machines, causing these dmesg messages after only a few
minutes of use:
 1809.662401] sd 0:0:0:0: [sda] tag#17 CDB: opcode=0x8a 8a 00 00 00 00 00 49 39
 3d d8 00 00 04 00 00 00
[ 1814.533718] sd 0:0:0:0: [sda] tag#26 uas_eh_abort_handler 0 uas-tag 9 inflight: CMD OUT
[ 1814.533728] sd 0:0:0:0: [sda] tag#26 CDB: opcode=0x8a 8a 00 00 00 00 00 49 39 65 48 00 00 04 00 00 00
[ 1814.533820] sd 0:0:0:0: [sda] tag#25 uas_eh_abort_handler 0 uas-tag 8 inflight: CMD OUT
[ 1814.533823] sd 0:0:0:0: [sda] tag#25 CDB: opcode=0x8a 8a 00 00 00 00 00 49 39 61 48 00 00 04 00 00 00
[ 1814.533907] sd 0:0:0:0: [sda] tag#24 uas_eh_abort_handler 0 uas-tag 7 inflight: CMD OUT
[ 1814.533910] sd 0:0:0:0: [sda] tag#24 CDB: opcode=0x8a 8a 00 00 00 00 00 49 39 5d 48 00 00 04 00 00 00
[ 1819.393717] sd 0:0:0:0: [sda] tag#27 uas_eh_abort_handler 0 uas-tag 10 inflight: CMD OUT
[ 1819.393724] sd 0:0:0:0: [sda] tag#27 CDB: opcode=0x8a 8a 00 00 00 00 00 49 39 69 48 00 00 04 00 00 00
[ 1819.409721] scsi host0: uas_eh_device_reset_handler start
[ 1819.541873] usb 2-1: reset SuperSpeed USB device number 2 using xhci-hcd
However, a fix for this was possible using the usb-storage.quirks setting. For
that, I needed the idVendor and idProduct of the dock, which is shown in
dmesg during power on:
[59635.003162] usb 2-1: New USB device found, idVendor=174c, idProduct=55aa,
bcdDevice= 1.00
[59635.003171] usb 2-1: New USB device strings: Mfr=2, Product=3, SerialNumber=1
[59635.003176] usb 2-1: Product: SATA Bridge
[59635.003179] usb 2-1: Manufacturer: Sabrent
With those two numbers the usb-storage.quirks setting can be configured inside
/boot/firmware/cmdline.txt:
root@h4nk4-m:~# cat /boot/firmware/cmdline.txt
console=tty1 root=PARTUUID=e5d7f358-02 rootfstype=ext4 fsck.repair=yes rootwait nvme_core.default_ps_max_latency_us=0 usb-storage.quirks=174c:55aa:u
After making this change, rebooting and reconnecting the dock, dmesg displays
the following line, showing that the setting is active:
[   64.583663] usb-storage 2-1:1.0: Quirks match for vid 174c pid 55aa: c00000
[   64.583692] scsi host0: usb-storage 2-1:1.0
With this in place the USB-HDD dock is able function properly. However, this change will have a performance impact – which isn’t that big of a deal on a backup drive that’s going to run throughout the night.
However, even with the fix for the uas_eh_abort_handler message in place,
backing up data is still a bit of a PITA. Ever so often messages like these show
up during rsync runs:
[ 3384.299014] INFO: task kworker/u10:9:5082 blocked for more than 120 seconds.
[ 3384.299022]       Tainted: G         C         6.6.51-v8-16k+ #1796
[ 3384.299024] "echo 0 > /proc/sys/kernel/hung_task_timeout_secs" disables this message.
[ 3384.299026] task:kworker/u10:9   state:D stack:0     pid:5082  ppid:2      flags:0x00000008
[ 3384.299031] Workqueue: writeback wb_workfn (flush-254:1)
[ 3384.299040] Call trace:
[ 3384.299041]  __switch_to+0xe8/0x168
[ 3384.299047]  __schedule+0x31c/0xd60
[ 3384.299049]  schedule+0x64/0x108
[ 3384.299052]  io_schedule+0x44/0x68
[ 3384.299054]  bit_wait_io+0x20/0x98
[ 3384.299057]  __wait_on_bit_lock+0x90/0x178
[ 3384.299060]  out_of_line_wait_on_bit_lock+0x88/0xb8
[ 3384.299063]  __lock_buffer+0x58/0x70
[ 3384.299066]  do_get_write_access+0x1b8/0x4b0
[ 3384.299069]  jbd2_journal_get_write_access+0x8c/0xd8
[ 3384.299071]  __ext4_journal_get_write_access+0x74/0x1d0
[ 3384.299073]  ext4_mb_mark_diskspace_used+0xb0/0x3e8
[ 3384.299076]  ext4_mb_new_blocks+0x1b4/0xfc0
[ 3384.299079]  ext4_new_meta_blocks+0xd4/0x120
[ 3384.299082]  ext4_ext_insert_extent+0x51c/0x1438
[ 3384.299084]  ext4_ext_map_blocks+0x504/0x1640
[ 3384.299086]  ext4_map_blocks+0x214/0x588
[ 3384.299090]  ext4_do_writepages+0x728/0xc00
[ 3384.299092]  ext4_writepages+0x80/0x108
[ 3384.299093]  do_writepages+0x90/0x1c8
[ 3384.299096]  __writeback_single_inode+0x4c/0x4b0
[ 3384.299098]  writeback_sb_inodes+0x214/0x4a8
[ 3384.299101]  __writeback_inodes_wb+0x58/0x118
[ 3384.299104]  wb_writeback+0x304/0x3f8
[ 3384.299106]  wb_workfn+0x364/0x5c0
[ 3384.299109]  process_one_work+0x148/0x388
[ 3384.299112]  worker_thread+0x338/0x450
[ 3384.299113]  kthread+0x120/0x130
[ 3384.299117]  ret_from_fork+0x10/0x20
I haven’t had the chance to further investigate what’s going on, however an
additional run of diff -r -q --no-dereference /mnt/storage /mnt/backup after
rsync has finished gives me the confidence that the data was copied properly.
Performance
Transfer speeds for the data from my old, degraded UPDC to the new Raspberry system were around 57 MB/s, with the bottlenecks being the 2.5" HDDs and OpenZFS attempting a resilver of the RAID.
After setting up the system and running all required services the following tests show more realistic numbers:
mrus@h4nk4-m:~$ dd if=/dev/zero of=./tempfile bs=1M count=1024 conv=fdatasync
1024+0 records in
1024+0 records out
1073741824 bytes (1.1 GB, 1.0 GiB) copied, 5.65105 s, 190 MB/s
root@h4nk4-m:~# /usr/bin/echo 3 > /proc/sys/vm/drop_caches
root@h4nk4-m:~#
logout
admin@h4nk4-m:~ $
logout
mrus@h4nk4-m:~$ dd if=./tempfile of=/dev/null bs=1M count=1024
1024+0 records in
1024+0 records out
1073741824 bytes (1.1 GB, 1.0 GiB) copied, 2.55352 s, 420 MB/s
mrus@h4nk4-m:~$ dd if=./tempfile of=/dev/null bs=1M count=1024
1024+0 records in
1024+0 records out
1073741824 bytes (1.1 GB, 1.0 GiB) copied, 0.134692 s, 8.0 GB/s
mrus@h4nk4-m:~$ iozone -t1 -i0 -i2 -r1k -s1g ./tmp
	Iozone: Performance Test of File I/O
	        Version $Revision: 3.489 $
		Compiled for 64 bit mode.
		Build: linux

	Contributors:William Norcott, Don Capps, Isom Crawford, Kirby Collins
	             Al Slater, Scott Rhine, Mike Wisner, Ken Goss
	             Steve Landherr, Brad Smith, Mark Kelly, Dr. Alain CYR,
	             Randy Dunlap, Mark Montague, Dan Million, Gavin Brebner,
	             Jean-Marc Zucconi, Jeff Blomberg, Benny Halevy, Dave Boone,
	             Erik Habbinga, Kris Strecker, Walter Wong, Joshua Root,
	             Fabrice Bacchella, Zhenghua Xue, Qin Li, Darren Sawyer,
	             Vangel Bojaxhi, Ben England, Vikentsi Lapa,
	             Alexey Skidanov, Sudhir Kumar.

	Run began: Fri Sep 13 19:36:33 2024

	Record Size 1 kB
	File size set to 1048576 kB
	Command line used: iozone -t1 -i0 -i2 -r1k -s1g ./tmp
	Output is in kBytes/sec
	Time Resolution = 0.000001 seconds.
	Processor cache size set to 1024 kBytes.
	Processor cache line size set to 32 bytes.
	File stride size set to 17 * record size.
	Throughput test with 1 process
	Each process writes a 1048576 kByte file in 1 kByte records

	Children see throughput for  1 initial writers 	=  616757.12 kB/sec
	Parent sees throughput for  1 initial writers 	=  170863.78 kB/sec
	Min throughput per process 			=  616757.12 kB/sec
	Max throughput per process 			=  616757.12 kB/sec
	Avg throughput per process 			=  616757.12 kB/sec
	Min xfer 					= 1048576.00 kB

	Children see throughput for  1 rewriters 	=  806837.69 kB/sec
	Parent sees throughput for  1 rewriters 	=  180875.69 kB/sec
	Min throughput per process 			=  806837.69 kB/sec
	Max throughput per process 			=  806837.69 kB/sec
	Avg throughput per process 			=  806837.69 kB/sec
	Min xfer 					= 1048576.00 kB

	Children see throughput for 1 random readers 	=  906171.94 kB/sec
	Parent sees throughput for 1 random readers 	=  897303.26 kB/sec
	Min throughput per process 			=  906171.94 kB/sec
	Max throughput per process 			=  906171.94 kB/sec
	Avg throughput per process 			=  906171.94 kB/sec
	Min xfer 					= 1048576.00 kB

	Children see throughput for 1 random writers 	=   68002.69 kB/sec
	Parent sees throughput for 1 random writers 	=   58723.43 kB/sec
	Min throughput per process 			=   68002.69 kB/sec
	Max throughput per process 			=   68002.69 kB/sec
	Avg throughput per process 			=   68002.69 kB/sec
	Min xfer 					= 1048576.00 kB


iozone test complete.

System load:
mrus@h4nk4-m:~$ top
top - 22:01:57 up 24 days,  7:26,  1 user,  load average: 0.10, 0.13, 0.10
Tasks: 224 total,   1 running, 223 sleeping,   0 stopped,   0 zombie
%Cpu(s):  0.5 us,  0.2 sy,  0.0 ni, 99.0 id,  0.3 wa,  0.0 hi,  0.0 si,  0.0 st
MiB Mem :   8052.4 total,   4888.5 free,   1740.3 used,   1527.9 buff/cache
MiB Swap:    200.0 total,     55.3 free,    144.7 used.   6312.1 avail Mem
Thermals
While performing the installation and copying the data I occasionally ran
sensors and nvme to check temperatures on the system.
root@h4nk4-m:~# apt install nvme-cli lm-sensors
I had the active cooler attached to the Pi but not yet connected. Instead, I had an actual standing fan pointed at the device, to blow air onto it, because the room lacked air circulation and was around 26°C on average. With that in mind, these were the thermals:
root@h4nk4-m:~# sensors
rpi_volt-isa-0000
Adapter: ISA adapter
in0:              N/A

nvme-pci-0400
Adapter: PCI adapter
Composite:    +37.9°C  (low  =  -0.1°C, high = +99.8°C)
                       (crit = +109.8°C)

cpu_thermal-virtual-0
Adapter: Virtual device
temp1:        +36.4°C

rp1_adc-isa-0000
Adapter: ISA adapter
in1:           1.48 V
in2:           2.53 V
in3:           1.41 V
in4:           1.45 V
temp1:        +42.1°C

nvme-pci-0300
Adapter: PCI adapter
Composite:    +35.9°C  (low  =  -0.1°C, high = +99.8°C)
                       (crit = +109.8°C)

root@h4nk4-m:~# nvme smart-log /dev/nvme0
Smart Log for NVME device:nvme0 namespace-id:ffffffff
critical_warning			: 0
temperature				: 36°C (309 Kelvin)
available_spare				: 100%
available_spare_threshold		: 32%
percentage_used				: 0%
endurance group critical warning summary: 0
Data Units Read				: 5,473,045 (2.80 TB)
Data Units Written			: 1,283,959 (657.39 GB)
host_read_commands			: 22,275,575
host_write_commands			: 5,103,184
controller_busy_time			: 0
power_cycles				: 5
power_on_hours				: 4
unsafe_shutdowns			: 3
media_errors				: 0
num_err_log_entries			: 0
Warning Temperature Time		: 0
Critical Composite Temperature Time	: 0
Thermal Management T1 Trans Count	: 0
Thermal Management T2 Trans Count	: 0
Thermal Management T1 Total Time	: 0
Thermal Management T2 Total Time	: 0
root@h4nk4-m:~# nvme smart-log /dev/nvme1
Smart Log for NVME device:nvme1 namespace-id:ffffffff
critical_warning			: 0
temperature				: 38°C (311 Kelvin)
available_spare				: 100%
available_spare_threshold		: 32%
percentage_used				: 0%
endurance group critical warning summary: 0
Data Units Read				: 97 (49.66 MB)
Data Units Written			: 7,512,923 (3.85 TB)
host_read_commands			: 2,960
host_write_commands			: 30,418,161
controller_busy_time			: 0
power_cycles				: 6
power_on_hours				: 5
unsafe_shutdowns			: 3
media_errors				: 0
num_err_log_entries			: 0
Warning Temperature Time		: 0
Critical Composite Temperature Time	: 0
Thermal Management T1 Trans Count	: 0
Thermal Management T2 Trans Count	: 0
Thermal Management T1 Total Time	: 0
Thermal Management T2 Total Time	: 0
The moment I would turn off the fan, however, thermals would look significantly different:
root@h4nk4-m:~# sensors
rpi_volt-isa-0000
Adapter: ISA adapter
in0:              N/A

nvme-pci-0400
Adapter: PCI adapter
Composite:    +48.9°C  (low  =  -0.1°C, high = +99.8°C)
                       (crit = +109.8°C)

cpu_thermal-virtual-0
Adapter: Virtual device
temp1:        +61.1°C

rp1_adc-isa-0000
Adapter: ISA adapter
in1:           1.47 V
in2:           2.52 V
in3:           1.34 V
in4:           1.38 V
temp1:        +59.0°C

nvme-pci-0300
Adapter: PCI adapter
Composite:    +48.9°C  (low  =  -0.1°C, high = +99.8°C)
                       (crit = +109.8°C)

root@h4nk4-m:~# nvme smart-log /dev/nvme0
Smart Log for NVME device:nvme0 namespace-id:ffffffff
critical_warning			: 0
temperature				: 50°C (323 Kelvin)
available_spare				: 100%
available_spare_threshold		: 32%
percentage_used				: 0%
endurance group critical warning summary: 0
Data Units Read				: 6,489,635 (3.32 TB)
Data Units Written			: 2,126,623 (1.09 TB)
host_read_commands			: 26,451,989
host_write_commands			: 8,429,426
controller_busy_time			: 0
power_cycles				: 5
power_on_hours				: 6
unsafe_shutdowns			: 3
media_errors				: 0
num_err_log_entries			: 0
Warning Temperature Time		: 0
Critical Composite Temperature Time	: 0
Thermal Management T1 Trans Count	: 0
Thermal Management T2 Trans Count	: 0
Thermal Management T1 Total Time	: 0
Thermal Management T2 Total Time	: 0
root@h4nk4-m:~# nvme smart-log /dev/nvme1
Smart Log for NVME device:nvme1 namespace-id:ffffffff
critical_warning			: 0
temperature				: 49°C (322 Kelvin)
available_spare				: 100%
available_spare_threshold		: 32%
percentage_used				: 0%
endurance group critical warning summary: 0
Data Units Read				: 97 (49.66 MB)
Data Units Written			: 9,372,348 (4.80 TB)
host_read_commands			: 2,960
host_write_commands			: 37,920,269
controller_busy_time			: 0
power_cycles				: 6
power_on_hours				: 7
unsafe_shutdowns			: 3
media_errors				: 0
num_err_log_entries			: 0
Warning Temperature Time		: 0
Critical Composite Temperature Time	: 0
Thermal Management T1 Trans Count	: 0
Thermal Management T2 Trans Count	: 0
Thermal Management T1 Total Time	: 0
Thermal Management T2 Total Time	: 0
SPOILER: The thermals on the finished build, with the active cooler attached and connected, as well as the case cooler running on 5V:
root@h4nk4-m:~# sensors
pwmfan-isa-0000
Adapter: ISA adapter
fan1:           0 RPM

nvme-pci-0400
Adapter: PCI adapter
Composite:    +29.9°C  (low  =  -0.1°C, high = +99.8°C)
                       (crit = +109.8°C)

cpu_thermal-virtual-0
Adapter: Virtual device
temp1:        +35.9°C

rpi_volt-isa-0000
Adapter: ISA adapter
in0:              N/A

rp1_adc-isa-0000
Adapter: ISA adapter
in1:           1.47 V
in2:           2.54 V
in3:           1.38 V
in4:           1.41 V
temp1:        +43.3°C

nvme-pci-0300
Adapter: PCI adapter
Composite:    +29.9°C  (low  =  -0.1°C, high = +99.8°C)
                       (crit = +109.8°C)

root@h4nk4-m:~# nvme smart-log /dev/nvme0
Smart Log for NVME device:nvme0 namespace-id:ffffffff
critical_warning			: 0
temperature				: 30°C (303 Kelvin)
available_spare				: 100%
available_spare_threshold		: 32%
percentage_used				: 0%
endurance group critical warning summary: 0
Data Units Read				: 15,352,860 (7.86 TB)
Data Units Written			: 5,038,906 (2.58 TB)
host_read_commands			: 90,619,639
host_write_commands			: 30,193,161
controller_busy_time			: 0
power_cycles				: 15
power_on_hours				: 607
unsafe_shutdowns			: 7
media_errors				: 0
num_err_log_entries			: 0
Warning Temperature Time		: 0
Critical Composite Temperature Time	: 0
Thermal Management T1 Trans Count	: 0
Thermal Management T2 Trans Count	: 0
Thermal Management T1 Total Time	: 0
Thermal Management T2 Total Time	: 0
Enclosure
Even before I ordered all the components for the Raspberry Pi 5 NAS I began drafting a case that would protect the fully built device and offer a way to make it transportable, as well as storable. As with the previous attempt, I wanted a case that would allow me to access the internals with at most a single Phillips-head screwdriver – ideally without any tools at all – in case I would need to replace any of the components during one of my travels.
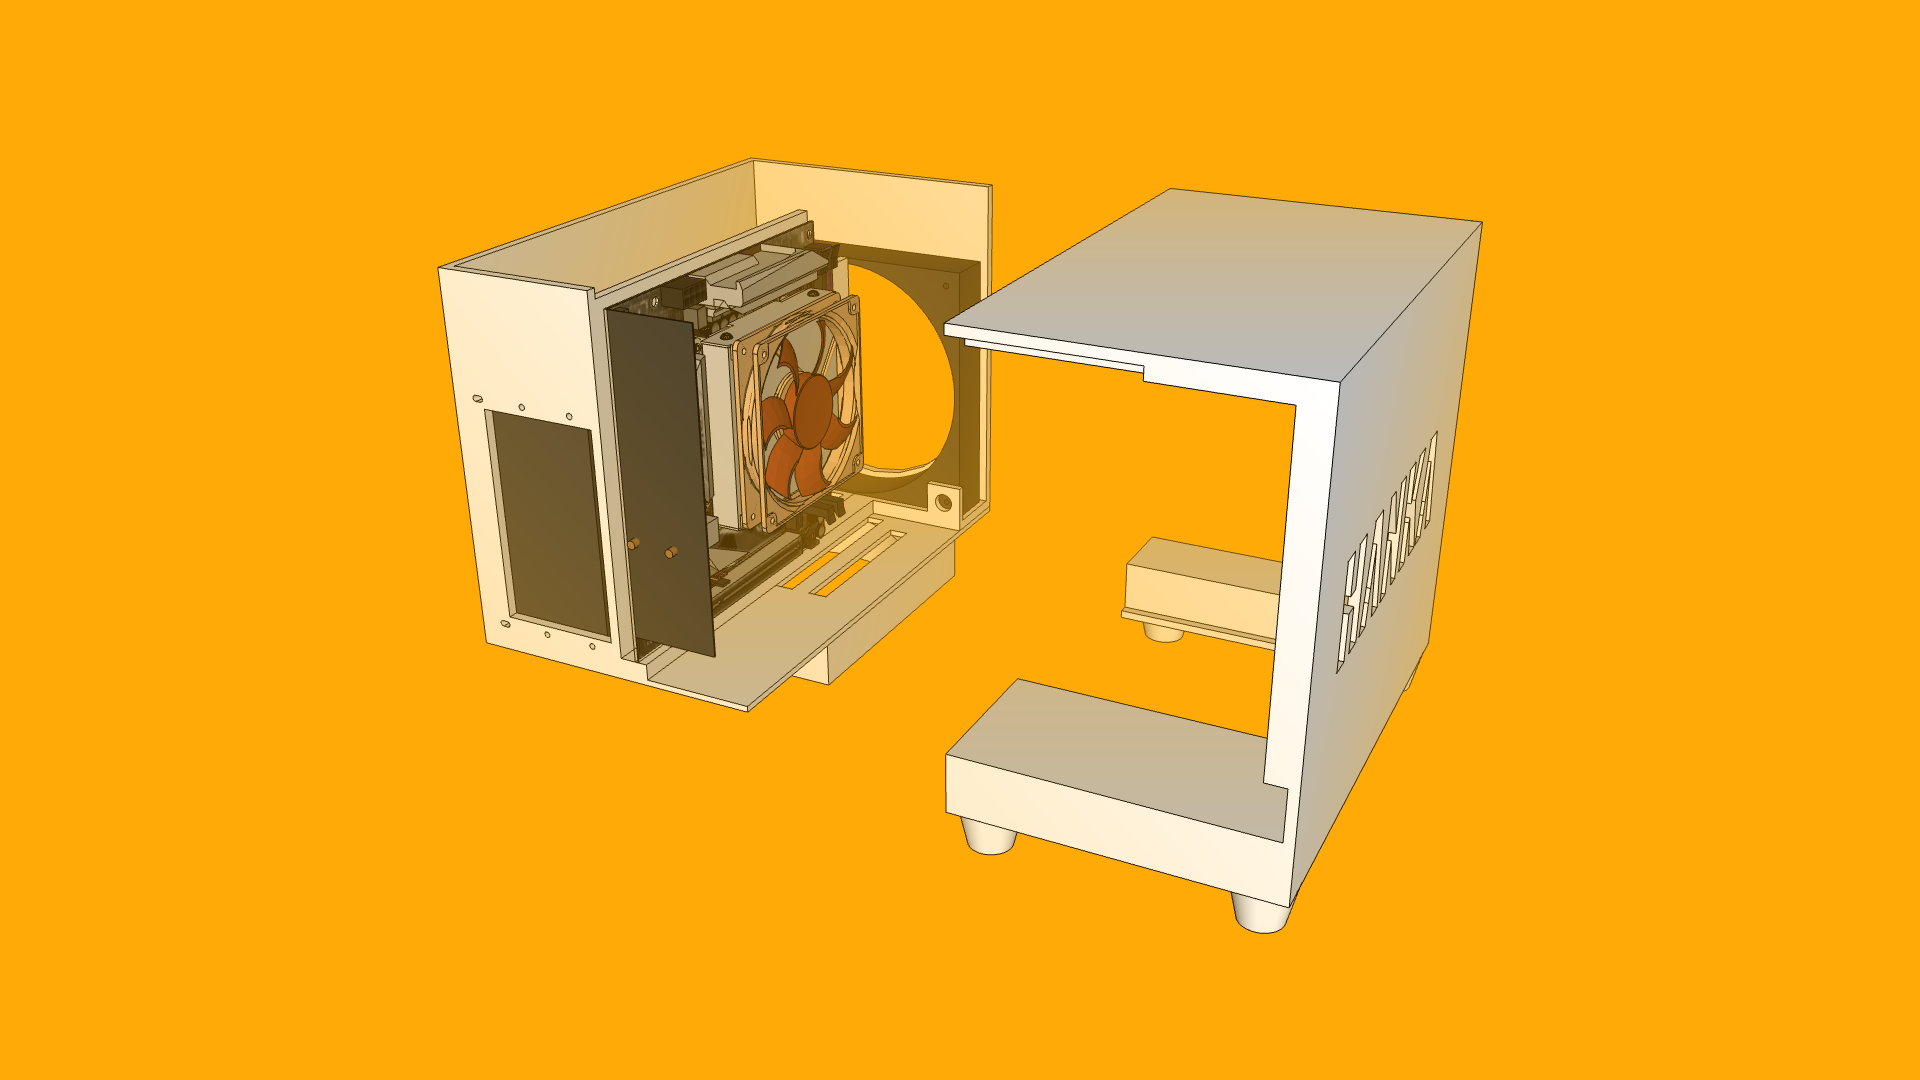
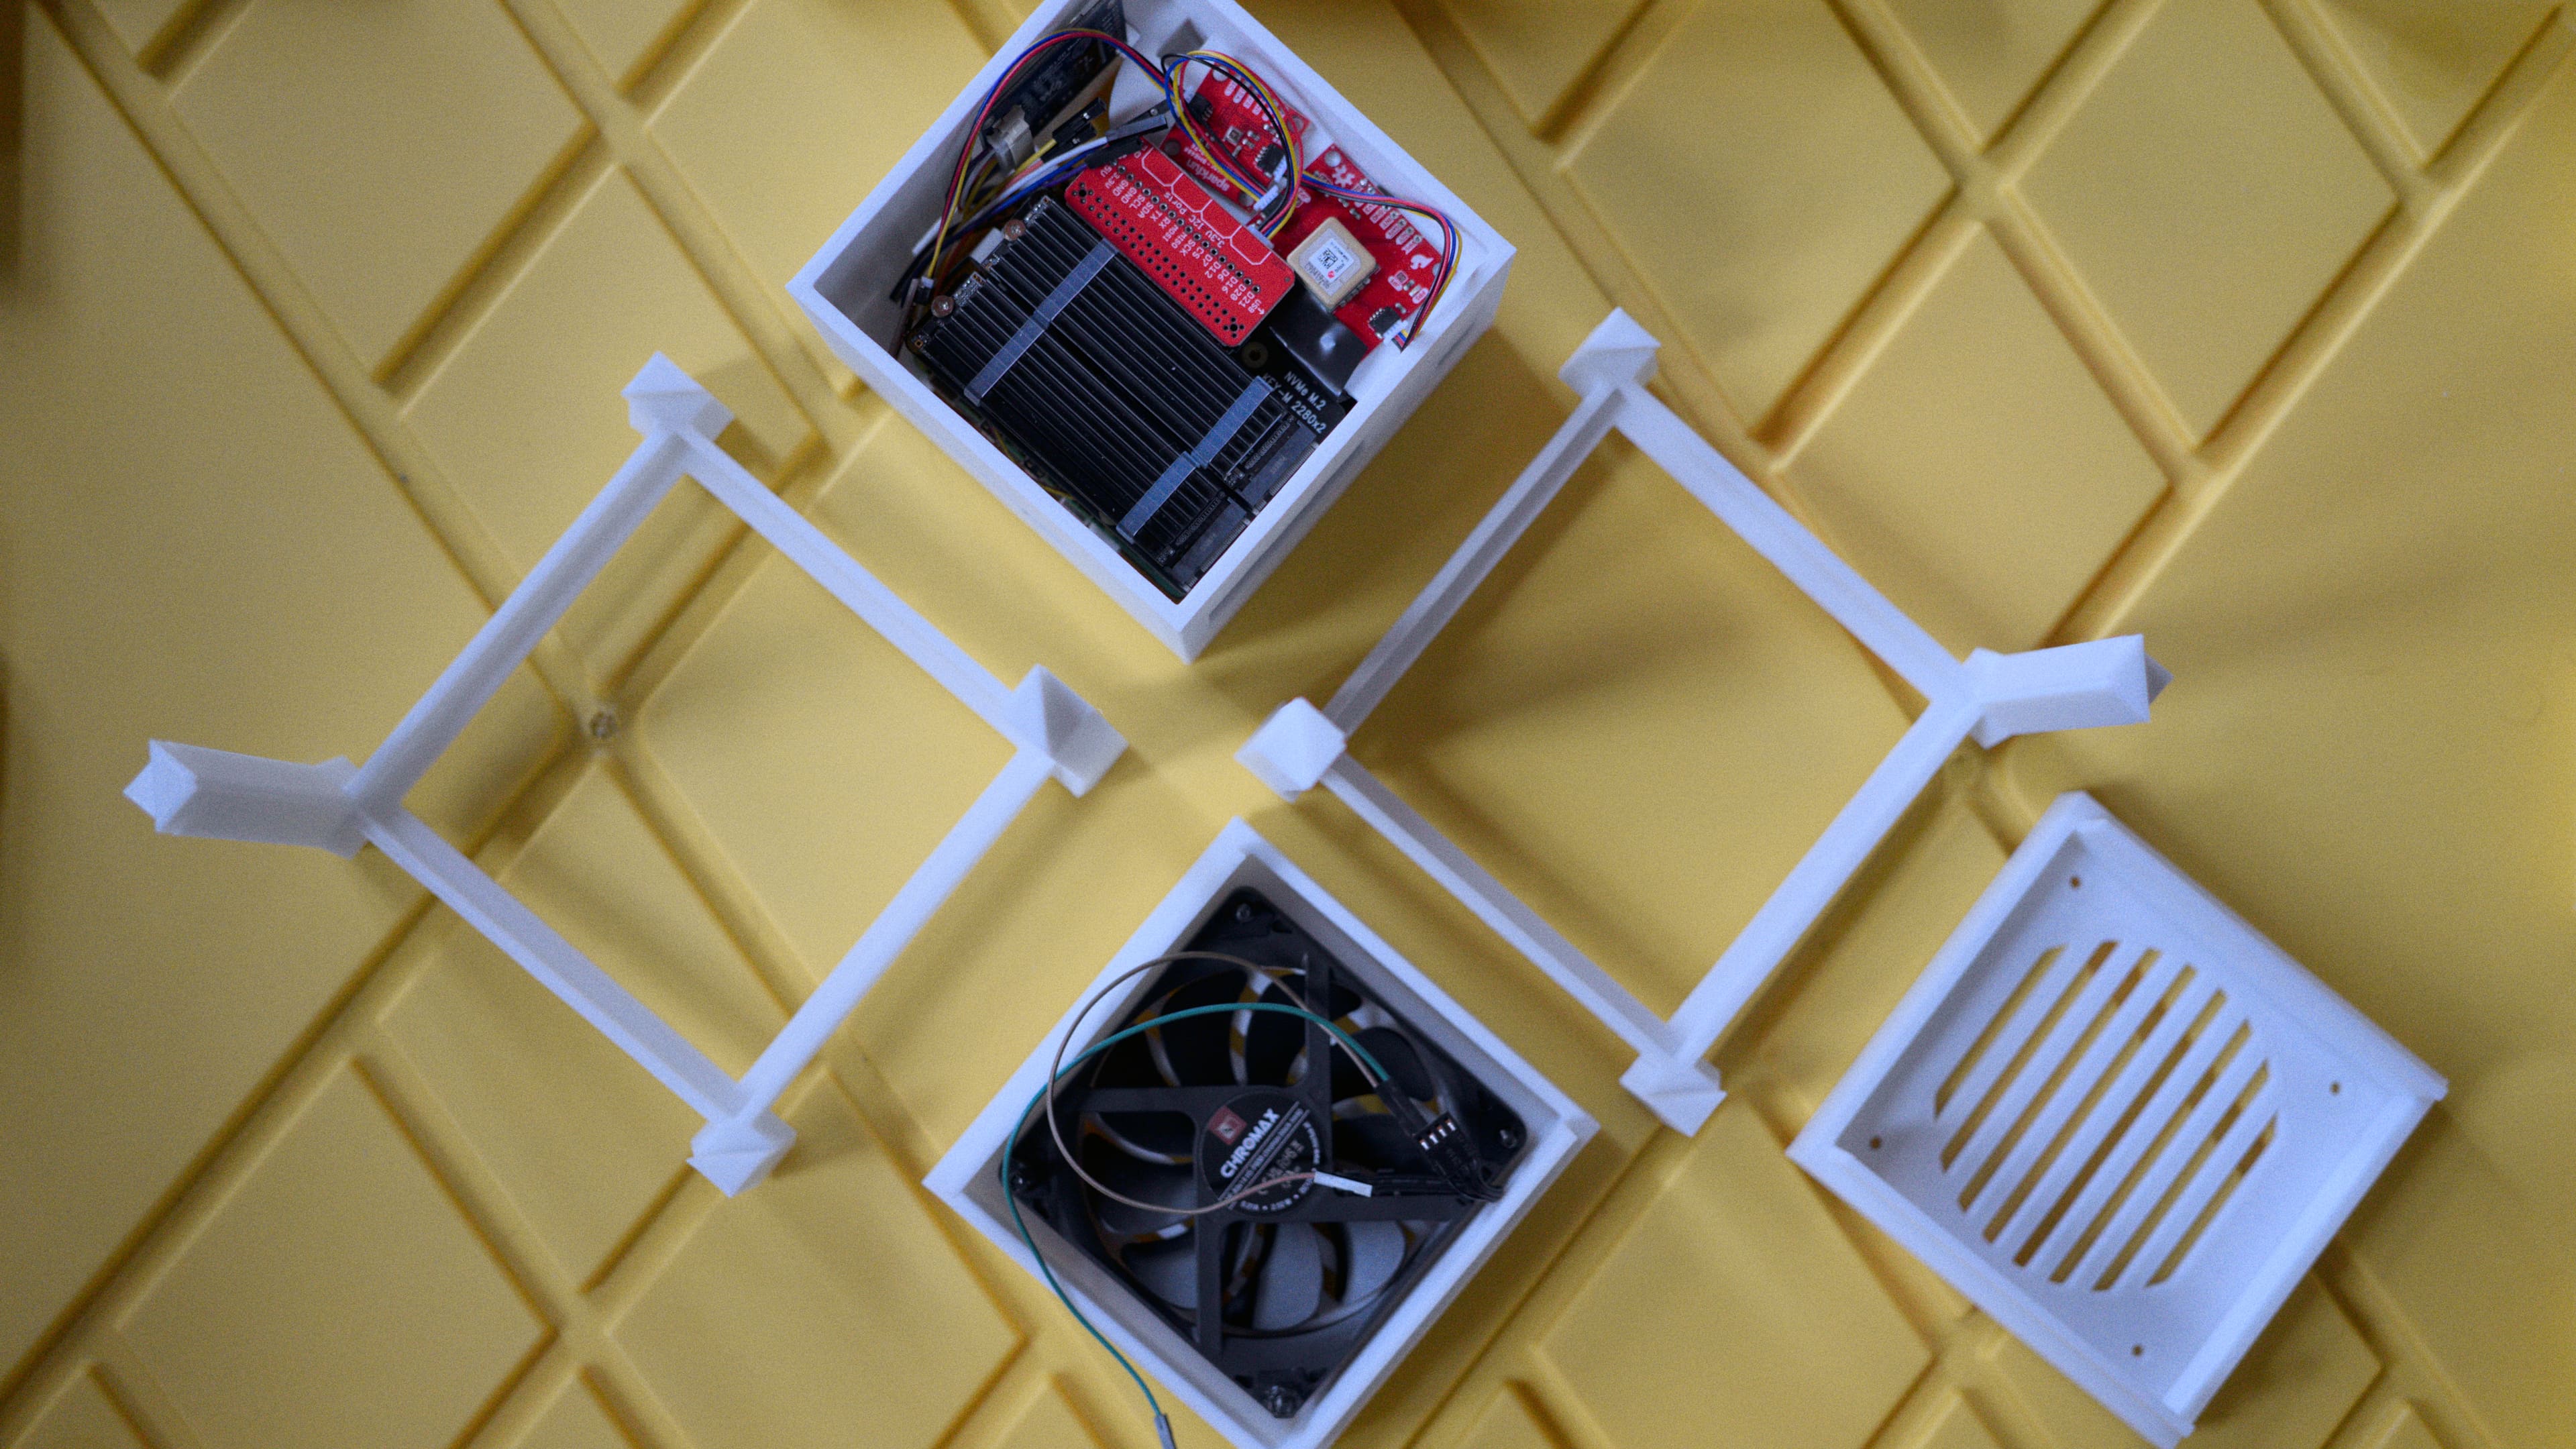
I ultimately came up with the following design:

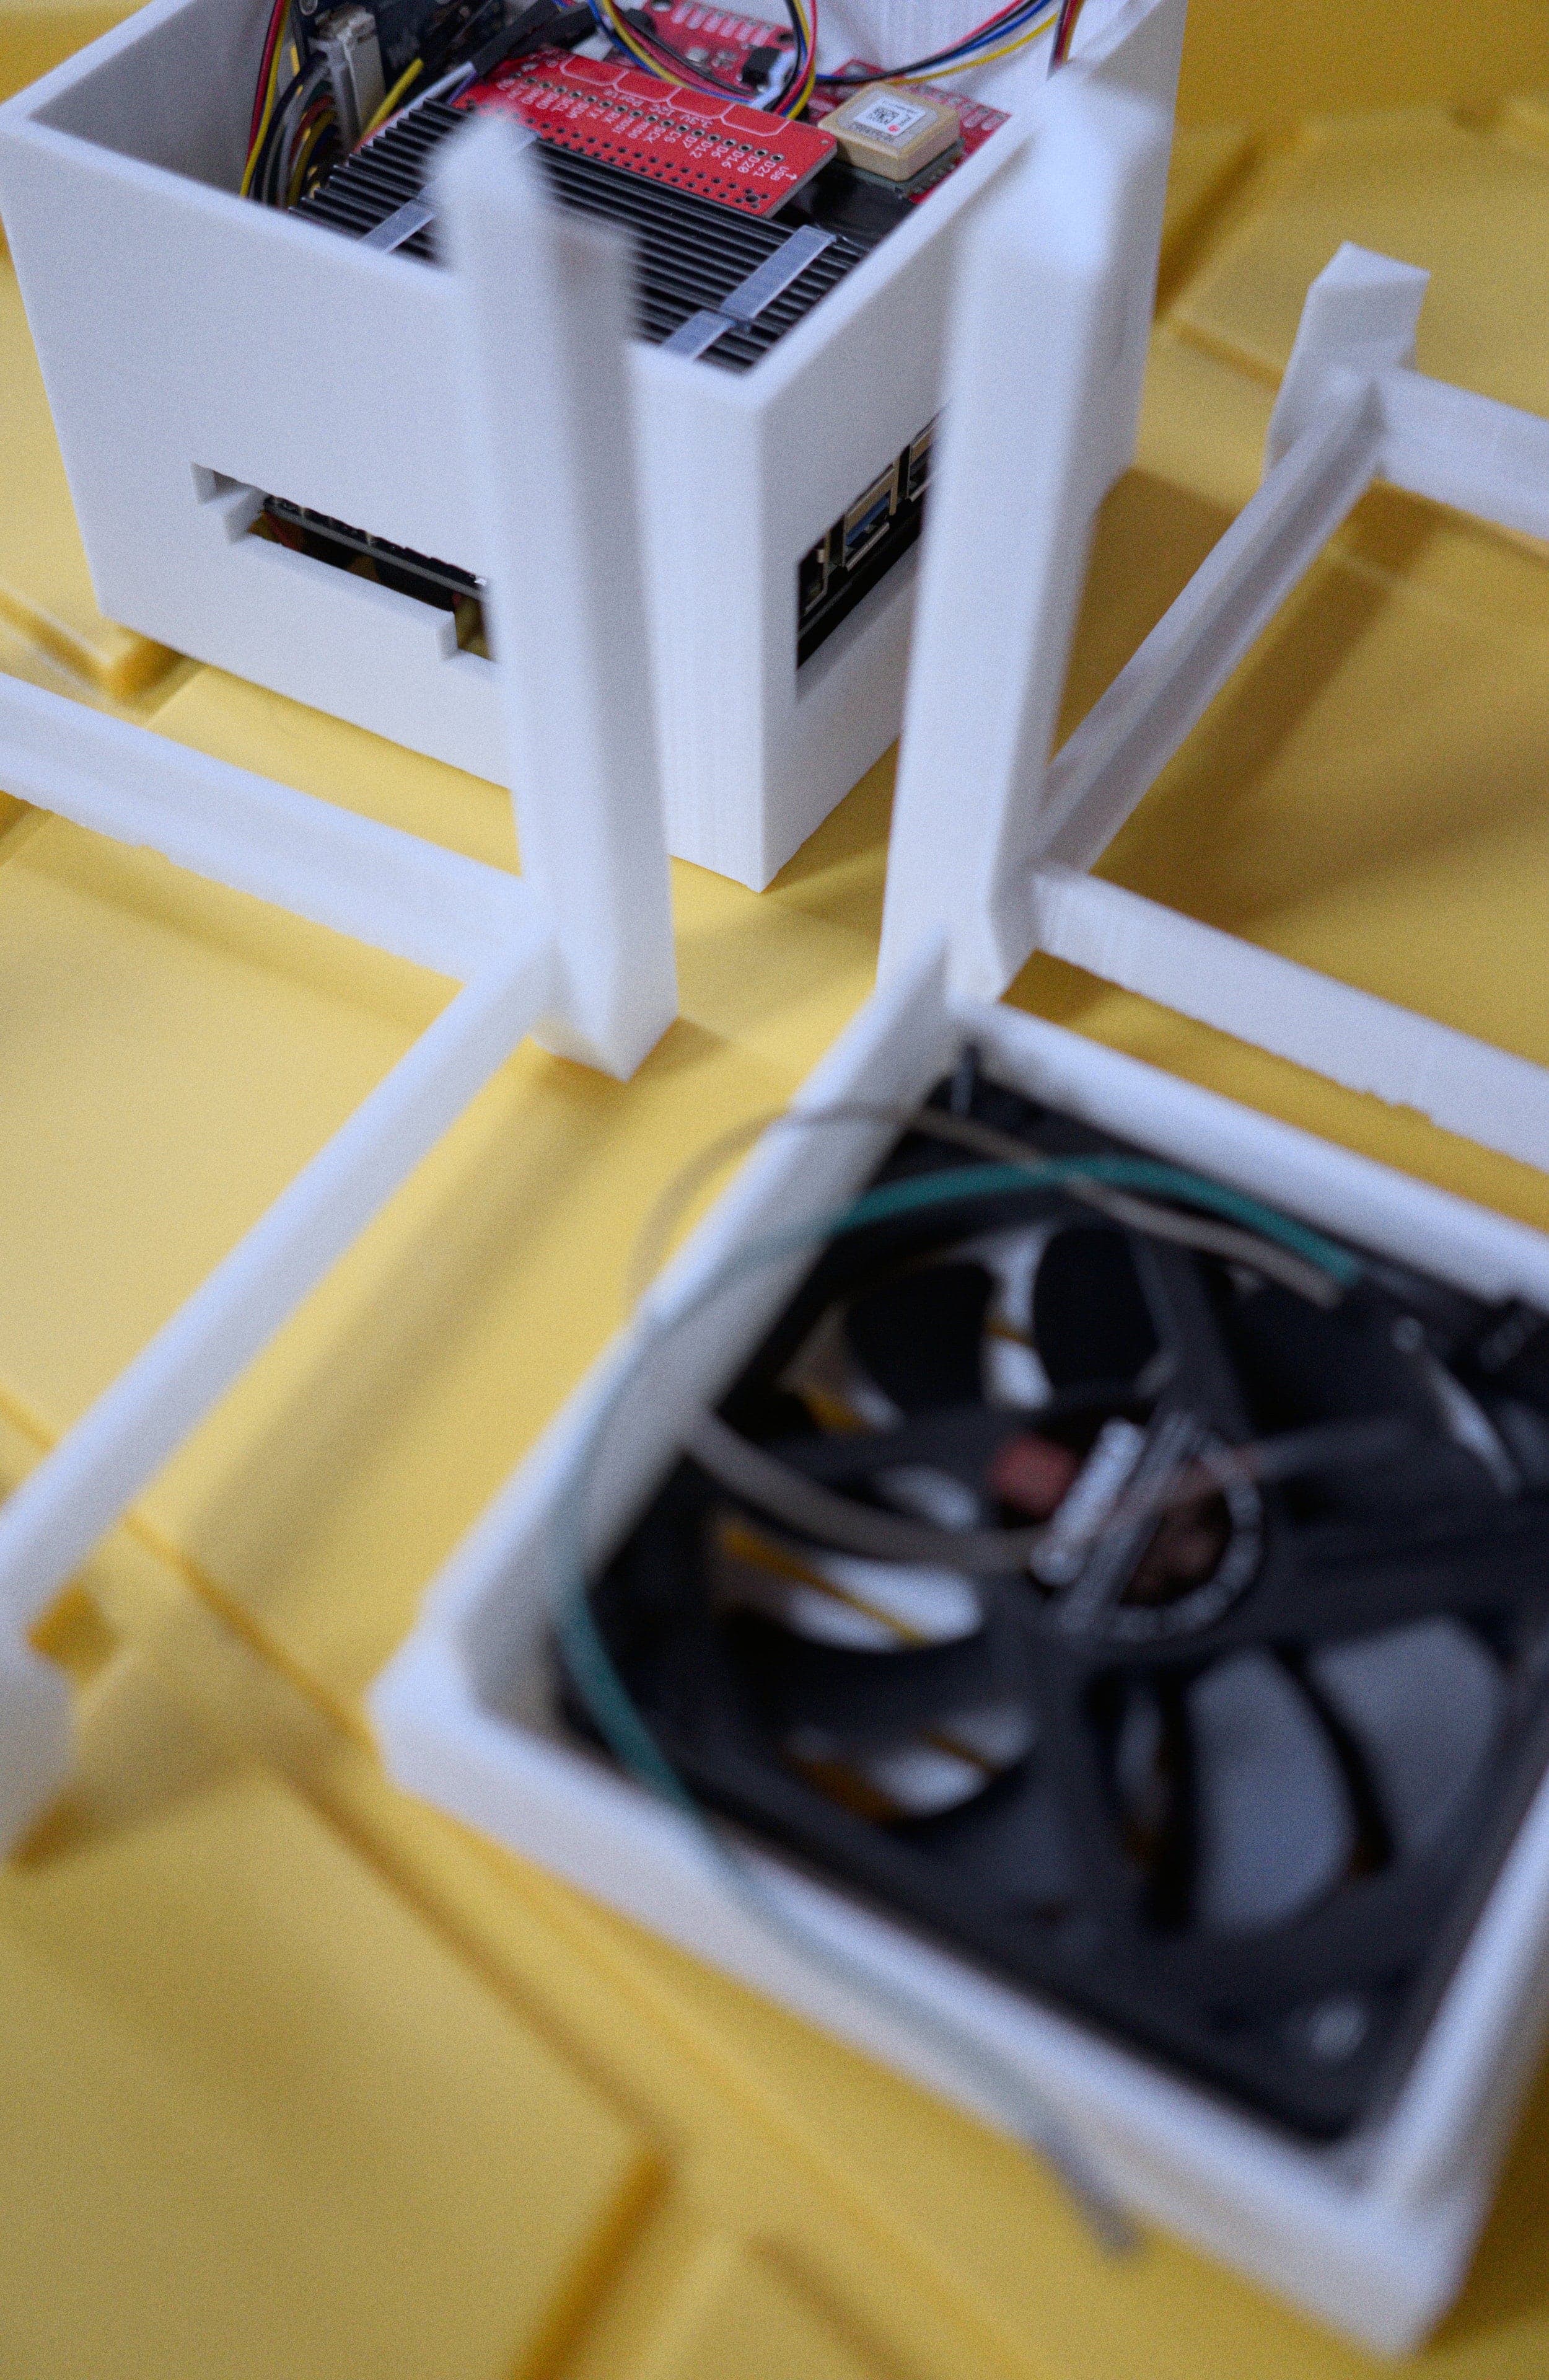
The case consists of a centerpiece with attachments, to which the Raspberry Pi and the Geekworm X1202 are being sandwiched, as well as two identical covers that go on the top and the bottom, and that can both hold either a 92mm fan (like the Noctua NF-A9x14) or a total of eight 40mm fans (like the Noctua NF-A4x10 FLX), using a special adapter plate. Whether the Raspberry/X1202 is able to power that amount of fans is another topic. :-) Thanks to the barrel jack on the X1202 however, it is possible to run a 12V fan at full speed!
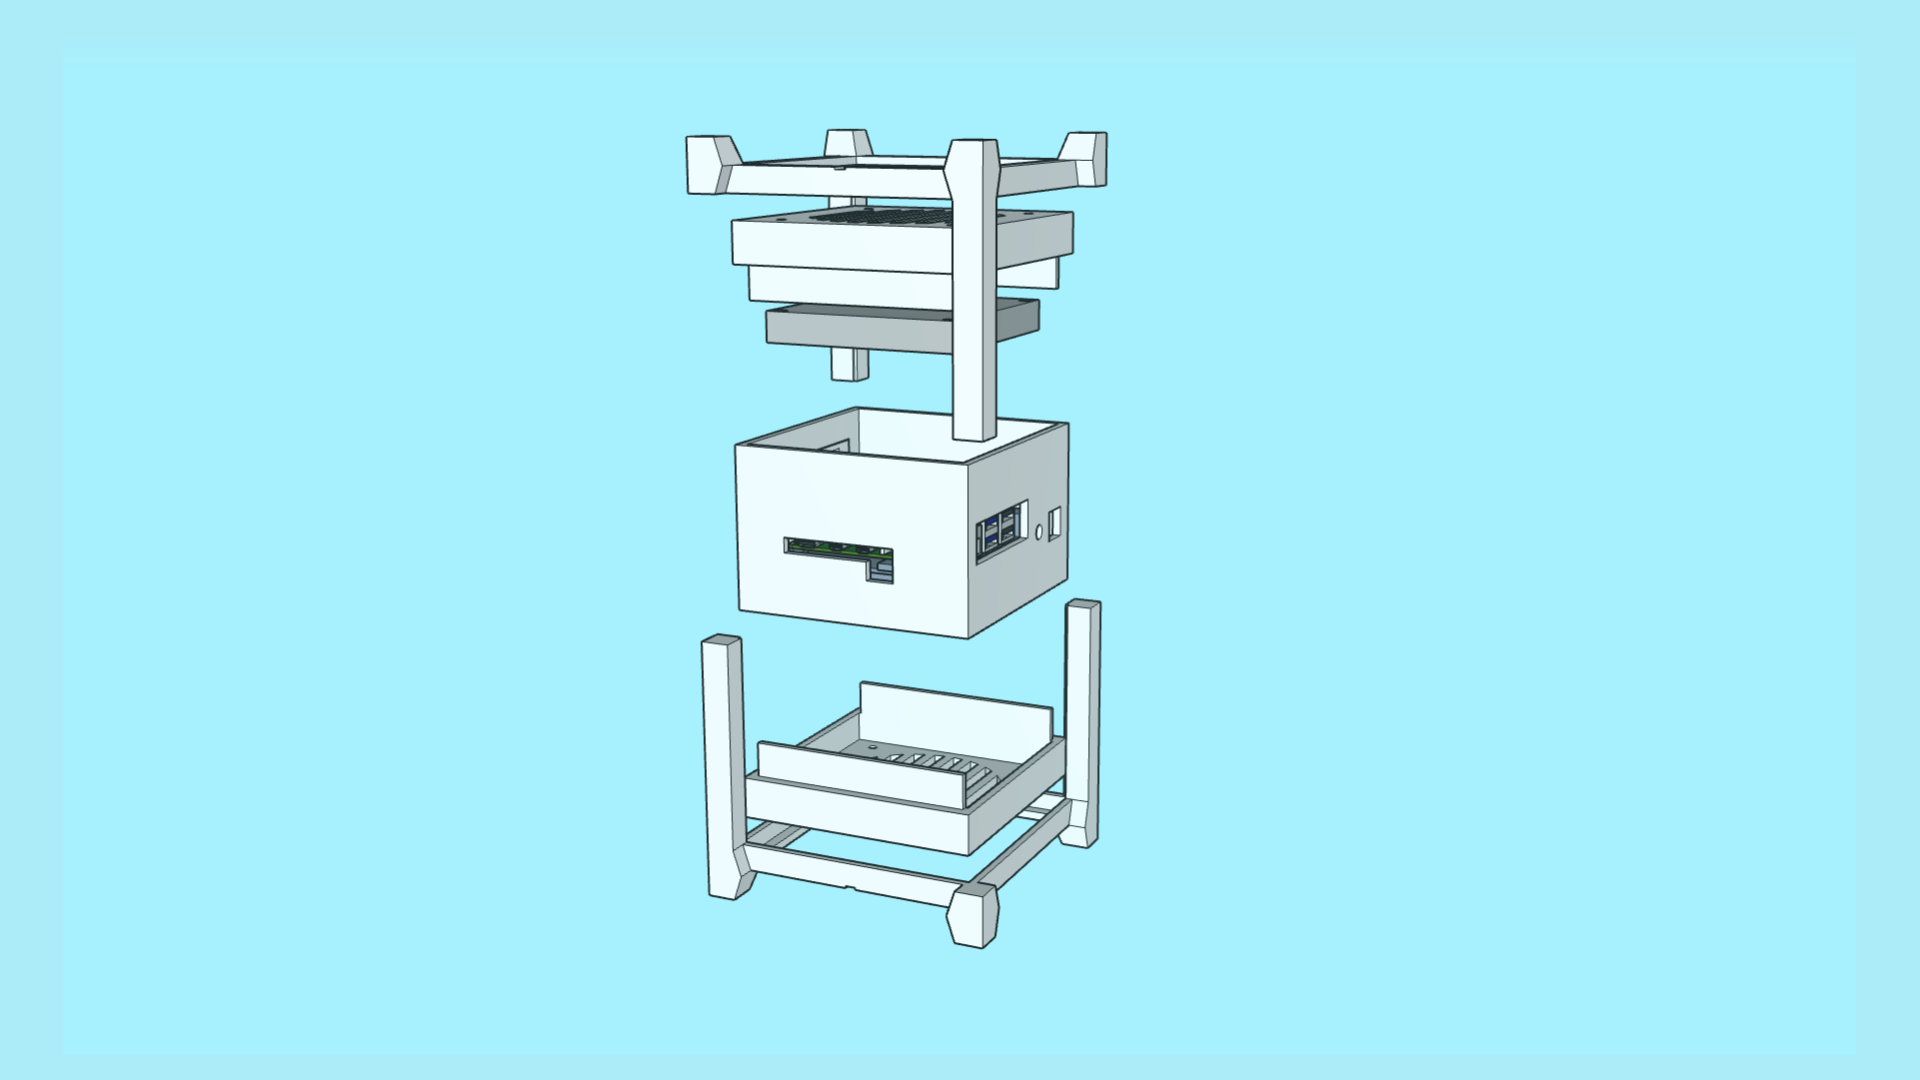
When put together, the centerpiece and the top and bottom covers make a cube of exactly 114mm x 114mm x 114mm. The stands are two identical halves that sort of interlock and create an additional “bumper frame” around that cube. Not only does this allow for better protection and lead to fewer individual parts: But because the case is a symmetrical cube, it can be oriented in whichever way happens to be best suited at that moment. Need constant access to USB ports? Mount it in its normal orientation. Want a more tidy look? Re-orient it to make the USB ports face the bottom. Both parts are being held together using a simple flat rubber band – no need for screws.
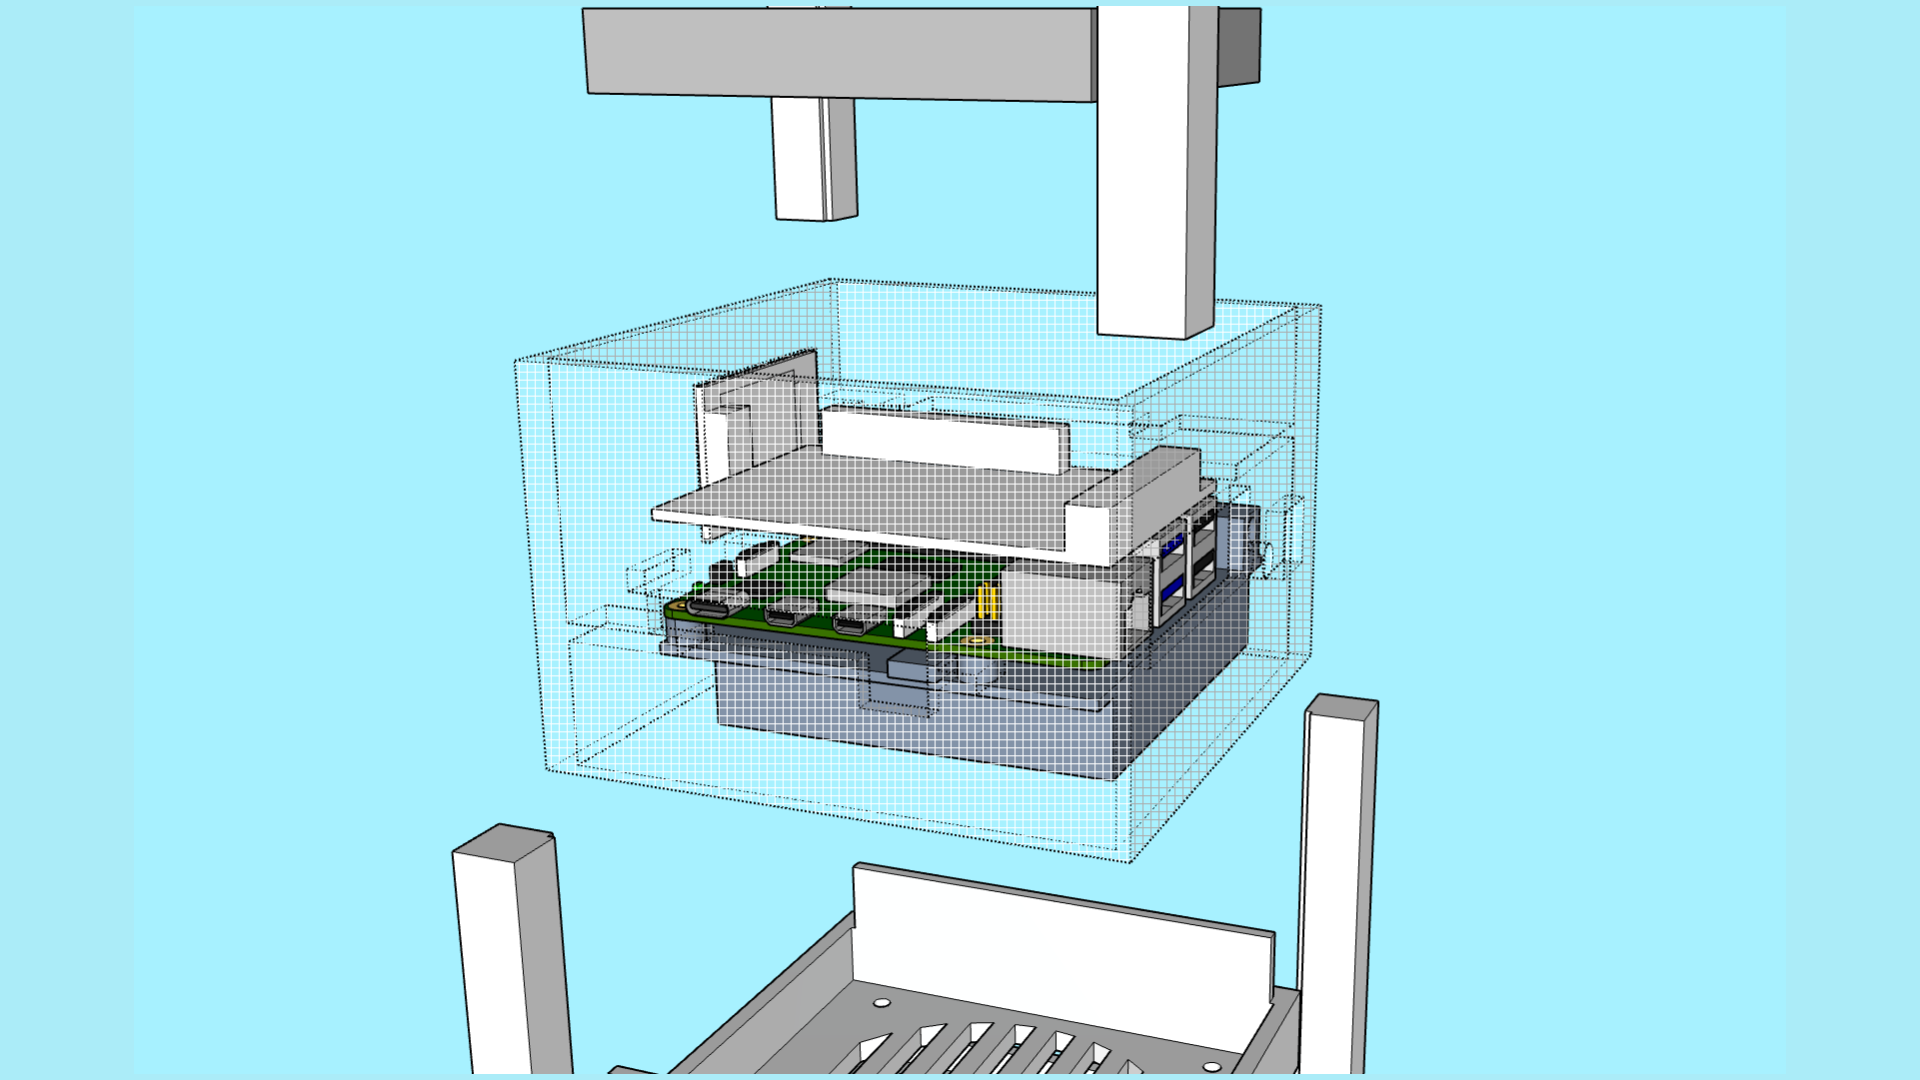
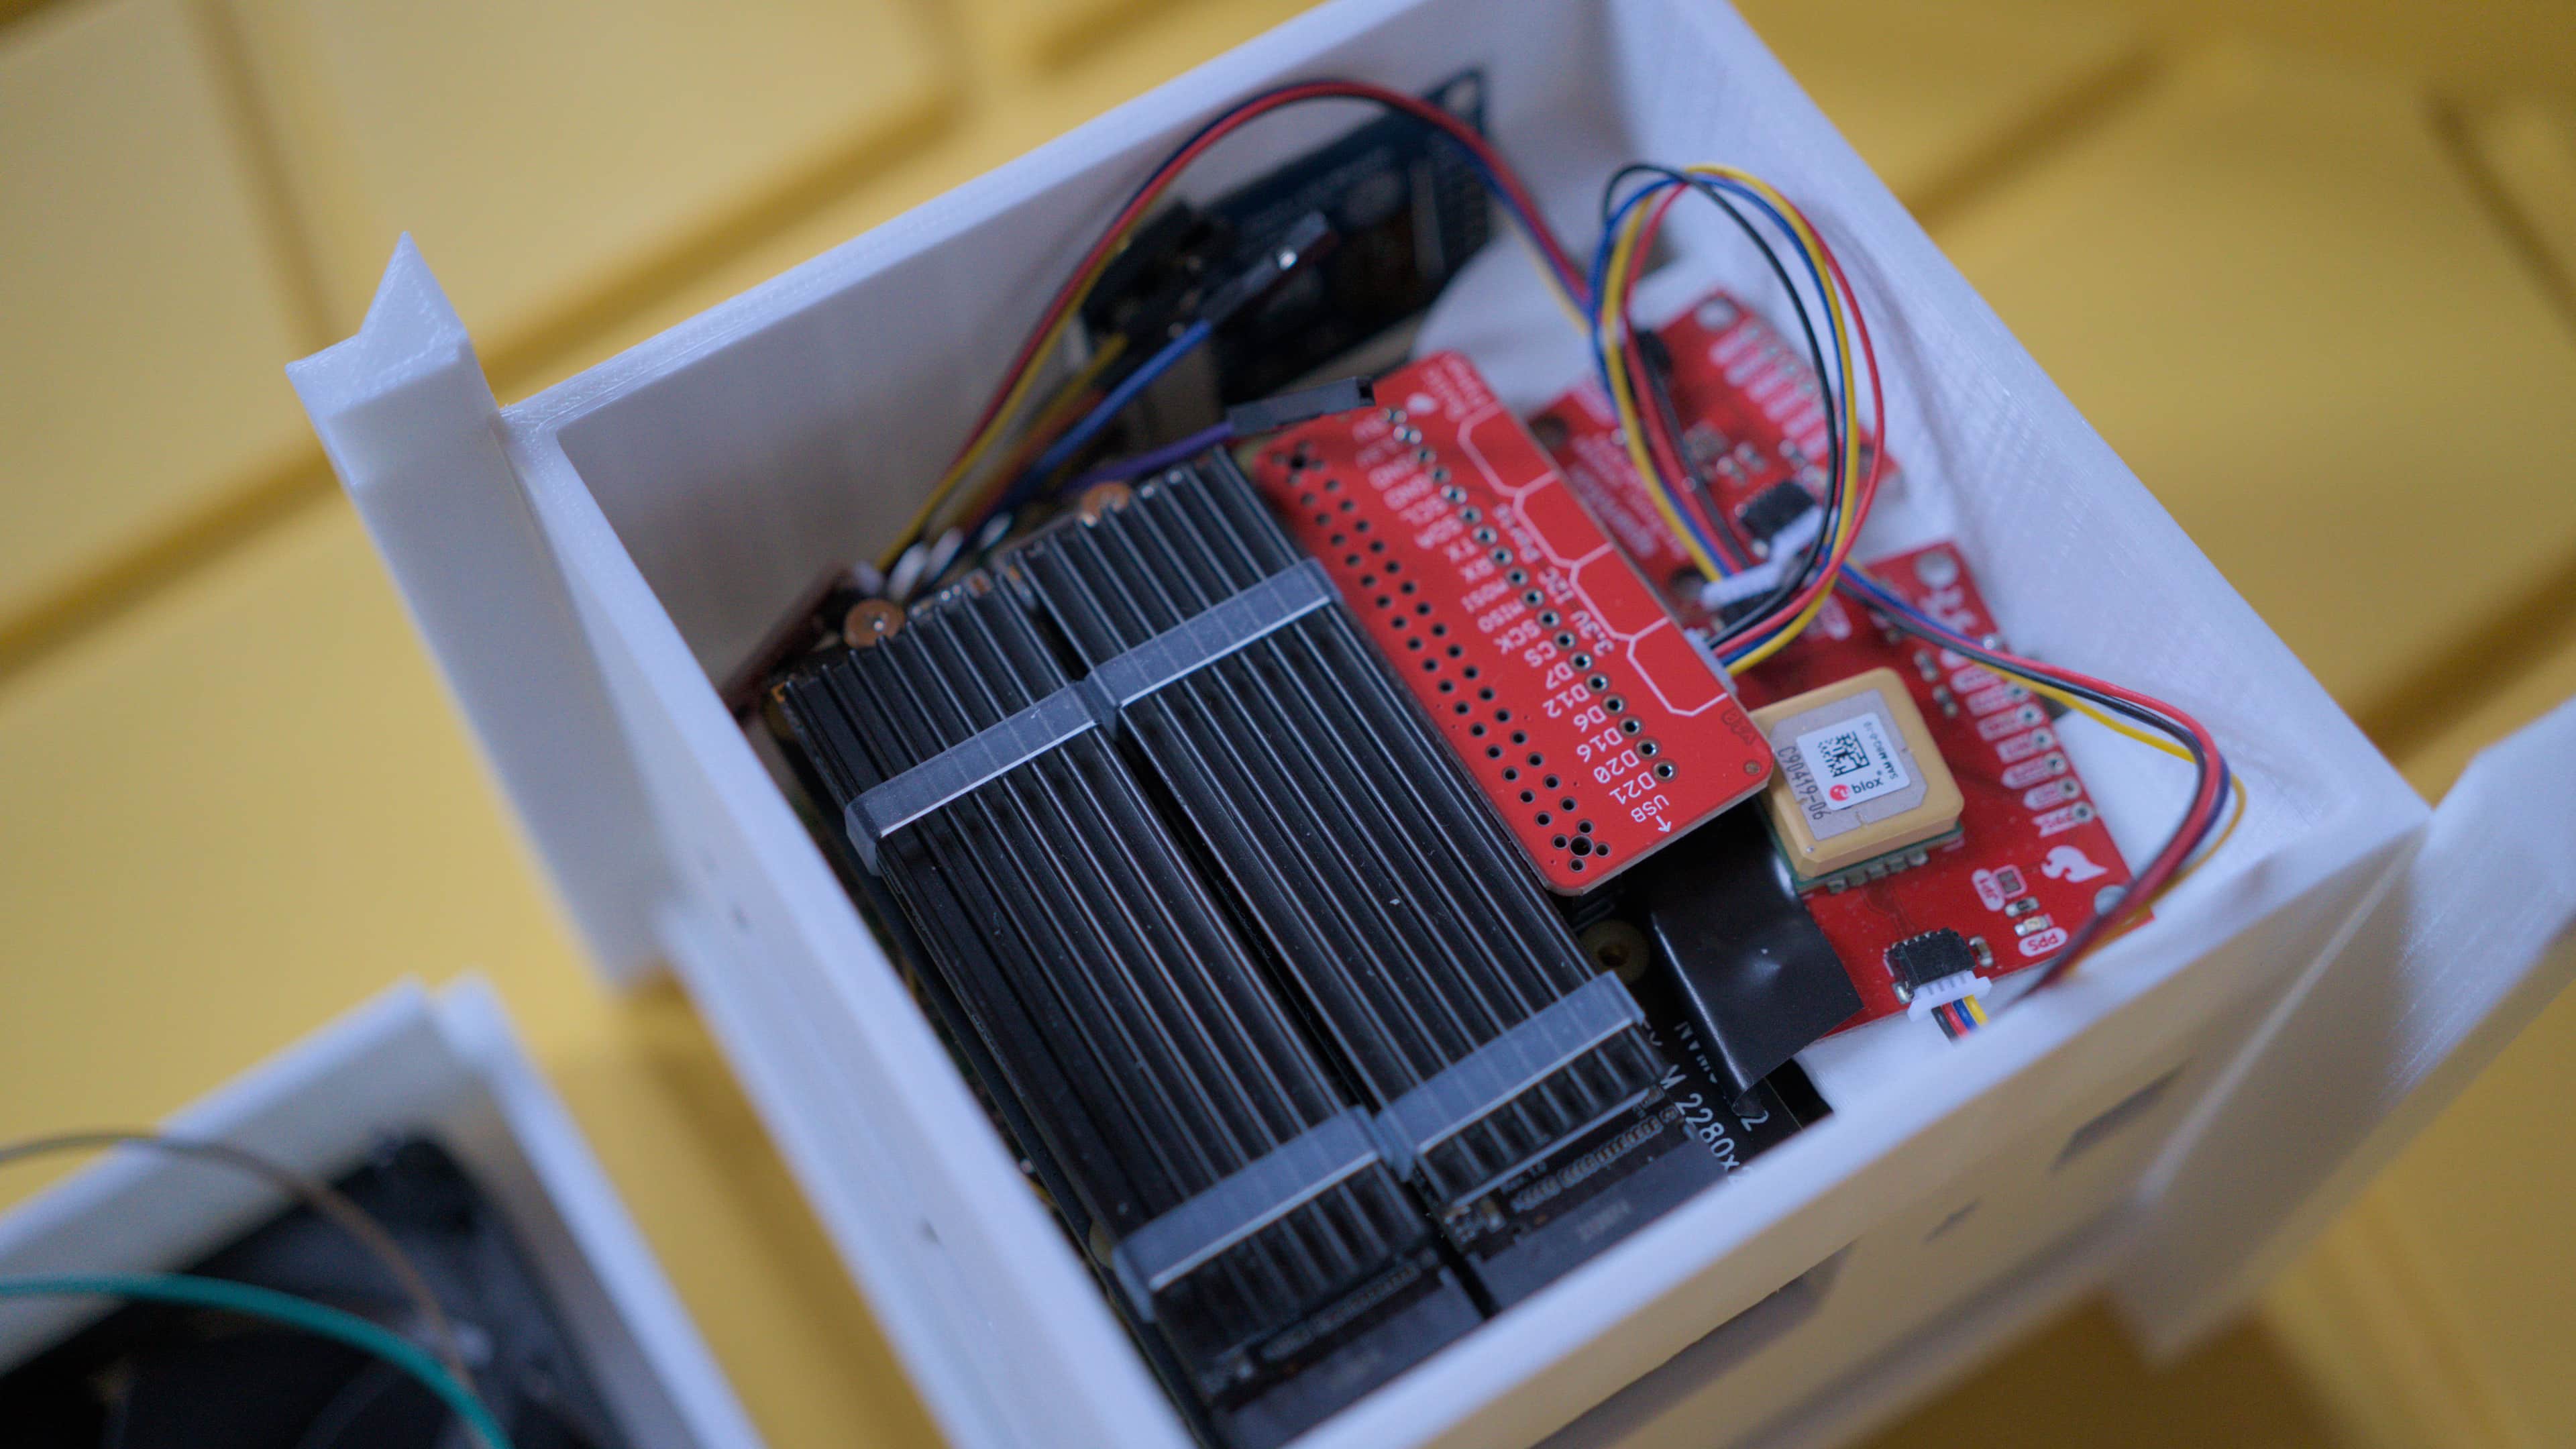
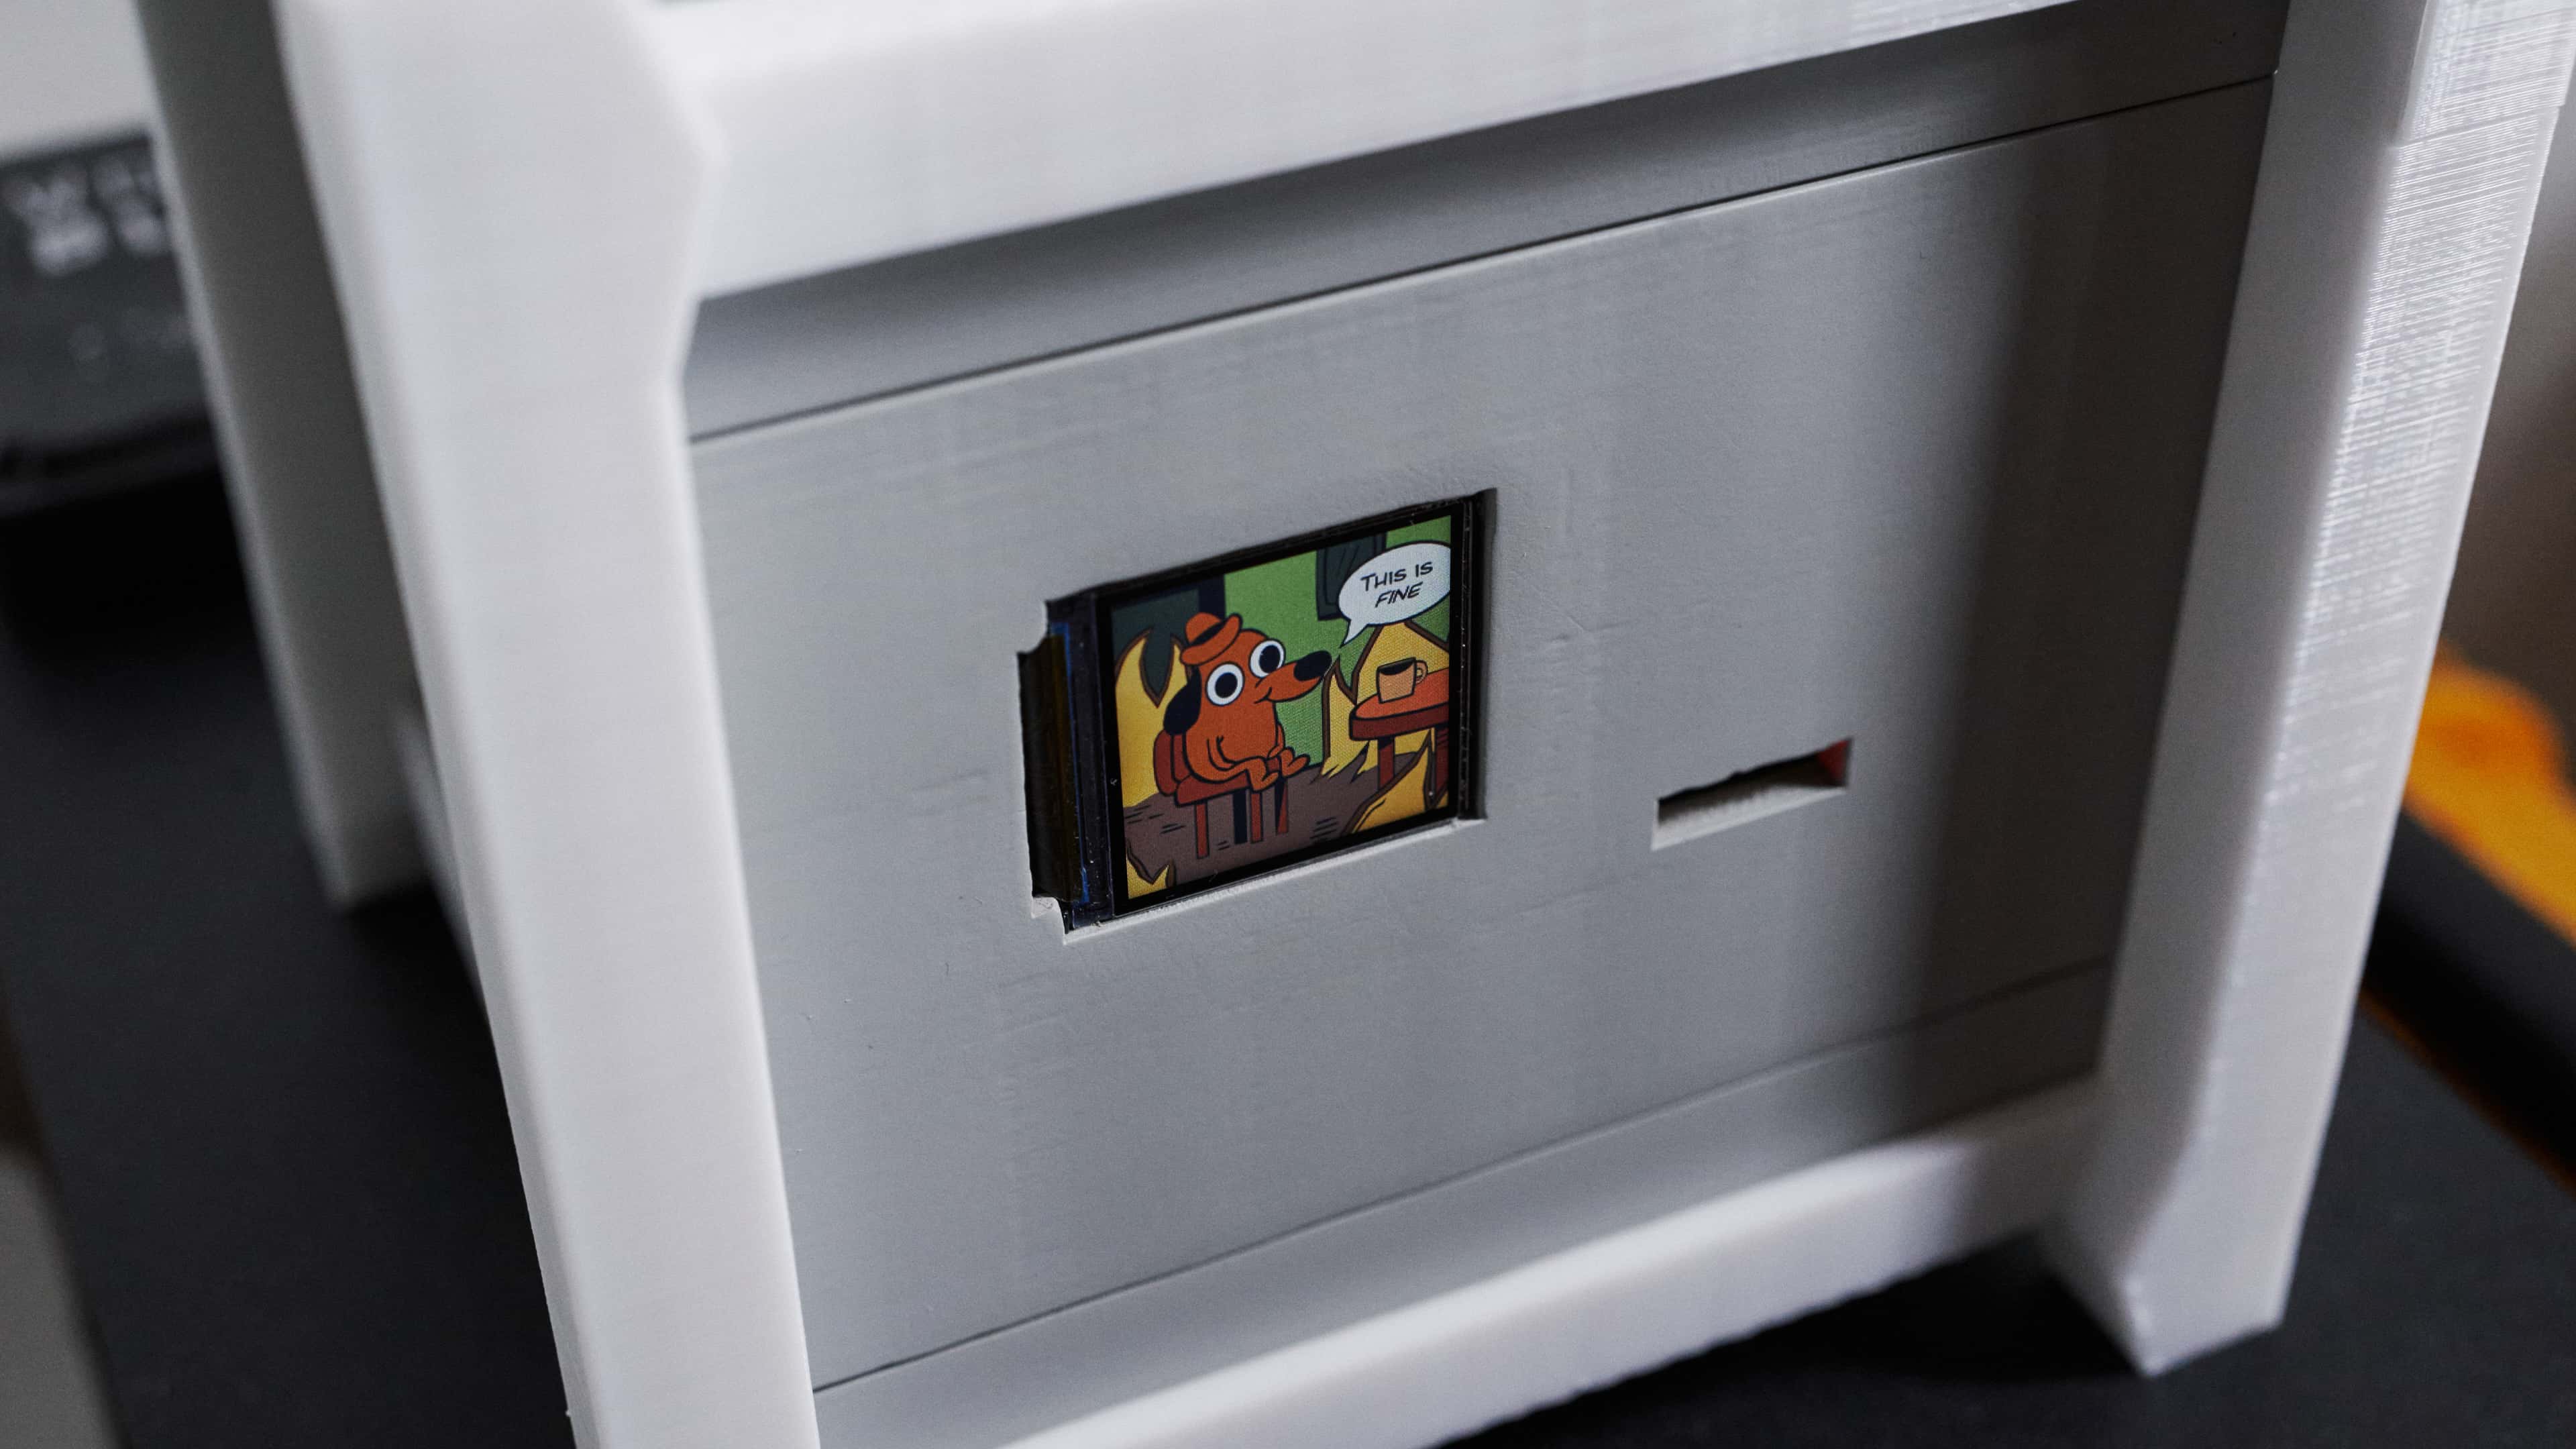
The internal space is big enough to fit the X1202 with batteries, the Raspberry Pi 5 with an active cooler, the X1004 with two NVMe drives and heatsinks, as well as the Sparkfun Qwiic PiHat and the Waveshare ST7789 1.3" LCD module.
“Wait, what?”, you’re probably thinking. You heard right! I figured that since my Ultra-Portable Data Center is going to be powered on for prolonged periods and have plenty of storage available, I might as well throw in a couple of sensors to collect some environmental data along the way. :-)
The interior offers a little surface onto which I mounted a variety of sensors, that I connected via the Qwiic HAT. While I could have simply wired/soldered a handful of cables and connected them to the Raspberry Pi’s I2C ports, I figured that Qwiic was a tidier (and easier) way to do it.
The modules that I included are the following:
- BMI270, an IMU that allows me to read the orientation of the device
- BME688, a Bosch sensor that scans for VOCs, VSCs, and other gasses and can read temperature, humidity, and barometric pressure
- AMG8833, an 8x8 grid eye thermal camera pointed towards the batteries, for monitoring their temperature
SparkFun Qwiic Buzzer(not available at the time of building this)
3D Print
I printed all parts using PETg, with varying infills. On the first round of prints, I noticed I made a slight mistake regarding the mounting points, hence I had to reprint the centerpiece. I also optimized the stands by adding an interlocking to the ends and had them reprinted as well.
The second round turned out better, but I still had some issues with the mounting points, which I decided to correct manually. I nevertheless included the corrections into the 3D design.
With the unfinished 3D print I gave the setup a try and found that everything fit perfectly.
The whole build consists of five parts, out of which four are identical twins, making production efficient.
I got myself a Dremel 7350-5 cordless rotary tool kit to be able to finish the parts off more easily. Since my new keyboard was also awaiting a final touch, I figured that the thirty bucks spent on the Dremel would be a good investment. I explicitly chose a portable device – even though it’s relatively weak compared to the corded tools – because I don’t like my devices to be bound to a specific voltage. While modern electronics can deal just fine with anything between 110V and 240V, tools that contain electric motors usually can’t.
Note
There is a more powerful alternative to the 7350-5, which is the 8240-5, a tool that runs on a 12V/2Ah rechargeable battery. While I would have preferred that one, it is triple the price of the 7350-5 and only brings an advantage when working with tougher materials.
Sand, prime, dry, repeat
I began by sanding the parts with 120 paper, washing the dust off, and priming
them with Tamiya 87042 (Gray) surface primer. Thanks to the print being really
good – kudos to 3D Hubs Hubs Protolabs – I didn’t have a lot of work
sanding and priming it. However, given that I was stuck in the rainy season and,
at some point, ran out of materials, which I then had to order/forward to me, it
took weeks to complete.
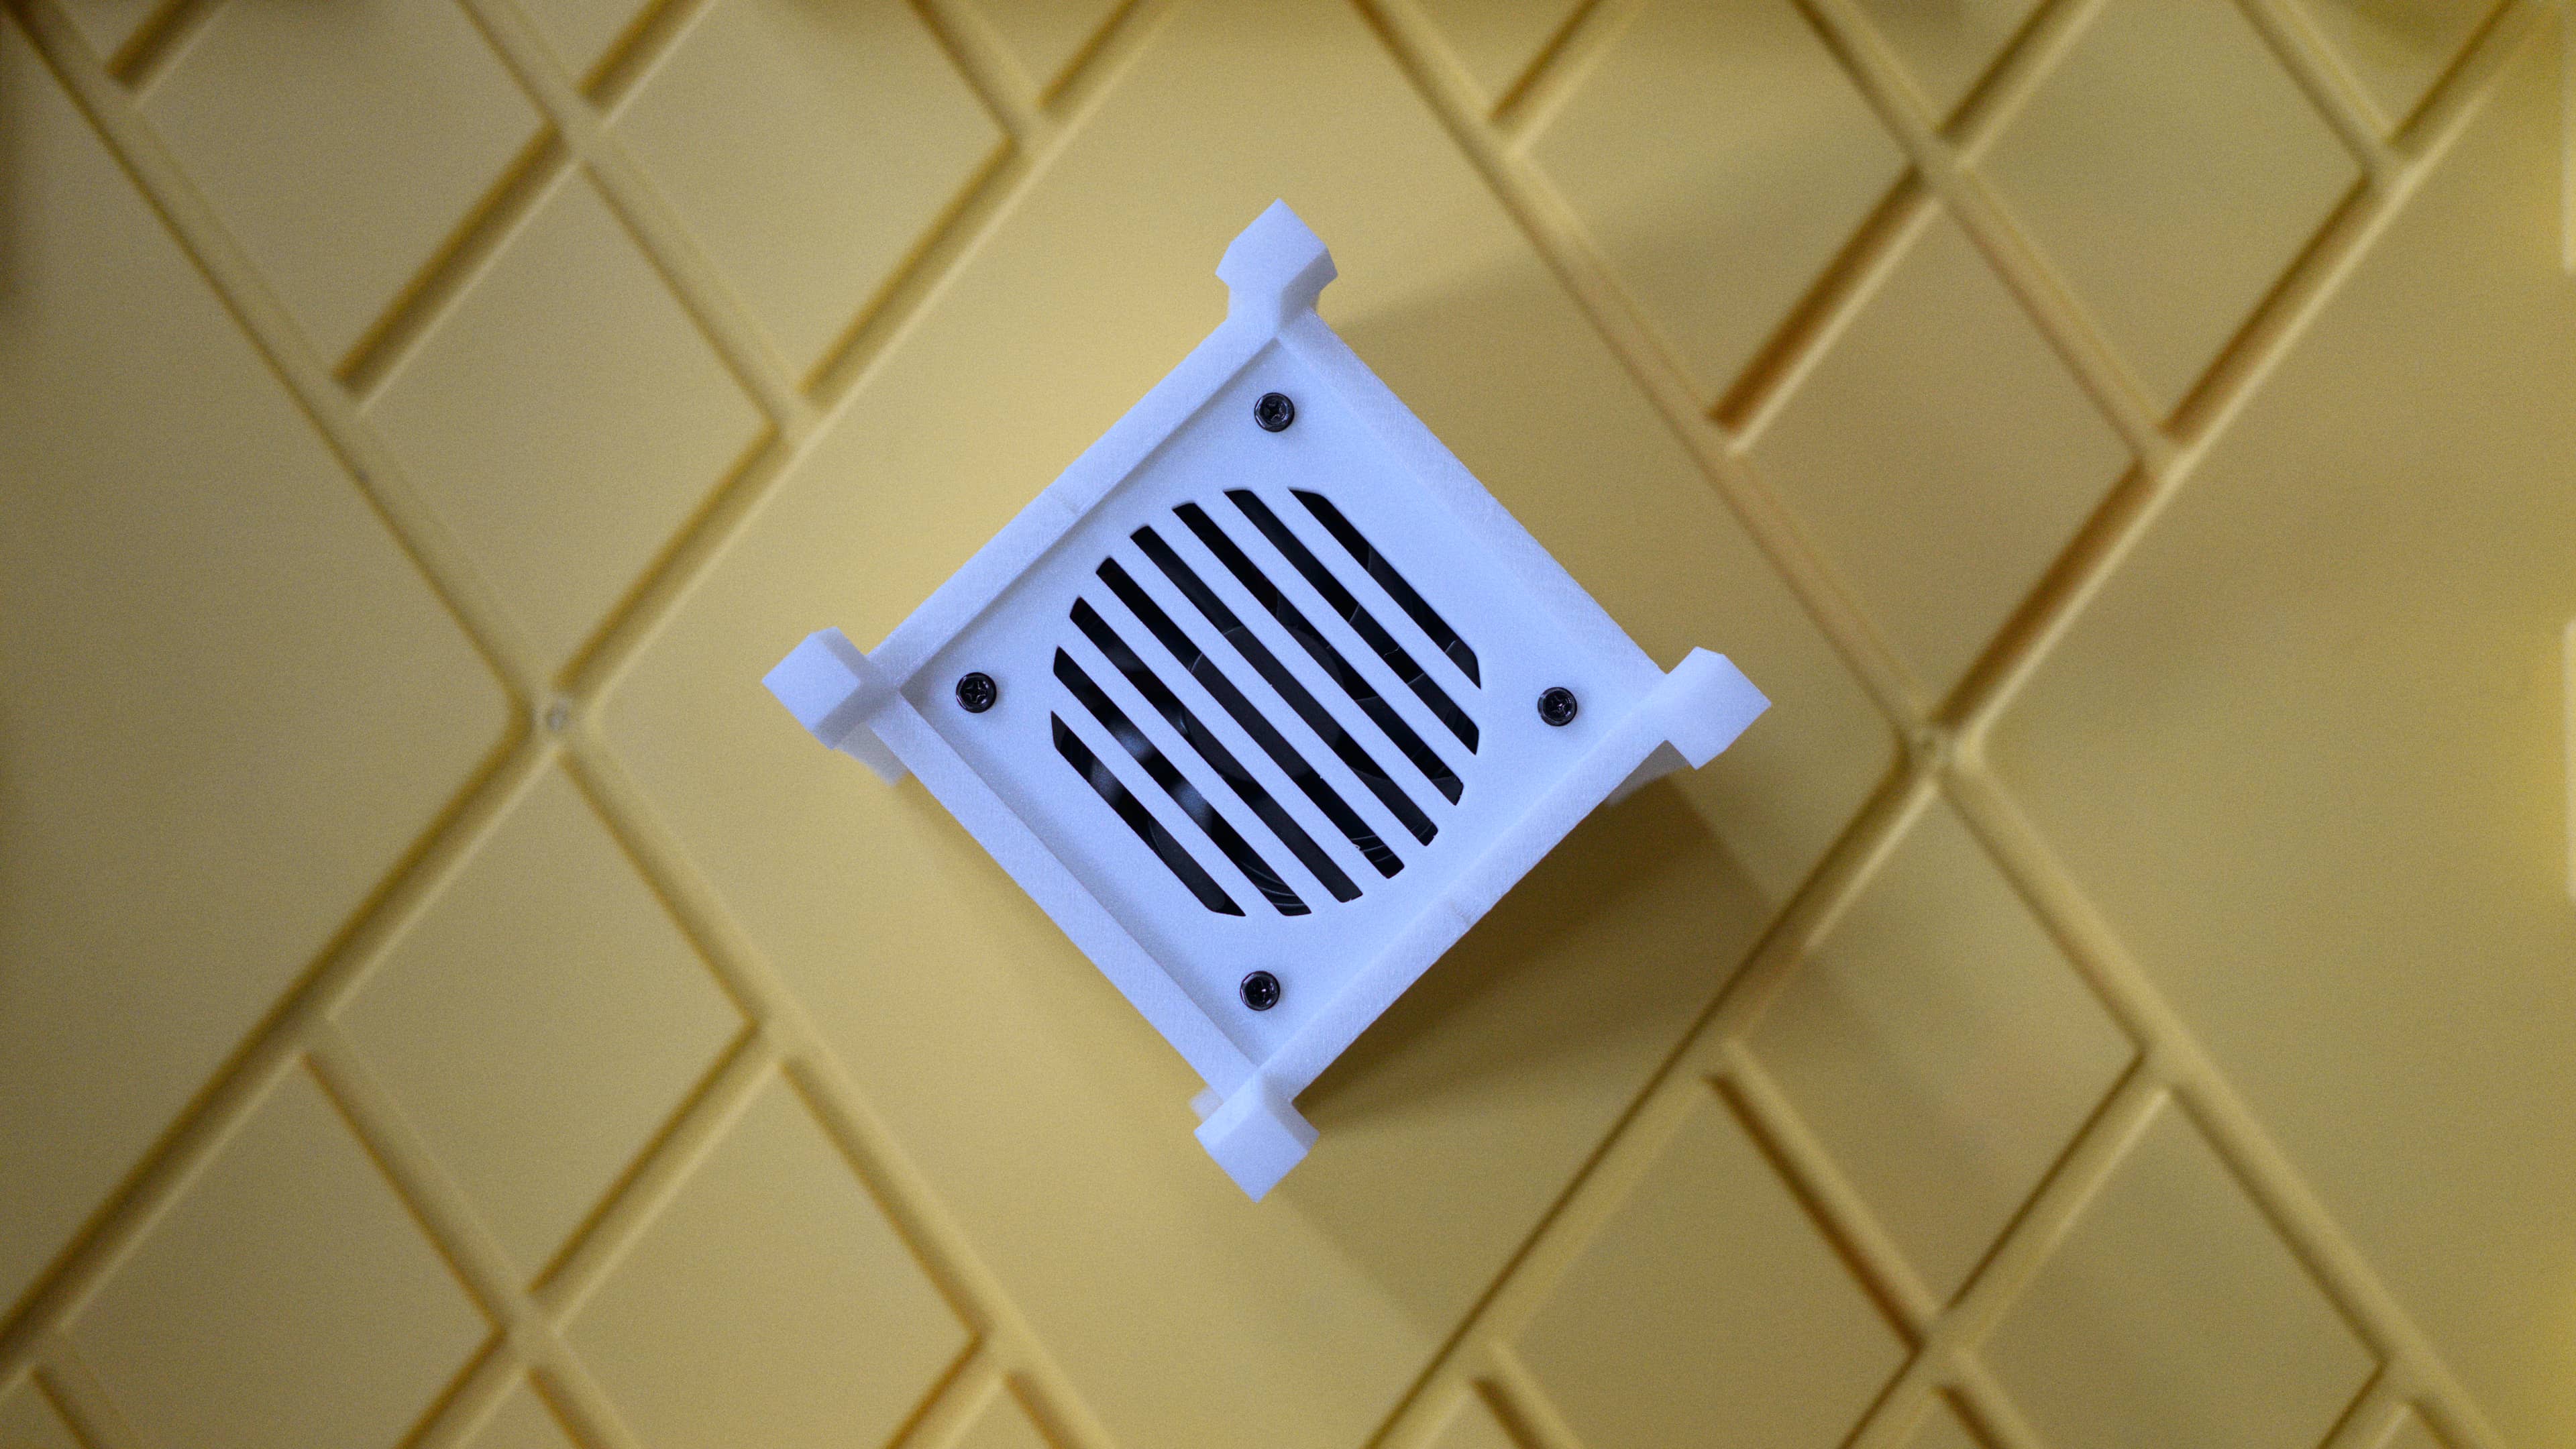
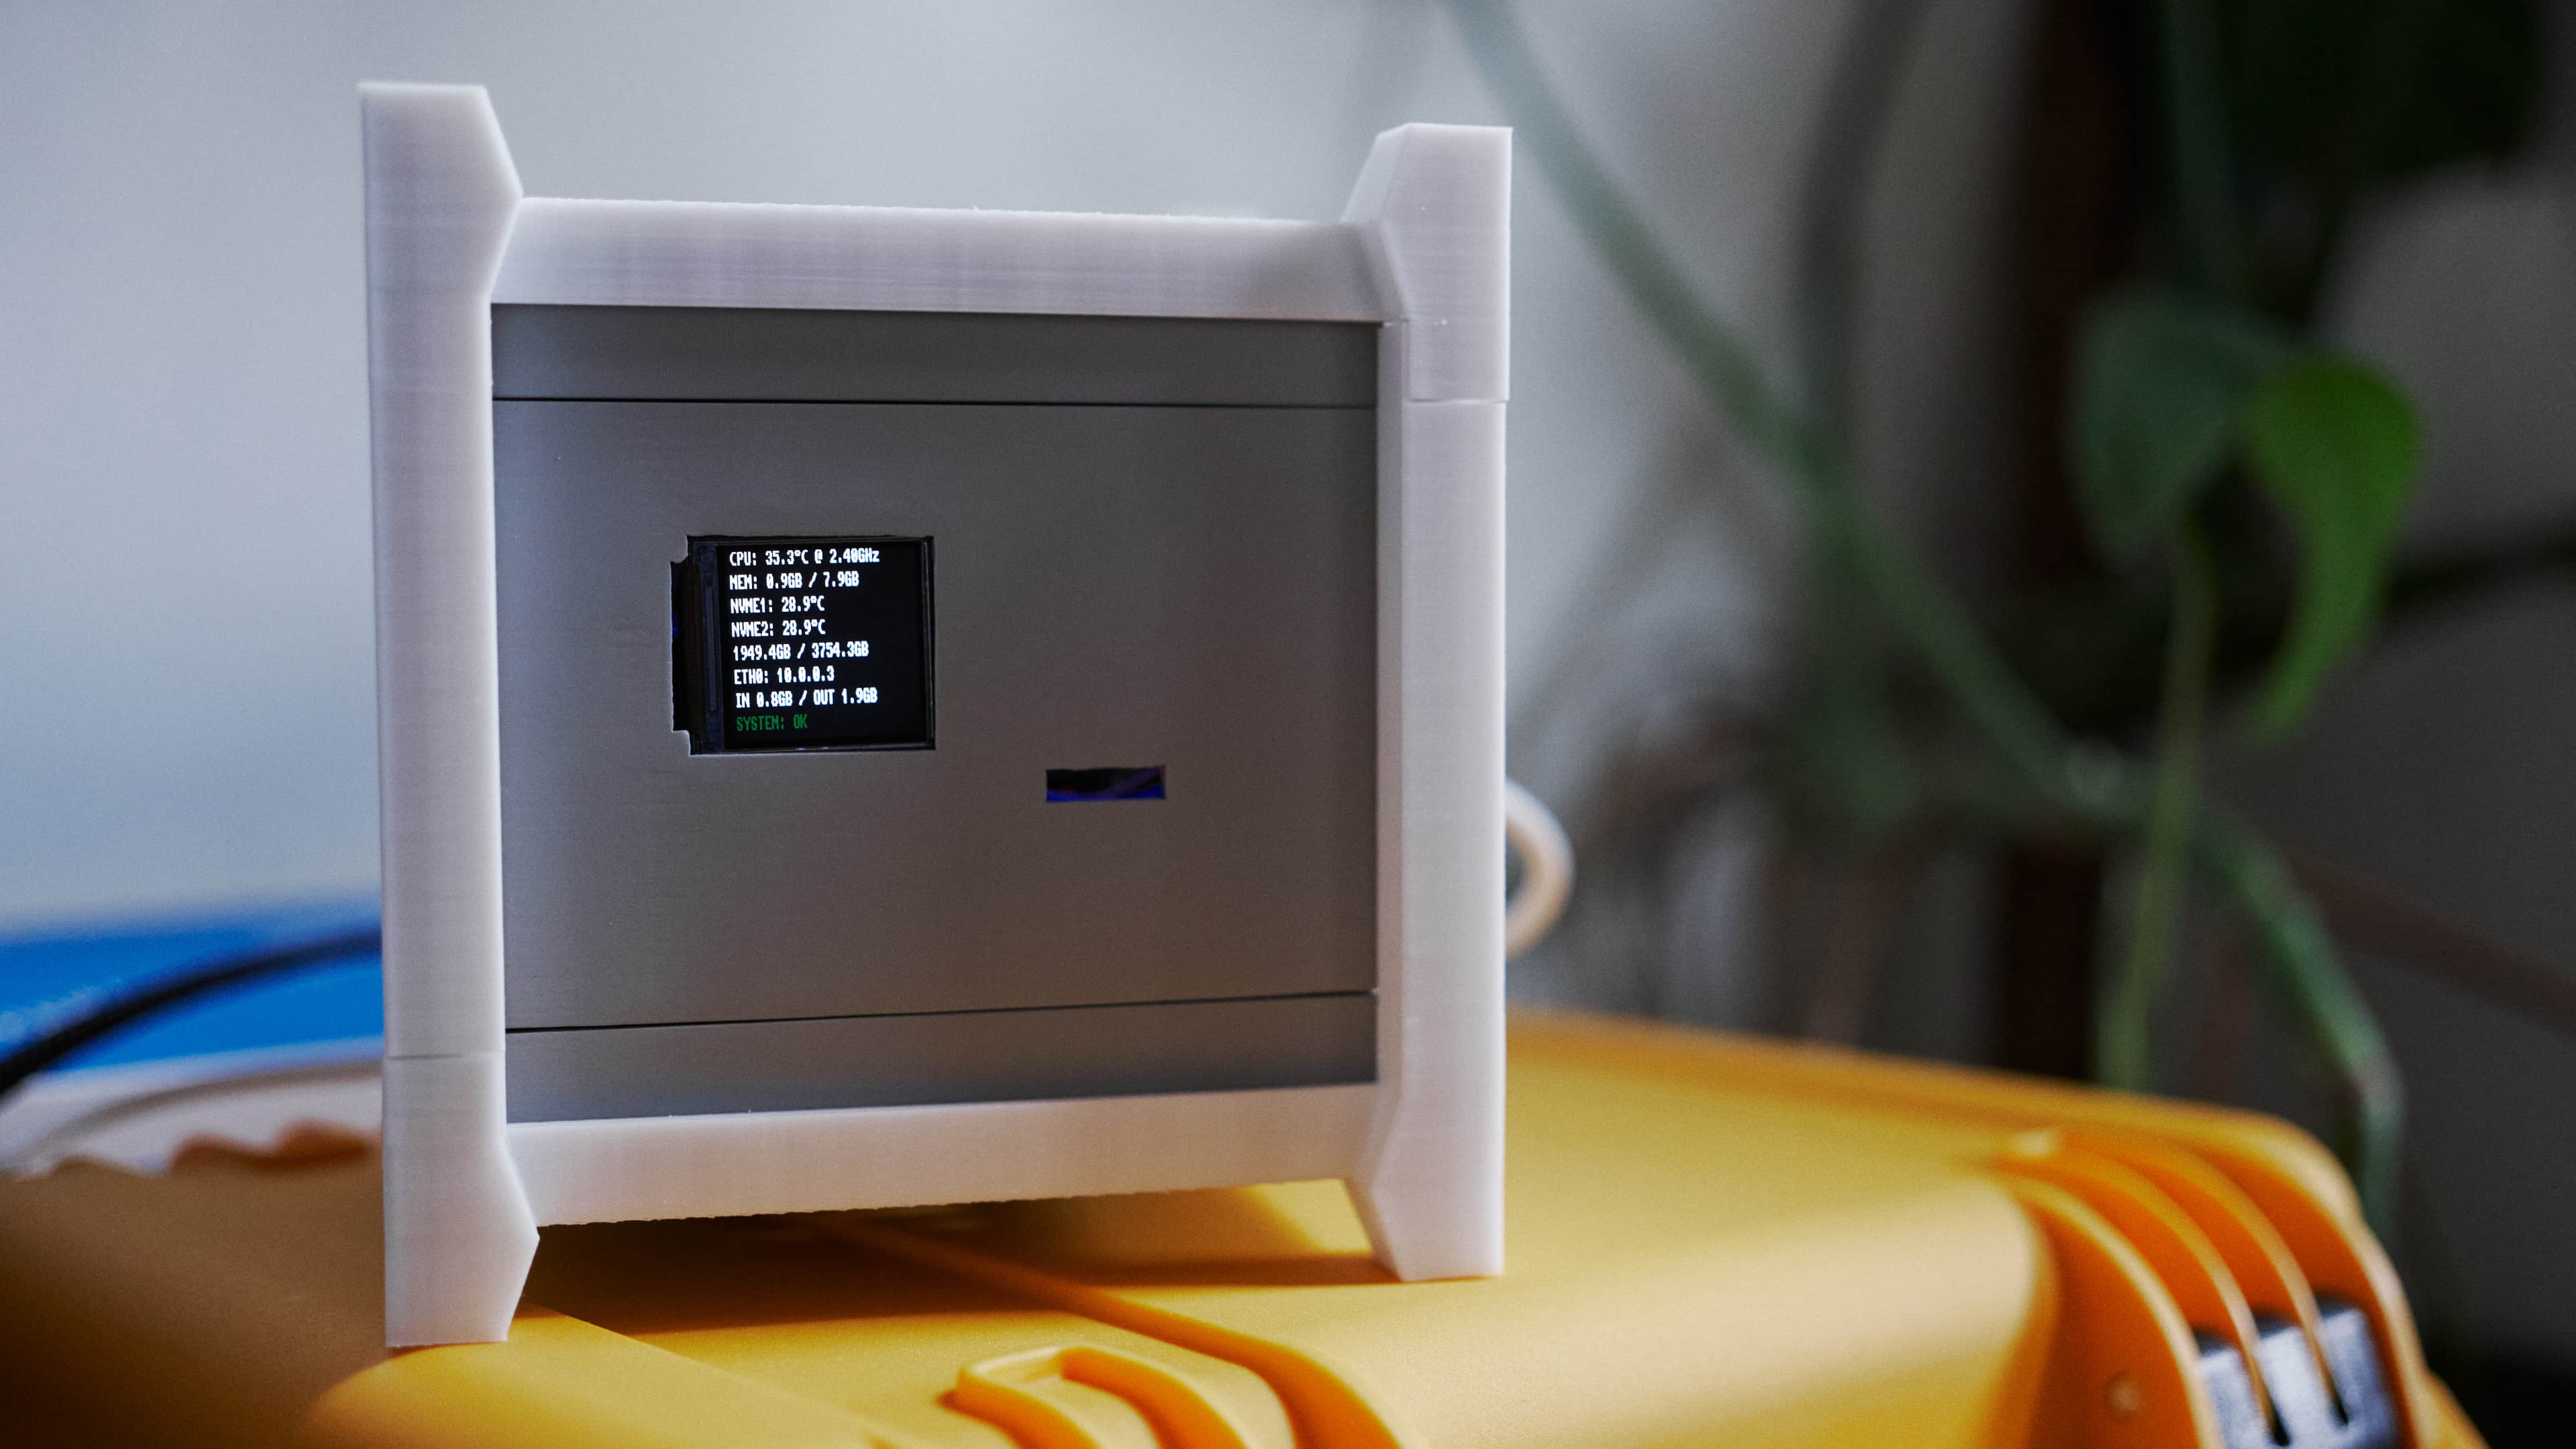
Paint
I began to spray paint the device in the same Tamiya TS-81 Royal Light Grey that I used for the original UPDC, as well as the Kunai – mainly because ordering spray cans is quite tedious and requires me to have them sent via container ship, which takes a long time. However, because I ran out of TS-81 while simultaneously working on the keyboard, I decided to not only order more TS-81, but also some TS-56, which on the pictures online appeared like a strong, not too bright yellow-orange color. Unfortunately, it turned out to look dull and not yellow at all. Hence, I instead continued with TS-81.
After I had a few solid layers of paint on the box, I finished it up using clear matte TS-80. Even though the paint job turned out significantly better than the one on the Kunai – mainly due to the simpler shape and better 3D print quality – I will eventually stickerbomb the device nevertheless.
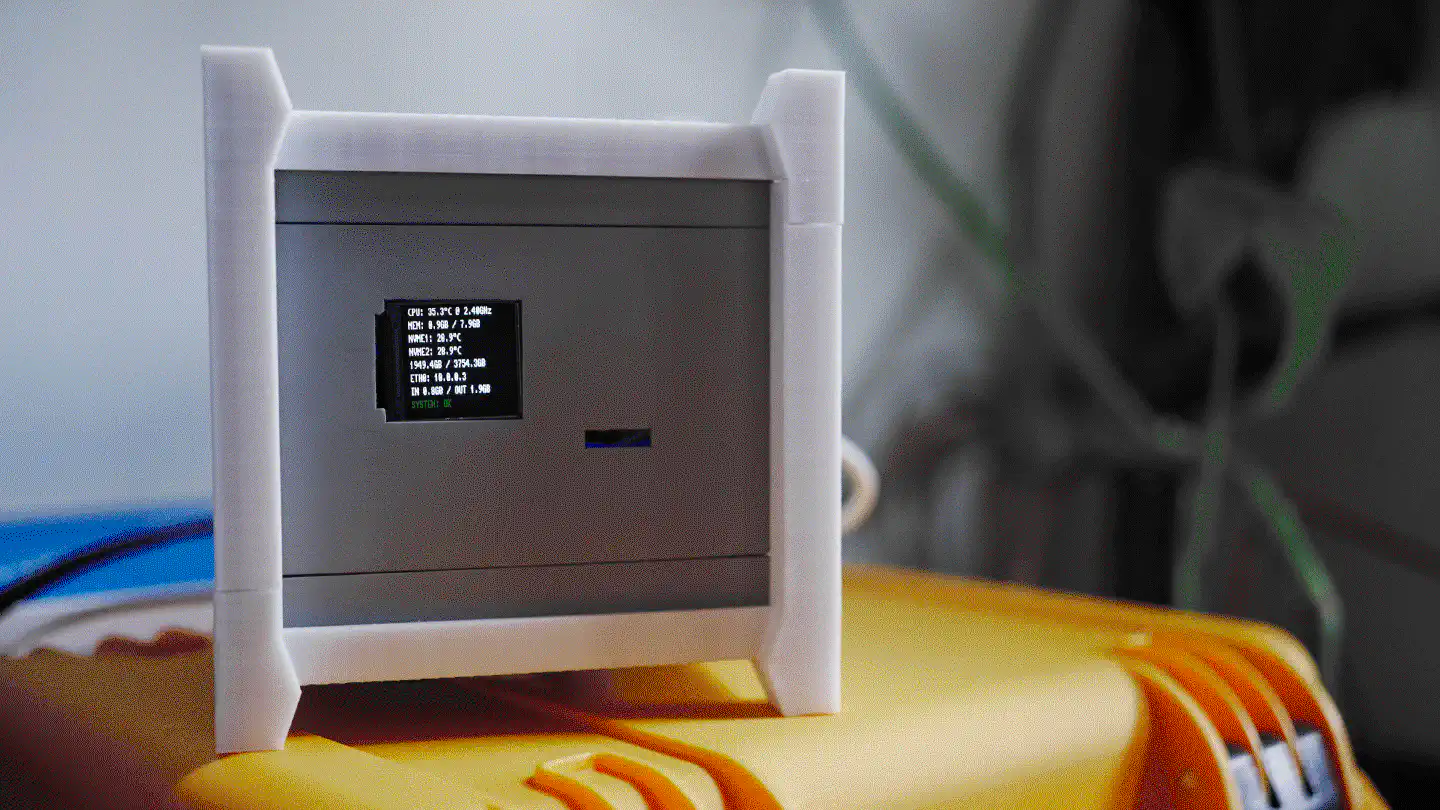
Sensors & display
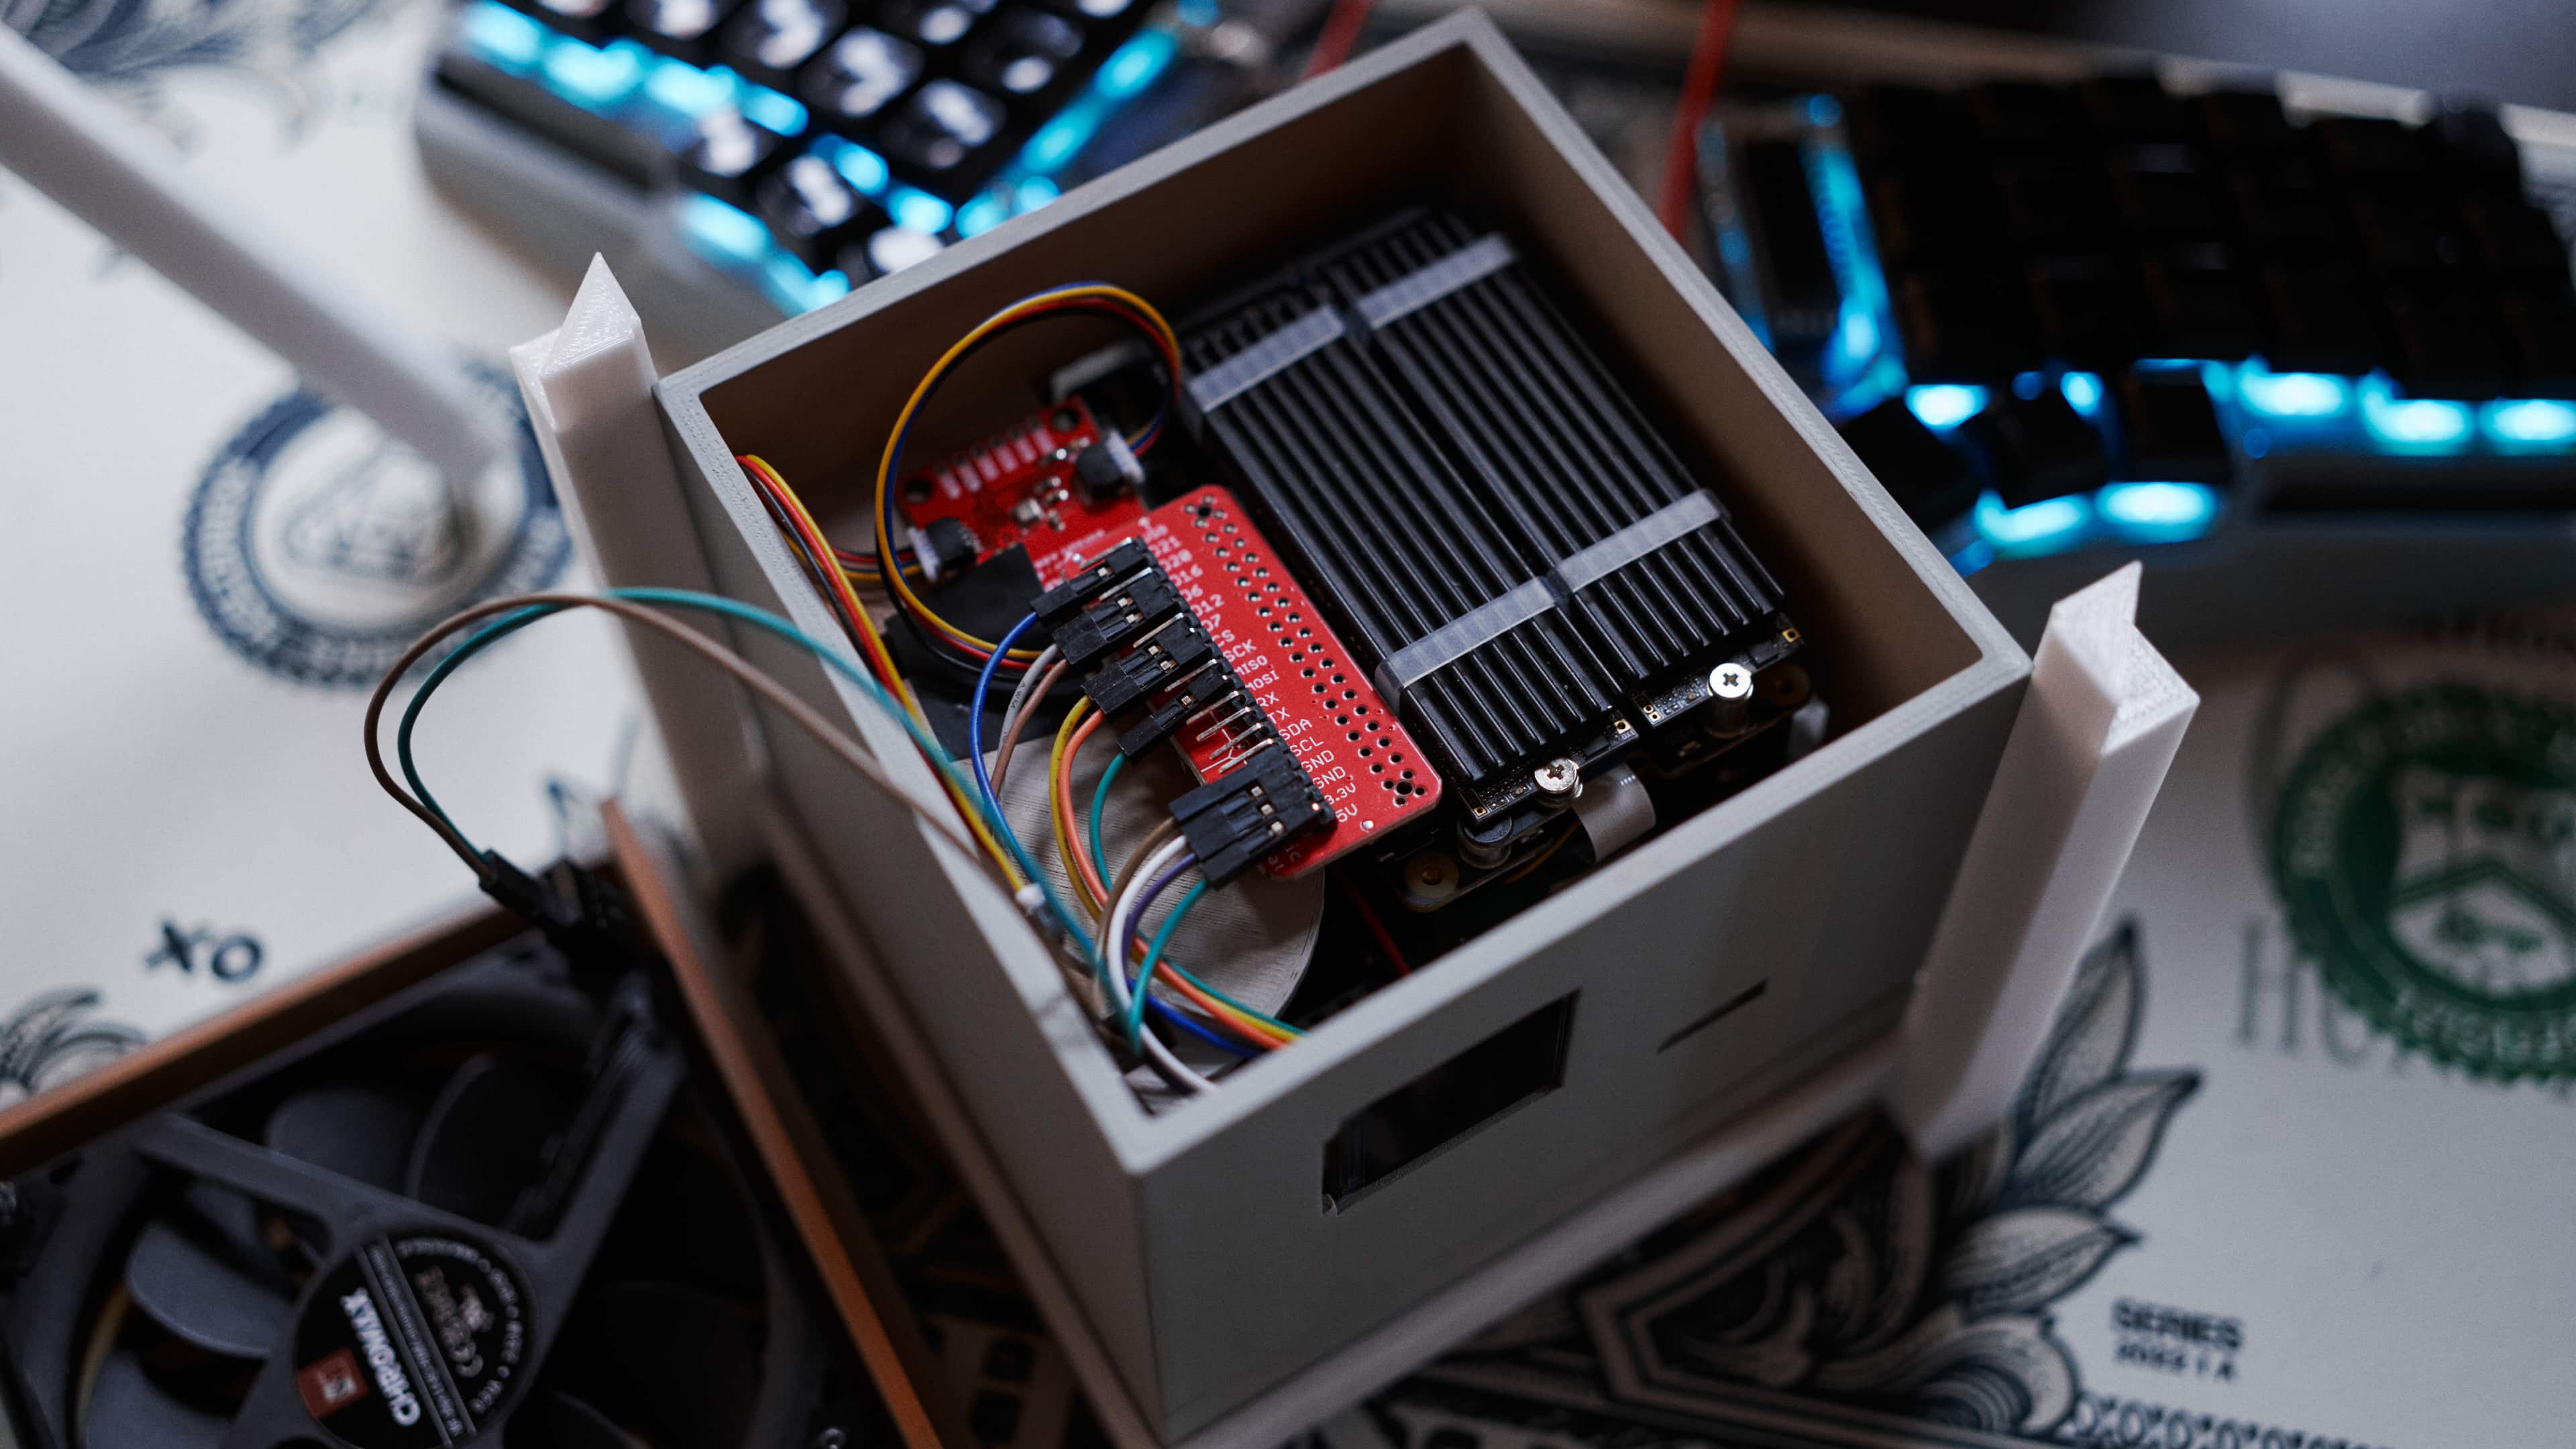
Jumping back into the tech side of things, the photos already gave away that the UPDC not only contains the Raspberry Pi 5, the Geekworm components, and the NVMe drives but also a few red PCBs (breakouts) and a display. The breakouts contain different sensors, precisely the Bosch BMI270 6DoF IMU, and the Bosch BME688 4-in-1 air quality and specific gas sensor. In addition, there is a AMG8833 IR thermal camera breakout mounted underneath the Geekworm X1202, pointing upwards onto the 18650 battery array. The display is a Waveshare ST7789 1.3" LCD.
I initially tried to add a RFM9x LoRa module to the setup as well, so I could
use the UPDC as a Meshtastic router. However, Meshtastic support for native
Linux hardware is relatively meh right now, and the
documentation for how to wire and configure the RFM9x sucks. For example, there
is no info on what Busy is supposed to be connected to, and
only after hours of research, it appears that it’s supposed to be connected to
DIO1, which appears to be G1 on the Adafruit RFM9x breakout that I have
around. However, with the Waveshare display already connected to SPI, I simply
couldn’t get the RFM9x and meshtasticd to work alongside of it and eventually
gave it up. If I had gotten the RFM9x to work with meshtasticd, I would have
also added the ublox SAM-M8Q breakout via UART, so the Meshtastic node would
have had GPS information available to it.

The display is powered using a custom-built Python script that I’m running via
supervisord. The script also uses Bosch’s proprietary BSEC2 binary library to
run the BME688 and it also reads the BMI270. I’m using the Cython VQF library
to calculate the 6D quaternion and find out how the device is currently
positioned so that I can rotate the display output accordingly. This way it’s
possible to place the UPDC in either orientation while still being able to read
the display. Additionally, the script integrates code from the
suptronics X120x repository, which it uses to read monitoring data
from the X1202. It integrates a routine that continuously checks the battery
levels and initiates a clean system shutdown if needed.

The script also outputs specific system data, as well as environmental data from the BME688, as well as power data from the X1202 as metrics that are being collected by Prometheus and displayed through Grafana. I haven’t published the script anywhere as it is specifically built for this use case and probably nobody else has a use for it anyway. However, if you happen to casually run a Waveshare ST7789 with a BME688, a BMI270 and an AMG8833 on a Raspberry Pi let me know and I can e-mail you the Python file.
In addition, I’m running rpi_export on the Raspberry Pi, to be
able to export the stats that can be queried through the vcgencmd to
Prometheus. I could have integrated system calls to the binary into my Python
script and parsed the output, but I preferred a cleaner solution. rpi_exporter
is a Go daemon that interfaces directly with the Pi’s VideoCore device.
Unfortunately, the project doesn’t seem like it’s actively maintained and
currently suffers from an issue on the Raspberry Pi 5, which I
was able to work around through.
I was running rpi_export, but when I did, the Raspberry began
crashing frequently. I didn’t have time to investigate whether it was an issue
of rpi_export specifically or maybe just a side effect of some sort. Ever
since I turned it off, the Pi went back to running 24/7 without any issues.
Honeymoon phase came to an end
After a few days of continuously running the build, however, I saw the red LED
on the inner NVMe flashing periodically. When checking dmesg, I encountered
the following output:
nvme nvme0: I/O 877 (I/O Cmd) QID 1 timeout, aborting
nvme nvme0: Abort status: 0x0
nvme nvme0: I/O 877 QID 1 timeout, reset controller
INFO: task md127_raid1:205 blocked for more than 120 seconds.
      Tainted: G         C         6.6.20+rpt-rpi-2712 #1 Debian 1:6.6.20-1+rpt1
"echo 0 > /proc/sys/kernel/hung_task_timeout_secs" disables this message.
task:md127_raid1     state:D stack:0     pid:205   ppid:2      flags:0x00000008
Call trace:
 __switch_to+0xe8/0x168
 __schedule+0x380/0xd70
 schedule+0x64/0x108
 md_super_wait+0xc0/0xf8 [md_mod]
 write_sb_page+0x154/0x350 [md_mod]
 md_bitmap_update_sb.part.0+0x158/0x170 [md_mod]
 md_bitmap_update_sb+0x2c/0x48 [md_mod and the device is completely reboot proof
 and ready within seconds after connecting it to power.
 md_update_sb+0x2d0/0x908 [md_mod]
 md_check_recovery+0x464/0x838 [md_mod]
 raid1d+0x68/0x1c68 [raid1]
 md_thread+0xb4/0x1c0 [md_mod]
 kthread+0x11c/0x128
 ret_from_fork+0x10/0x20
INFO: task dmcrypt_write/2:726 blocked for more than 120 seconds.
      Tainted: G         C         6.6.20+rpt-rpi-2712 #1 Debian 1:6.6.20-1+rpt1
"echo 0 > /proc/sys/kernel/hung_task_timeout_secs" disables this message.
task:dmcrypt_write/2 state:D stack:0     pid:726   ppid:2      flags:0x00000008
Call trace:
 __switch_to+0xe8/0x168
 __schedule+0x380/0xd70
 schedule+0x64/0x108
 md_write_start+0xd0/0x278 [md_mod]
 raid1_make_request+0x78/0xd08 [raid1]
 md_handle_request+0x174/0x258 [md_mod]
 md_submit_bio+0x7c/0xc0 [md_mod]
 __submit_bio+0xd0/0x160
 submit_bio_noacct_nocheck+0x114/0x318
 submit_bio_noacct+0x168/0x480
 dm_submit_bio_remap+0x54/0xf8 [dm_mod]
 dmcrypt_write+0x128/0x150 [dm_crypt]
 kthread+0x11c/0x128
 ret_from_fork+0x10/0x20
INFO: task jbd2/dm-0-8:743 blocked for more than 120 seconds.
      Tainted: G         C         6.6.20+rpt-rpi-2712 #1 Debian 1:6.6.20-1+rpt1
"echo 0 > /proc/sys/kernel/hung_task_timeout_secs" disables this message.
task:jbd2/dm-0-8     state:D stack:0     pid:743   ppid:2      flags:0x00000008
Call trace:
 __switch_to+0xe8/0x168
 __schedule+0x380/0xd70
 schedule+0x64/0x108
 io_schedule+0x44/0x68
 folio_wait_bit_common+0x16c/0x3c0
 folio_wait_bit+0x20/0x38
 folio_wait_writeback+0x5c/0xd8
 __filemap_fdatawait_range+0x94/0x118
 filemap_fdatawait_range_keep_errors+0x20/0x58
 jbd2_journal_finish_inode_data_buffers+0x28/0x40
 ext4_journal_finish_inode_data_buffers+0x44/0x60
 jbd2_journal_commit_transaction+0x9d8/0x1a60
 kjournald2+0xc0/0x270
 kthread+0x11c/0x128
 ret_from_fork+0x10/0x20
INFO: task syncthing:986 blocked for more than 120 seconds.
      Tainted: G         C         6.6.20+rpt-rpi-2712 #1 Debian 1:6.6.20-1+rpt1
"echo 0 > /proc/sys/kernel/hung_task_timeout_secs" disables this message.
task:syncthing       state:D stack:0     pid:986   ppid:943    flags:0x00000804
Call trace:
 __switch_to+0xe8/0x168
 __schedule+0x380/0xd70
 schedule+0x64/0x108
 io_schedule+0x44/0x68
 bit_wait_io+0x20/0x88
 __wait_on_bit+0x58/0x180
 out_of_line_wait_on_bit+0x8c/0xc0
 do_get_write_access+0x2ec/0x498
 jbd2_journal_get_write_access+0x8c/0xd8
 __ext4_journal_get_write_access+0x74/0x1b0
 ext4_reserve_inode_write+0xac/0x108
 __ext4_mark_inode_dirty+0x64/0x2a0
 ext4_dirty_inode+0x6c/0x98
 __mark_inode_dirty+0x60/0x420
 generic_update_time+0x54/0x70
 touch_atime+0x1bc/0x220
 iterate_dir+0x108/0x198
 __arm64_sys_getdents64+0x74/0x160
 invoke_syscall+0x50/0x128
 el0_svc_common.constprop.0+0xc8/0xf0
 do_el0_svc+0x24/0x38
 el0_svc+0x40/0xe8
 el0t_64_sync_handler+0x100/0x130
 el0t_64_sync+0x190/0x198
INFO: task .NET ThreadPool:14362 blocked for more than 120 seconds.
      Tainted: G         C         6.6.20+rpt-rpi-2712 #1 Debian 1:6.6.20-1+rpt1
"echo 0 > /proc/sys/kernel/hung_task_timeout_secs" disables this message.
task:.NET ThreadPool state:D stack:0     pid:14362 ppid:4200   flags:0x00000808
Call trace:
 __switch_to+0xe8/0x168
 __schedule+0x380/0xd70
 schedule+0x64/0x108
 io_schedule+0x44/0x68
 folio_wait_bit_common+0x16c/0x3c0
 folio_wait_bit+0x20/0x38
 folio_wait_writeback+0x5c/0xd8
 __filemap_fdatawait_range+0x94/0x118
 file_write_and_wait_range+0xb0/0xe8
 ext4_sync_file+0x7c/0x3e0
 vfs_fsync_range+0x3c/0x90
 do_fsync+0x48/0x98
 __arm64_sys_fsync+0x20/0x38
 invoke_syscall+0x50/0x128
 el0_svc_common.constprop.0+0xc8/0xf0
 do_el0_svc+0x24/0x38
 el0_svc+0x40/0xe8
 el0t_64_sync_handler+0x100/0x130
 el0t_64_sync+0x190/0x198
INFO: task .NET ThreadPool:15124 blocked for more than 120 seconds.
      Tainted: G         C         6.6.20+rpt-rpi-2712 #1 Debian 1:6.6.20-1+rpt1
"echo 0 > /proc/sys/kernel/hung_task_timeout_secs" disables this message.
task:.NET ThreadPool state:D stack:0     pid:15124 ppid:4200   flags:0x00000800
Call trace:
 __switch_to+0xe8/0x168
 __schedule+0x380/0xd70
 schedule+0x64/0x108
 io_schedule+0x44/0x68
 folio_wait_bit_common+0x16c/0x3c0
 folio_wait_bit+0x20/0x38
 folio_wait_writeback+0x5c/0xd8
 __filemap_fdatawait_range+0x94/0x118
 file_write_and_wait_range+0xb0/0xe8
 ext4_sync_file+0x7c/0x3e0
 vfs_fsync_range+0x3c/0x90
 do_fsync+0x48/0x98
 __arm64_sys_fsync+0x20/0x38
 invoke_syscall+0x50/0x128
 el0_svc_common.constprop.0+0xc8/0xf0
 do_el0_svc+0x24/0x38
 el0_svc+0x40/0xe8
 el0t_64_sync_handler+0x100/0x130
 el0t_64_sync+0x190/0x198
INFO: task kworker/u11:0:5292 blocked for more than 120 seconds.
      Tainted: G         C         6.6.20+rpt-rpi-2712 #1 Debian 1:6.6.20-1+rpt1
"echo 0 > /proc/sys/kernel/hung_task_timeout_secs" disables this message.
task:kworker/u11:0   state:D stack:0     pid:5292  ppid:2      flags:0x00000008
Workqueue: writeback wb_workfn (flush-253:0)
Call trace:
 __switch_to+0xe8/0x168
 __schedule+0x380/0xd70
 schedule+0x64/0x108
 io_schedule+0x44/0x68
 bit_wait_io+0x20/0x88
 __wait_on_bit+0x58/0x180
 out_of_line_wait_on_bit+0x8c/0xc0
 do_get_write_access+0x2ec/0x498
 jbd2_journal_get_write_access+0x8c/0xd8
 __ext4_journal_get_write_access+0x74/0x1b0
 ext4_reserve_inode_write+0xac/0x108
 __ext4_mark_inode_dirty+0x64/0x2a0
 __ext4_ext_dirty+0xbc/0x100
 ext4_split_extent_at+0x334/0x458
 ext4_split_extent+0xe8/0x1b0
 ext4_ext_map_blocks+0xfcc/0x1770
 ext4_map_blocks+0x1a0/0x5a8
 ext4_do_writepages+0x748/0xbe0
 ext4_writepages+0x80/0x108
 do_writepages+0x90/0x1d8
 __writeback_single_inode+0x4c/0x4d8
 writeback_sb_inodes+0x200/0x488
 __writeback_inodes_wb+0x58/0x120
 wb_writeback+0x2f4/0x3b8
 wb_workfn+0x430/0x5c0
 process_one_work+0x148/0x3b8
 worker_thread+0x32c/0x450
 kthread+0x11c/0x128
 ret_from_fork+0x10/0x20
INFO: task podman:15448 blocked for more than 120 seconds.
      Tainted: G         C         6.6.20+rpt-rpi-2712 #1 Debian 1:6.6.20-1+rpt1
"echo 0 > /proc/sys/kernel/hung_task_timeout_secs" disables this message.
task:podman          state:D stack:0     pid:15448 ppid:4104   flags:0x00000004
Call trace:
 __switch_to+0xe8/0x168
 __schedule+0x380/0xd70
 schedule+0x64/0x108
 io_schedule+0x44/0x68
 bit_wait_io+0x20/0x88
 __wait_on_bit+0x58/0x180
 out_of_line_wait_on_bit+0x8c/0xc0
 do_get_write_access+0x2ec/0x498
 jbd2_journal_get_write_access+0x8c/0xd8
 __ext4_journal_get_write_access+0x74/0x1b0
 __ext4_new_inode+0x744/0x1428
 ext4_create+0xe8/0x218
 path_openat+0xcd4/0xf18
 do_filp_open+0xa4/0x160
 do_sys_openat2+0xc8/0xf8
 __arm64_sys_openat+0x6c/0xb8
 invoke_syscall+0x50/0x128
 el0_svc_common.constprop.0+0x48/0xf0
 do_el0_svc+0x24/0x38
 el0_svc+0x40/0xe8
 el0t_64_sync_handler+0x100/0x130
 el0t_64_sync+0x190/0x198
nvme nvme0: Device not ready; aborting reset, CSTS=0x1
INFO: task md127_raid1:205 blocked for more than 241 seconds.
      Tainted: G         C         6.6.20+rpt-rpi-2712 #1 Debian 1:6.6.20-1+rpt1
"echo 0 > /proc/sys/kernel/hung_task_timeout_secs" disables this message.
task:md127_raid1     state:D stack:0     pid:205   ppid:2      flags:0x00000008
Call trace:
 __switch_to+0xe8/0x168
 __schedule+0x380/0xd70
 schedule+0x64/0x108
 md_super_wait+0xc0/0xf8 [md_mod]
 write_sb_page+0x154/0x350 [md_mod]
 md_bitmap_update_sb.part.0+0x158/0x170 [md_mod]
 md_bitmap_update_sb+0x2c/0x48 [md_mod]
 md_update_sb+0x2d0/0x908 [md_mod]
 md_check_recovery+0x464/0x838 [md_mod]
 raid1d+0x68/0x1c68 [raid1]
 md_thread+0xb4/0x1c0 [md_mod]
 kthread+0x11c/0x128
 ret_from_fork+0x10/0x20
INFO: task dmcrypt_write/2:726 blocked for more than 241 seconds.
      Tainted: G         C         6.6.20+rpt-rpi-2712 #1 Debian 1:6.6.20-1+rpt1
"echo 0 > /proc/sys/kernel/hung_task_timeout_secs" disables this message.
task:dmcrypt_write/2 state:D stack:0     pid:726   ppid:2      flags:0x00000008
Call trace:
 __switch_to+0xe8/0x168
 __schedule+0x380/0xd70
 schedule+0x64/0x108
 md_write_start+0xd0/0x278 [md_mod]
 raid1_make_request+0x78/0xd08 [raid1]
 md_handle_request+0x174/0x258 [md_mod]
 md_submit_bio+0x7c/0xc0 [md_mod]
 __submit_bio+0xd0/0x160
 submit_bio_noacct_nocheck+0x114/0x318
 submit_bio_noacct+0x168/0x480
 dm_submit_bio_remap+0x54/0xf8 [dm_mod]
 dmcrypt_write+0x128/0x150 [dm_crypt]
 kthread+0x11c/0x128
 ret_from_fork+0x10/0x20
Future hung task reports are suppressed, see sysctl kernel.hung_task_warnings
nvme nvme0: Device not ready; aborting reset, CSTS=0x1
nvme nvme0: Disabling device after reset failure: -19
I/O error, dev nvme0n1, sector 2261172136 op 0x0:(READ) flags 0x0 phys_seg 3 prio class 2
md: super_written gets error=-5
md/raid1:md127: nvme0n1p1: rescheduling sector 2260905896
md/raid1:md127: Disk failure on nvme0n1p1, disabling device.
                md/raid1:md127: Operation continuing on 1 devices.
md/raid1:md127: redirecting sector 2260905896 to other mirror: nvme1n1p1

It appeared as if the NVMe had died (it didn’t). I turned off the device, cut
the power, reconnected it, and powered it back on. The NVMe was back online and
mdadm performed a rebuild of the RAID. Upon checking I did not find any
corrupted files, however, it reminded me to run a full backup before continuing
the investigation.
The error appeared to be due to the NVMe entering a power state (Autonomous
Power State Transition/APST) that renders it unusable until the system is
reset. In order to prevent this from happening, I adjusted
/boot/firmware/cmdline.txt and added the kernel parameter
nvme_core.default_ps_max_latency_us=0:
root@h4nk4-m:~# cat /boot/firmware/cmdline.txt
console=serial0,115200 console=tty1 root=PARTUUID=e5d7f358-02 rootfstype=ext4 fsck.repair=yes rootwait nvme_core.default_ps_max_latency_us=0
After rebooting I was able to verify that APST was disabled using
nvme error-log /dev/nvme0 and nvme get-feature /dev/nvme0 -f 0x0c -H.
After implementing the change the device has been up and running for nearly a month without this or any other NVMe-related issues happening again.

As for the performance, it indeed isn’t as big of a deal as it seems. All services perform reasonably well and given the fact that the Raspberry Pi 5 only has a Gigabit Ethernet port neither Samba nor Syncthing saturates the (split) PCIe Gen 2 throughput. Disk speed is admittedly not a differentiating factor when compared to the previous 2.5" SMR setup, especially during read operations with four disks plus NVMe cache, and from a financial standpoint the benchmarks also smell a lot like burnt money. However, considering that the second UPDC iteration is a fraction of the size and weight of its predecessor and now truly deserves the title Ultra-Portable, it’s not too bad after all.
TCP: eth0: Driver has suspect GRO implementation, TCP performance may be
compromised.
This was the first time I encountered an RX error, and I will keep investigating what it is about. It might be coincidential and just due to a hickup – or it might be a more serious issue, I don’t know yet.

Portability
The whole cube, with all its hardware but without batteries, totals to 636g. Each half of the optional frame/stand weighs 69g, bringing the device’s weight up to 774g. The special USB power supply adds 178g, leading to a carry-on weight of 952g. One 18650 battery weighs about 42g to 50g, so pessimistically we can add another 200g to the build if we decide to travel with batteries included.
The cube is 114mm in height, width, and depth, making it approximately 1.48L in volume. The frame/stand is 146mm in height and 139mm in width and depth at its longest sides.
With a total of 1152g including the frame/stand, the power supply, and batteries it is comparable to some of the most lightweight and portable NUCs – e.g. the ASUS NUC 13 Pro including its 65W PSU – while offering more (redundant) storage, an integrated UPS, and better tinkerability thanks to the GPIO.
Cost
Here’s a full breakdown of the total cost for the setup:
| Part | Price (USD) |
|---|---|
| Raspberry Pi 8 GB | 85.00 |
| CanaKit 45W USB-C | 19.99 |
| 2 x Teamgroup MP34 4TB | 419.98 |
| Geekworm X1202 | 52.99 |
| Geekworm X1004 | 42.00 |
| Argon THRML 30mm | 8.00 |
| 2 x M.2 heatsinks | 8.99 |
| SparkFun Qwiic HAT | 7.49 |
| SparkFun BMI270 | 14.95 |
| SparkFun BME688 | 24.95 |
| SparkFun Qwiic cable kit | 9.99 |
| Adafruit AMG8833 | 44.95 |
| Waveshare ST7789 1.3" LCD | 9.49 |
| Noctua NF-A9x14 HS-PWM chromax.Black | 21.95 |
| 3D print: Case | 28.69 |
| 3D print: 2 x Cover | 19.16 |
| 3D print: 2 x Stand | 28.84 |
| 2 x TS-81, 1 x TS-80 | 36.11 |
| TOTAL | 883.52 |
Note
Having made a few mistakes along the way I had to reprint some parts, which I did not add to the breakdown. On the other hand, I didn’t order the BMI270 and the AMG8833 specifically for this project, as I already had them around.
While the total amount might seem like a lot, it’s worth noting that it contains the actual storage (2 x 4TB), which, no matter what board/setup one chooses, is expensive af. Leaving that aside, as well as the sensors that I added as a fun project on top of the actual NAS, the boards plus the 3D-printed case cost $325.10 – without the 18650 batteries, that add approximately $25. As I’ve acquired the components over several months, prices might have changed.
In addition, it would have been possible to solder the sensors together using wires and connect them directly to the GPIO header, to spare the costs for the Qwiic HAT and the cable kit. However, as I was looking for an easily repairable build, it was better to keep the items modular. Also, these prices are mostly Amazon US prices. You can most likely find all of the sensors and cables for probably a third of the price on Aliexpress, if you’re able/willing to deal with delivery times.
Next steps
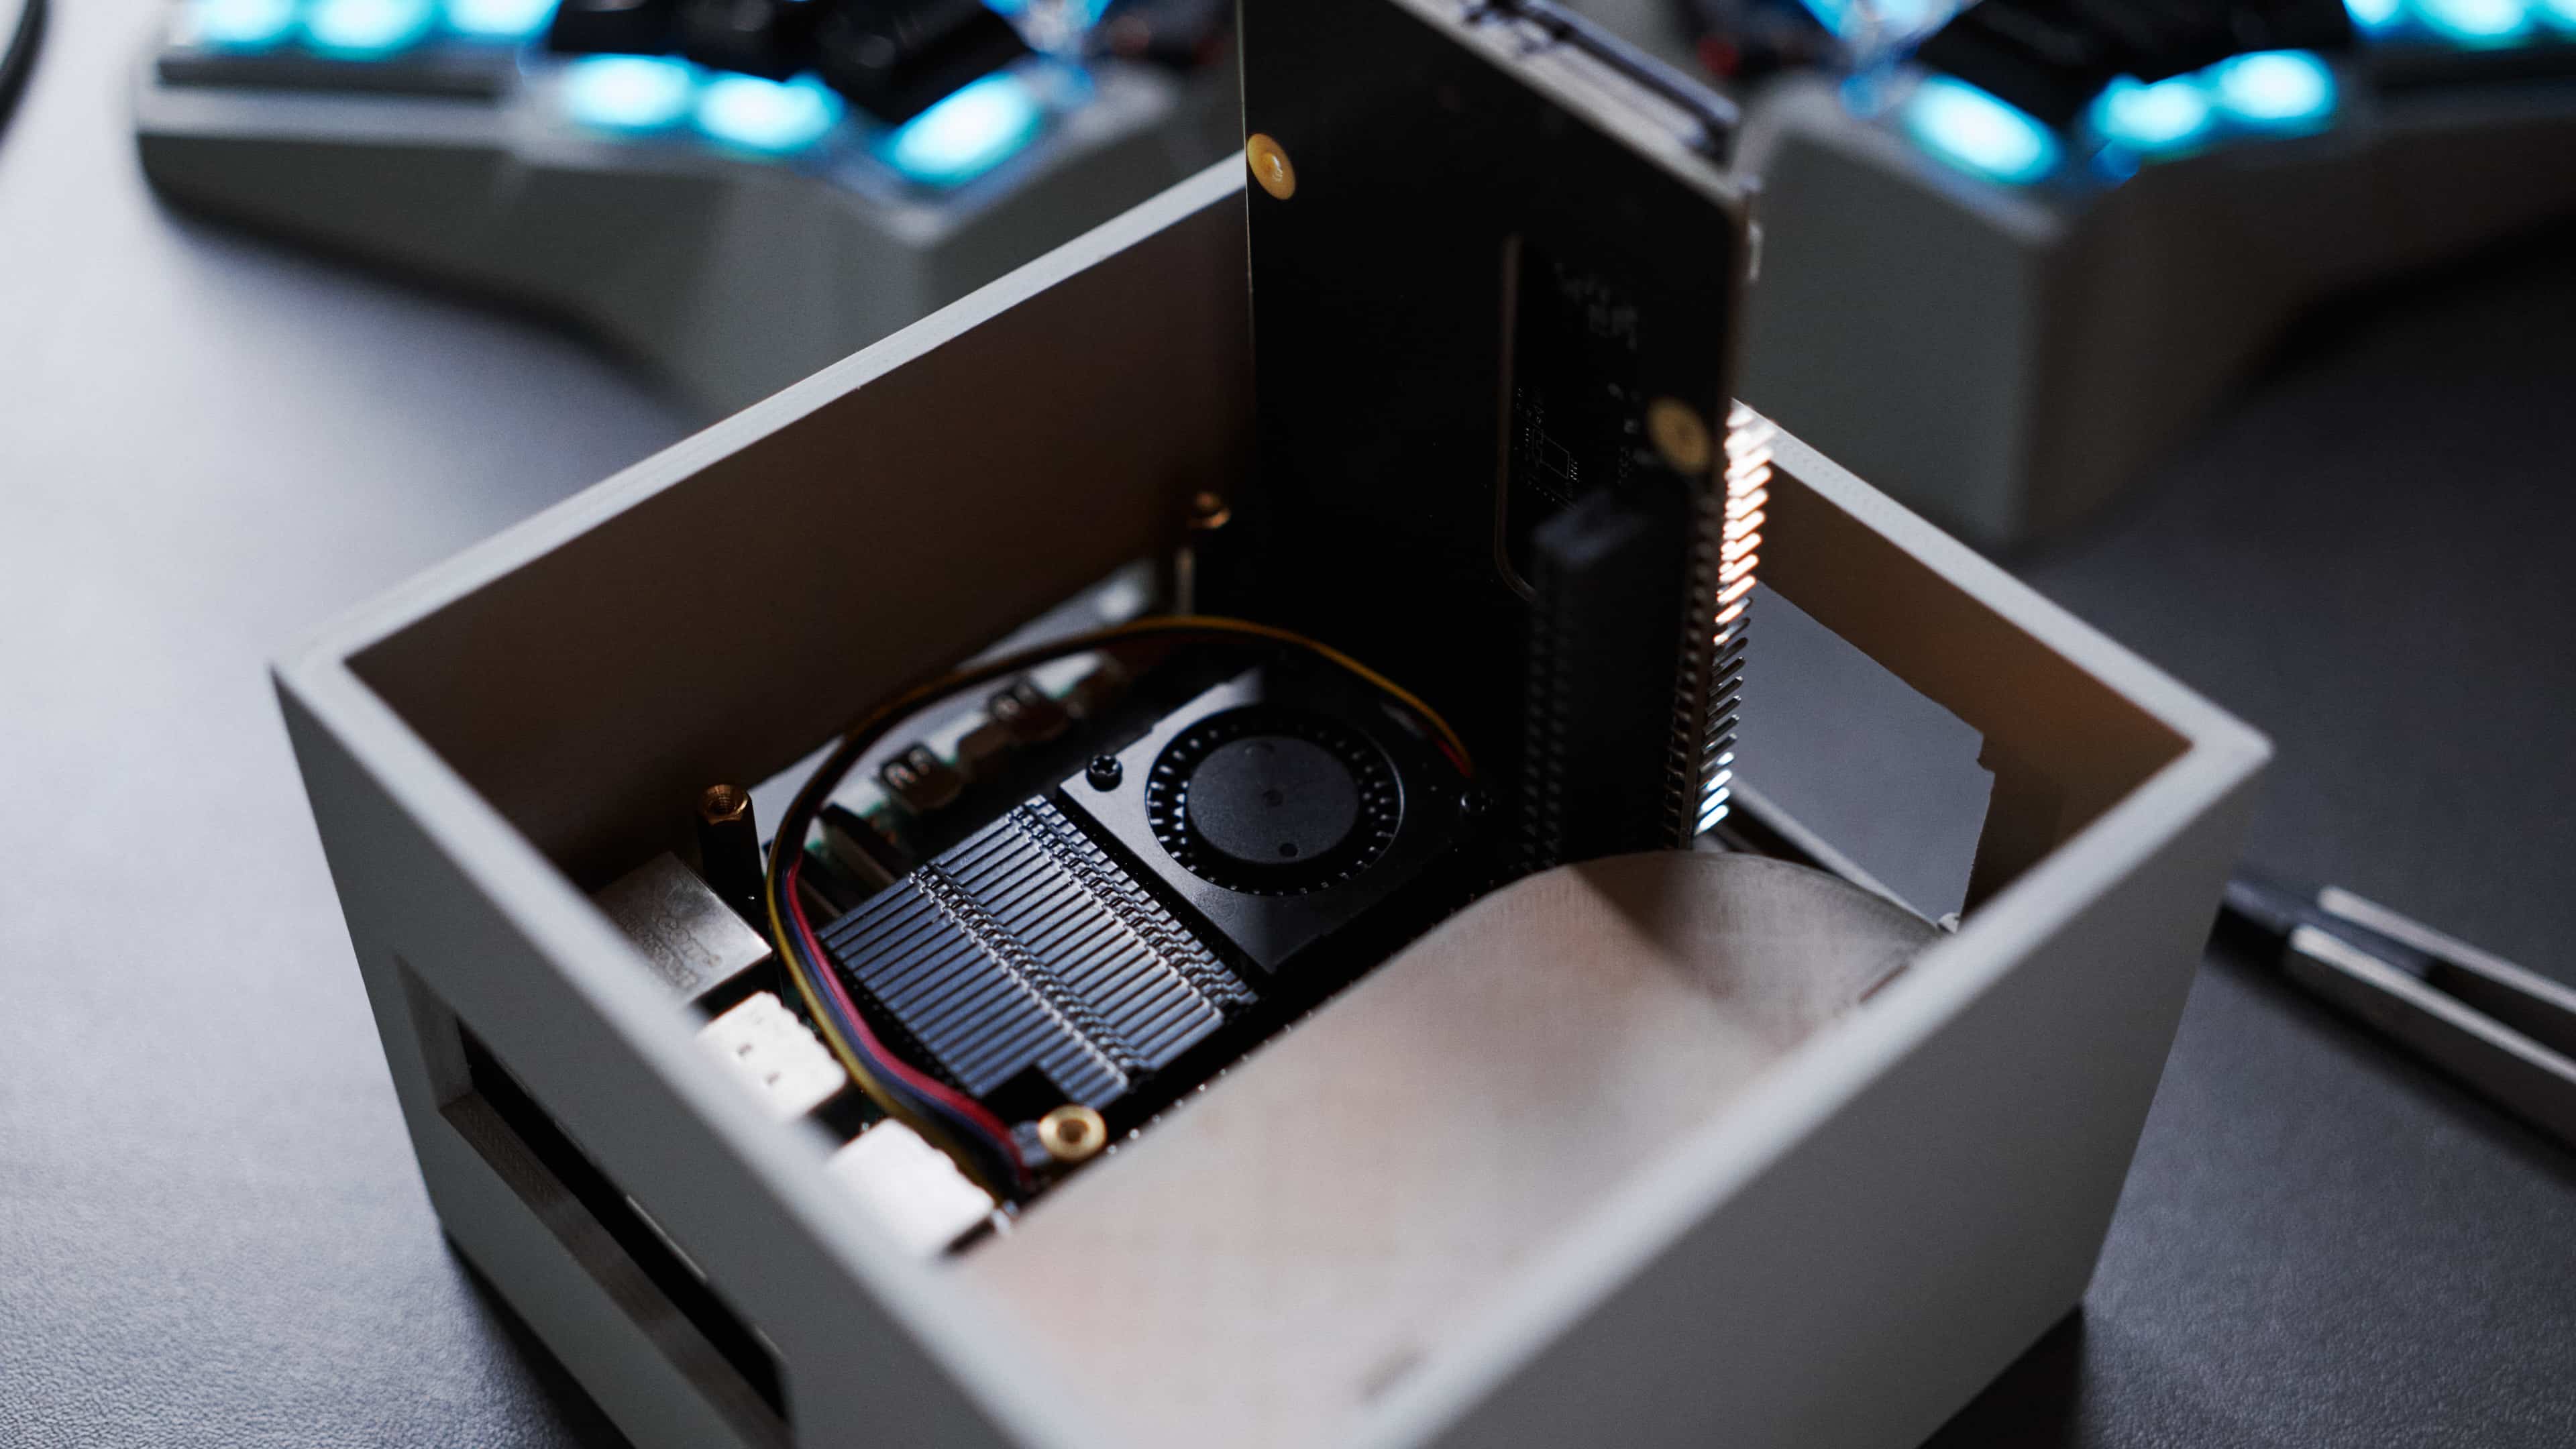
With a few TB of data left on cold storage, a.k.a. a handful of 2.5" USB HDDs, I am now looking into building a cold storage solution that is as ultra-portable as the UPDC, and ideally WORM. With large parts of that data being mostly sentimental things, like photos and videos, or data that I’m obliged to keep for prolonged periods, like client project data, contracts, and official documents, it doesn’t make much sense to keep those files available in hot storage. I would explicitly like that data to be immutable. All of the software I use supports nondestructive editing of photos and videos. Documents like contracts and invoices are not supposed to be edited anyway and are often scanned, and exported as JPGs, PNGs, or PDFs. And even downloads of purchased software – for example, old versions of X-Plane, that I used for testing aerodynamic capabilities of aerial vehicles – will not change anymore.
I have been diving into optical disc technology – namely M-DISCs – but the current state of that field doesn’t seem as reliable anymore as it did twenty years ago.
Another thing that I’m still looking into is Meshtastic. I would have liked to include a Meshtastic relay and it’s a bummer that my specific Raspberry Pi setup was too finicky to work. I might however just end up just using a dedicated, supported board, to add another dot on the map.
FAQ
If you only need 2 NVMe SSDs, couldn’t you have used a Mini PC?
Even though devices like the Minisforum MS-01 offer multiple M.2 2280 slots, they usually list 2TB as the maximum capacity per slot. Besides, with a weight of around 1kg to 1.5kg for these sorts of NUCs, and around 500g additionally for the power supply, these devices are definitely more noticeable in carry-on luggage. I would hence argue that portability on the UPDC v2 is superior to most (almost all?) off-the-shelf Mini PCs and NUCs – with the exception of the UnifyDrive UT2, which is yet to be released and evaluated. Also, the UT2 in its most basic version (without SSDs included) is expected to costs $399, which is at least $50 above the basic build for the UPDC v2.
And also …

Does the system run off of the MicroSD card?
Yes. It’s sufficient for running the base system and it can easily be replicated
(dd) onto backup cards for an uncomplicated recovery procedure that solely
consists of replacing the MicroSD.
It can even be made a read-only filesystem, with some effort.
Did you really put the keyfile into /etc/keyfile?
No, after finishing the setup I moved it to a USB stick and re-configured
crypttab. The reason I didn’t document this is that I did not have a proper,
low-profile USB stick available at the time of writing this post.
As soon as I received the USB stick, I wrote the keyfile onto it using dd:
dd if=/etc/keyfile of=/dev/sda bs=1 count=2048
I then went ahead to adjust the crypttab:
root@h4nk4-m:~# cat /etc/crypttab
# <target name>	<source device>		<key file>	<options>
storage	UUID=f0463afa-5cec-4f3f-a935-caee4a757515	/dev/disk/by-path/platform-xhci-hcd.1-usb-0:2:1.0-scsi-0:0:0:0	keyfile-size=2048,luks,discard
I used the disk path rather than the its device name. With that in place I
reloaded systemd and manually tested mounting the storage, before giving it a
reboot. Afterwards I deleted the keyfile in /etc/keyfile.
How did you migrate from TrueNAS SCALE?
Migration was fairly easy as it only involved data, which I copied using
rsync -aH, the Syncthing config, which I manually created on the new system
by sharing all the folders from the old system to the new one after the data was
copied, and so-called Cloud Sync Tasks, which were a bit more tricky.
For the Cloud Sync Tasks I went ahead and modified the file
/usr/lib/python3/dist-packages/middlewared/plugins/cloud_sync.py and extended
every call to tempfile.NamedTemporaryFile(mode="w+") with one parameter:
tempfile.NamedTemporaryFile(mode="w+",delete=False)
This would prevent the temporary files that TrueNAS creates, in which it stores
the rclone config, from being deleted. After editing the file, I manually
restarted the middleware using service middlewared restart, only to then log
in on the web UI and manually trigger each Cloud Sync Task. As soon as every
task began running I would then collect all the configs using:
grep -l '\[encrypted*' /tmp* | while read line; do cat $line; echo "---";done
After adjusting the individual configurations to the new environment I was able
to run rclone with them.
How does the Raspberry Pi 5 feel compared to the previous build?
Honestly, not much different. In fact, it feels significantly snappier. I feel like while TrueNAS SCALE made it easy to manage a NAS system, it added a lot of overhead, resulting in every little thing becoming excruciatingly slow. Even actions running off of the RAID1 NVMe root fs (e.g. launching K8s) took a disproportionate amount of time to complete. On the Raspberry, on the other hand, Podman starts every service within seconds and the device is completely reboot-proof and ready in no time, after connecting it to power.
Does powering it via the barrel connector work?
Yes and no. It works, however, not with the MacBook power brick and a USB-C to barrel cable. Geekworm sells a dedicated DC5521 PSU that delivers 60W (12V/5A), which I might go for eventually.
Does the Noctua 12V fan work?
Yes, although at reduced speed, as it is powered by the Raspberry’s 5V pin. Even though it is totally sufficient for cooling the NVMes, powering it at 12V would be another reason to go for the DC5521 PSU. The X1202 has a dedicated XH2.54-2P DC connector that would allow me to power the fan at 12V instead of occupying the 5V pin on the GPIO.
Do you use a cloud backup service?
No.
Aren’t you sick of spending money and effort on storage?
I am indeed. Especially with temperatures around 26° indoors, humidity levels above 80% and direct proximity to saltwater it’s a huge PITA.
I want to build one myself, will you release the STLs?
Yes, I’m working on that, however, I’m still fixing and optimizing a few things that didn’t turn out as expected, e.g. the microSD card slot. I will post an update as soon as I have a first version of the STLs ready for public use.
Meanwhile, if you don’t care too much about the aesthetics and won’t require a display, or a big amount of sensors, you could just get the Geekworm X1202-C1.
Where can I get 18650 batteries from?
USA
- 18650 Battery Store
- Li-on Wholesale
- Illumn
- IMR Batteries
- Mountain Electronics
- Killzone Flashlights
Canada
- Li-on Wholesale
- Illumn
- Mountain Electronics
Australia
- techaroundyou on eBay or their website
- Lanplus.com.au
- liteshop.com.au
UK
- Torchy
- Ecolux
- Fogstar
- 18650.UK
- Vapour Depot
EU
- NKON
- Akkuteile
- Vapemodbox
Did you use tape to fix the components?
In the photos I took, yes. However, later on, when I got a hot glue pistol, I used hot glue to fix components in place. This way nothing moves around during travels but I could still rip out individual parts and replace them in case they might break one day.
You went through the effort of including an LCD that rotates based on the cube’s orientation only to display Taxation is Theft?
That’s some commitment, isn’t it? Jokes aside, the display shows system stats. However, as those don’t change too much and I didn’t want to risk permanent burn-in, I decided to make it display a random image every ten seconds.
Is your network’s name really birdsarentreal?
No, I replaced my actual network name in this write-up for privacy reasons. However, birds aren’t real nevertheless.
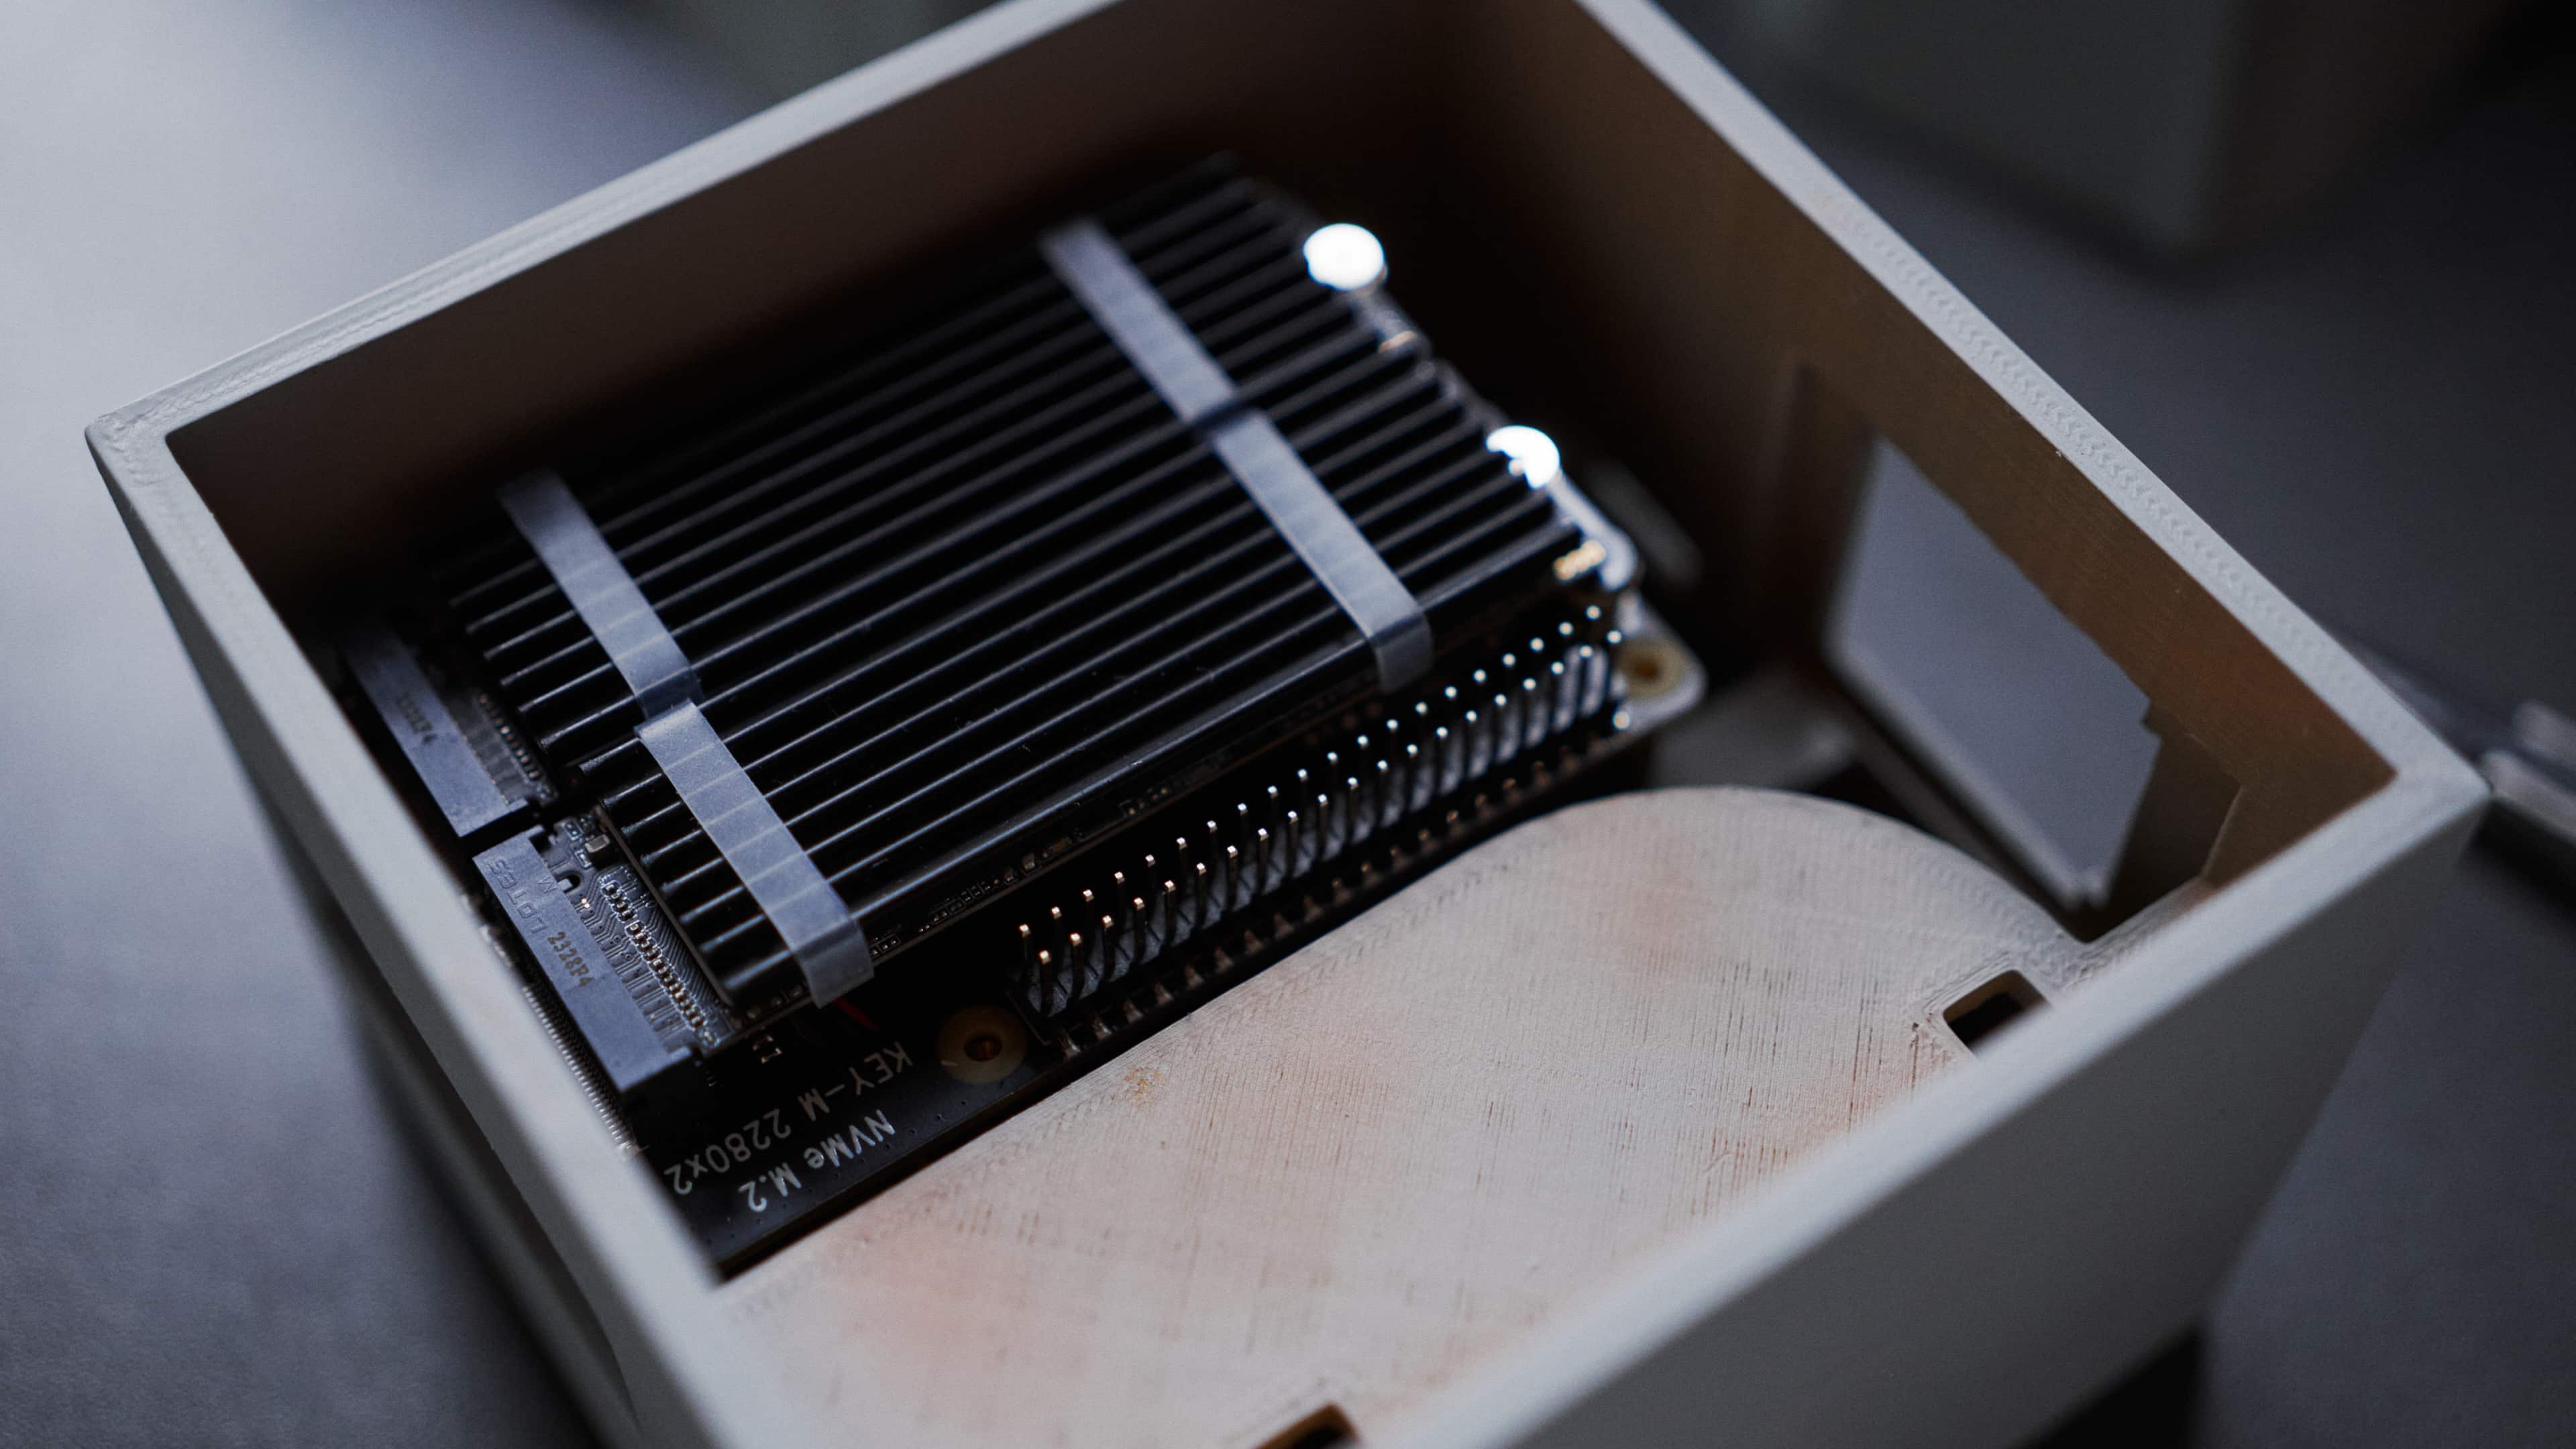
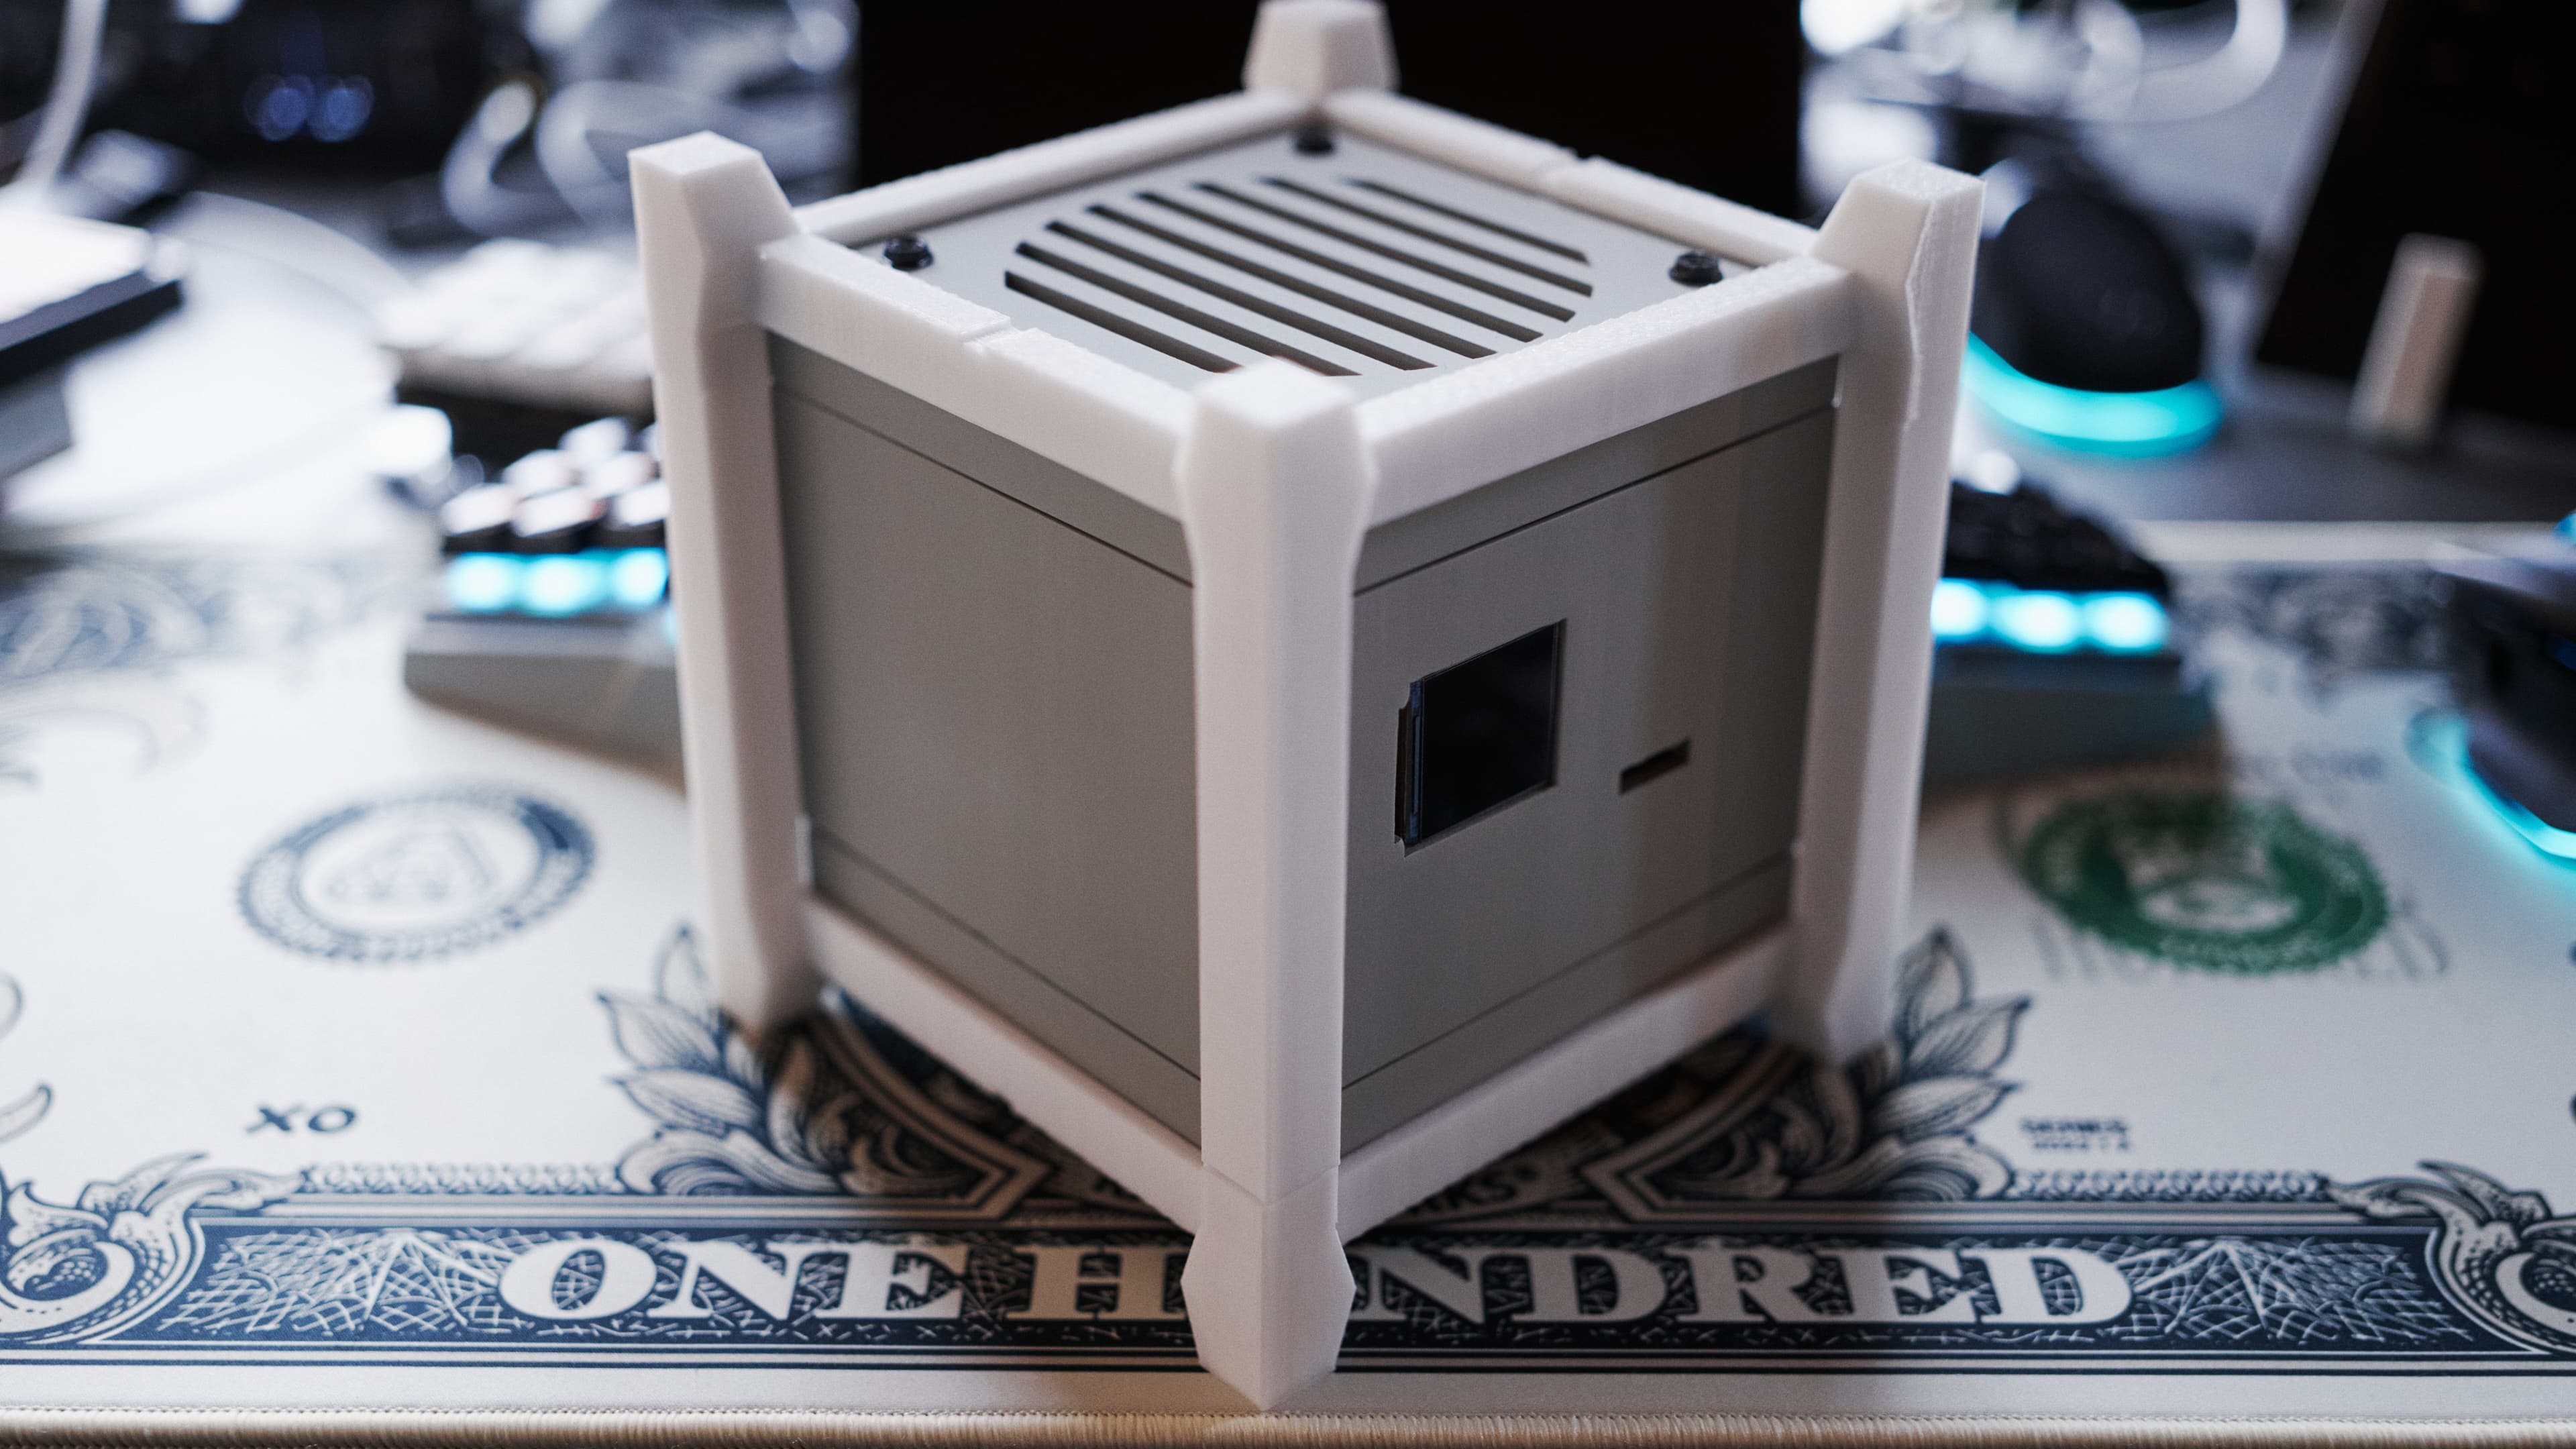
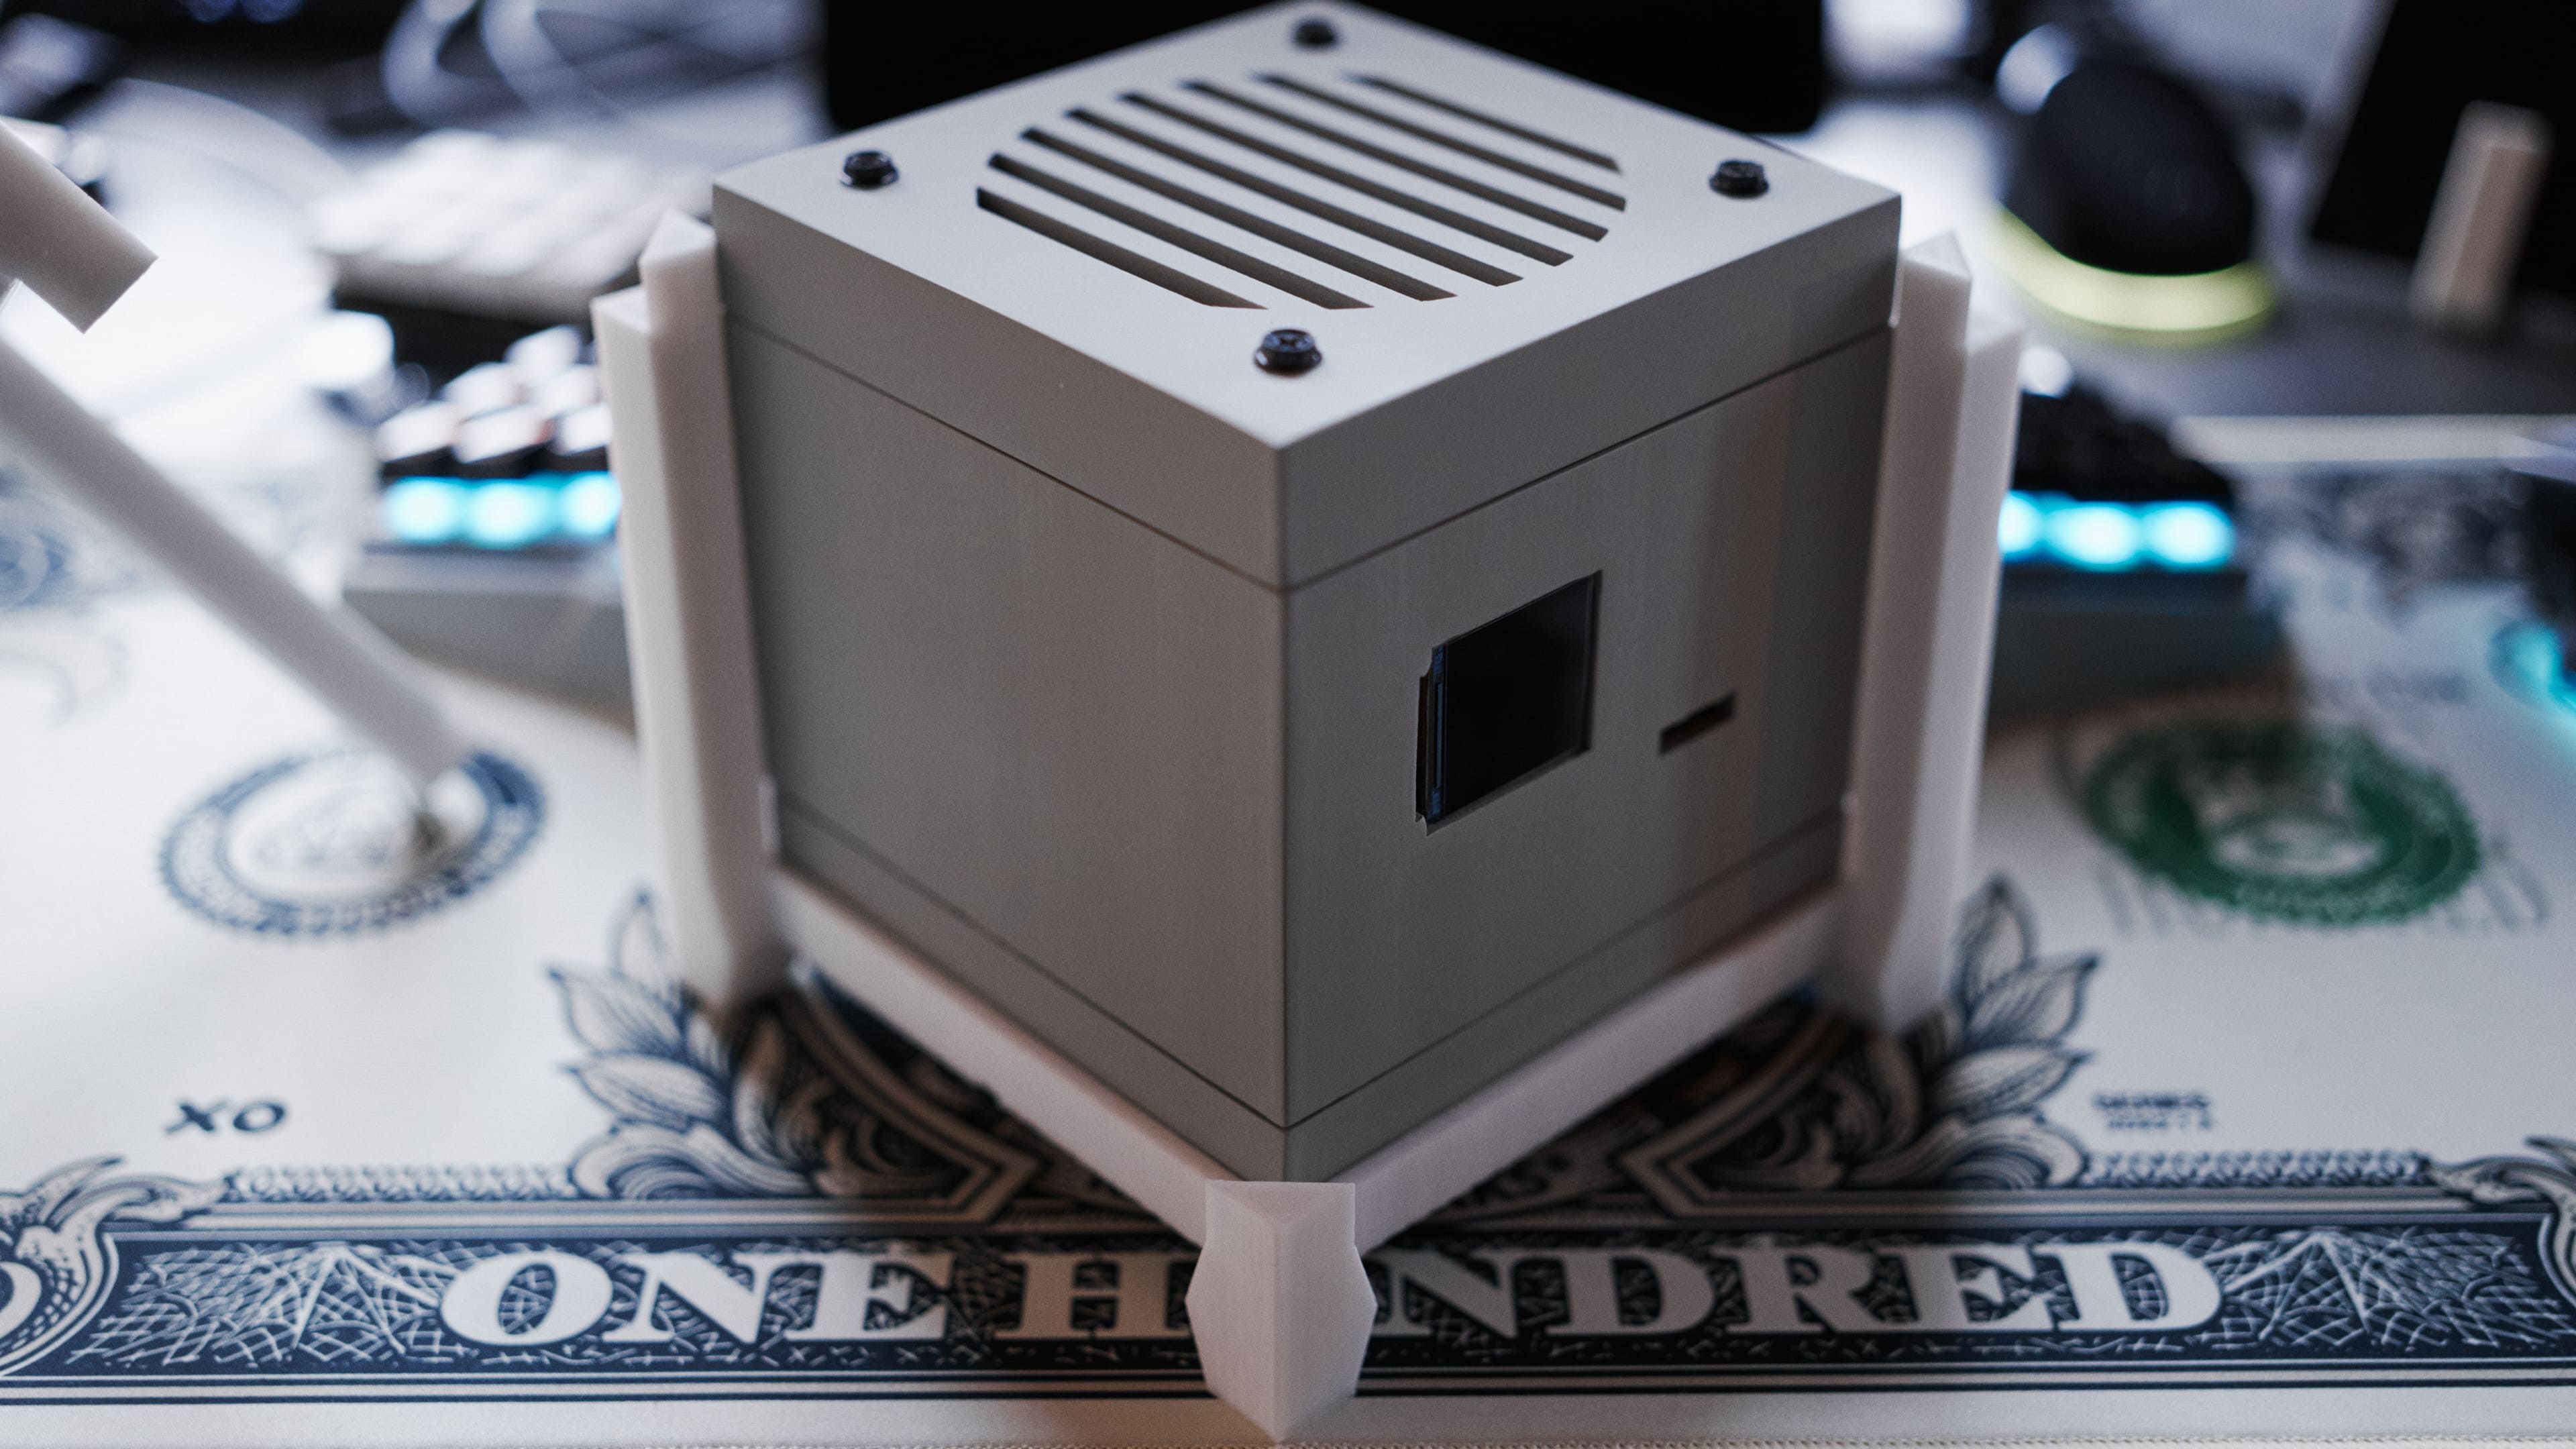
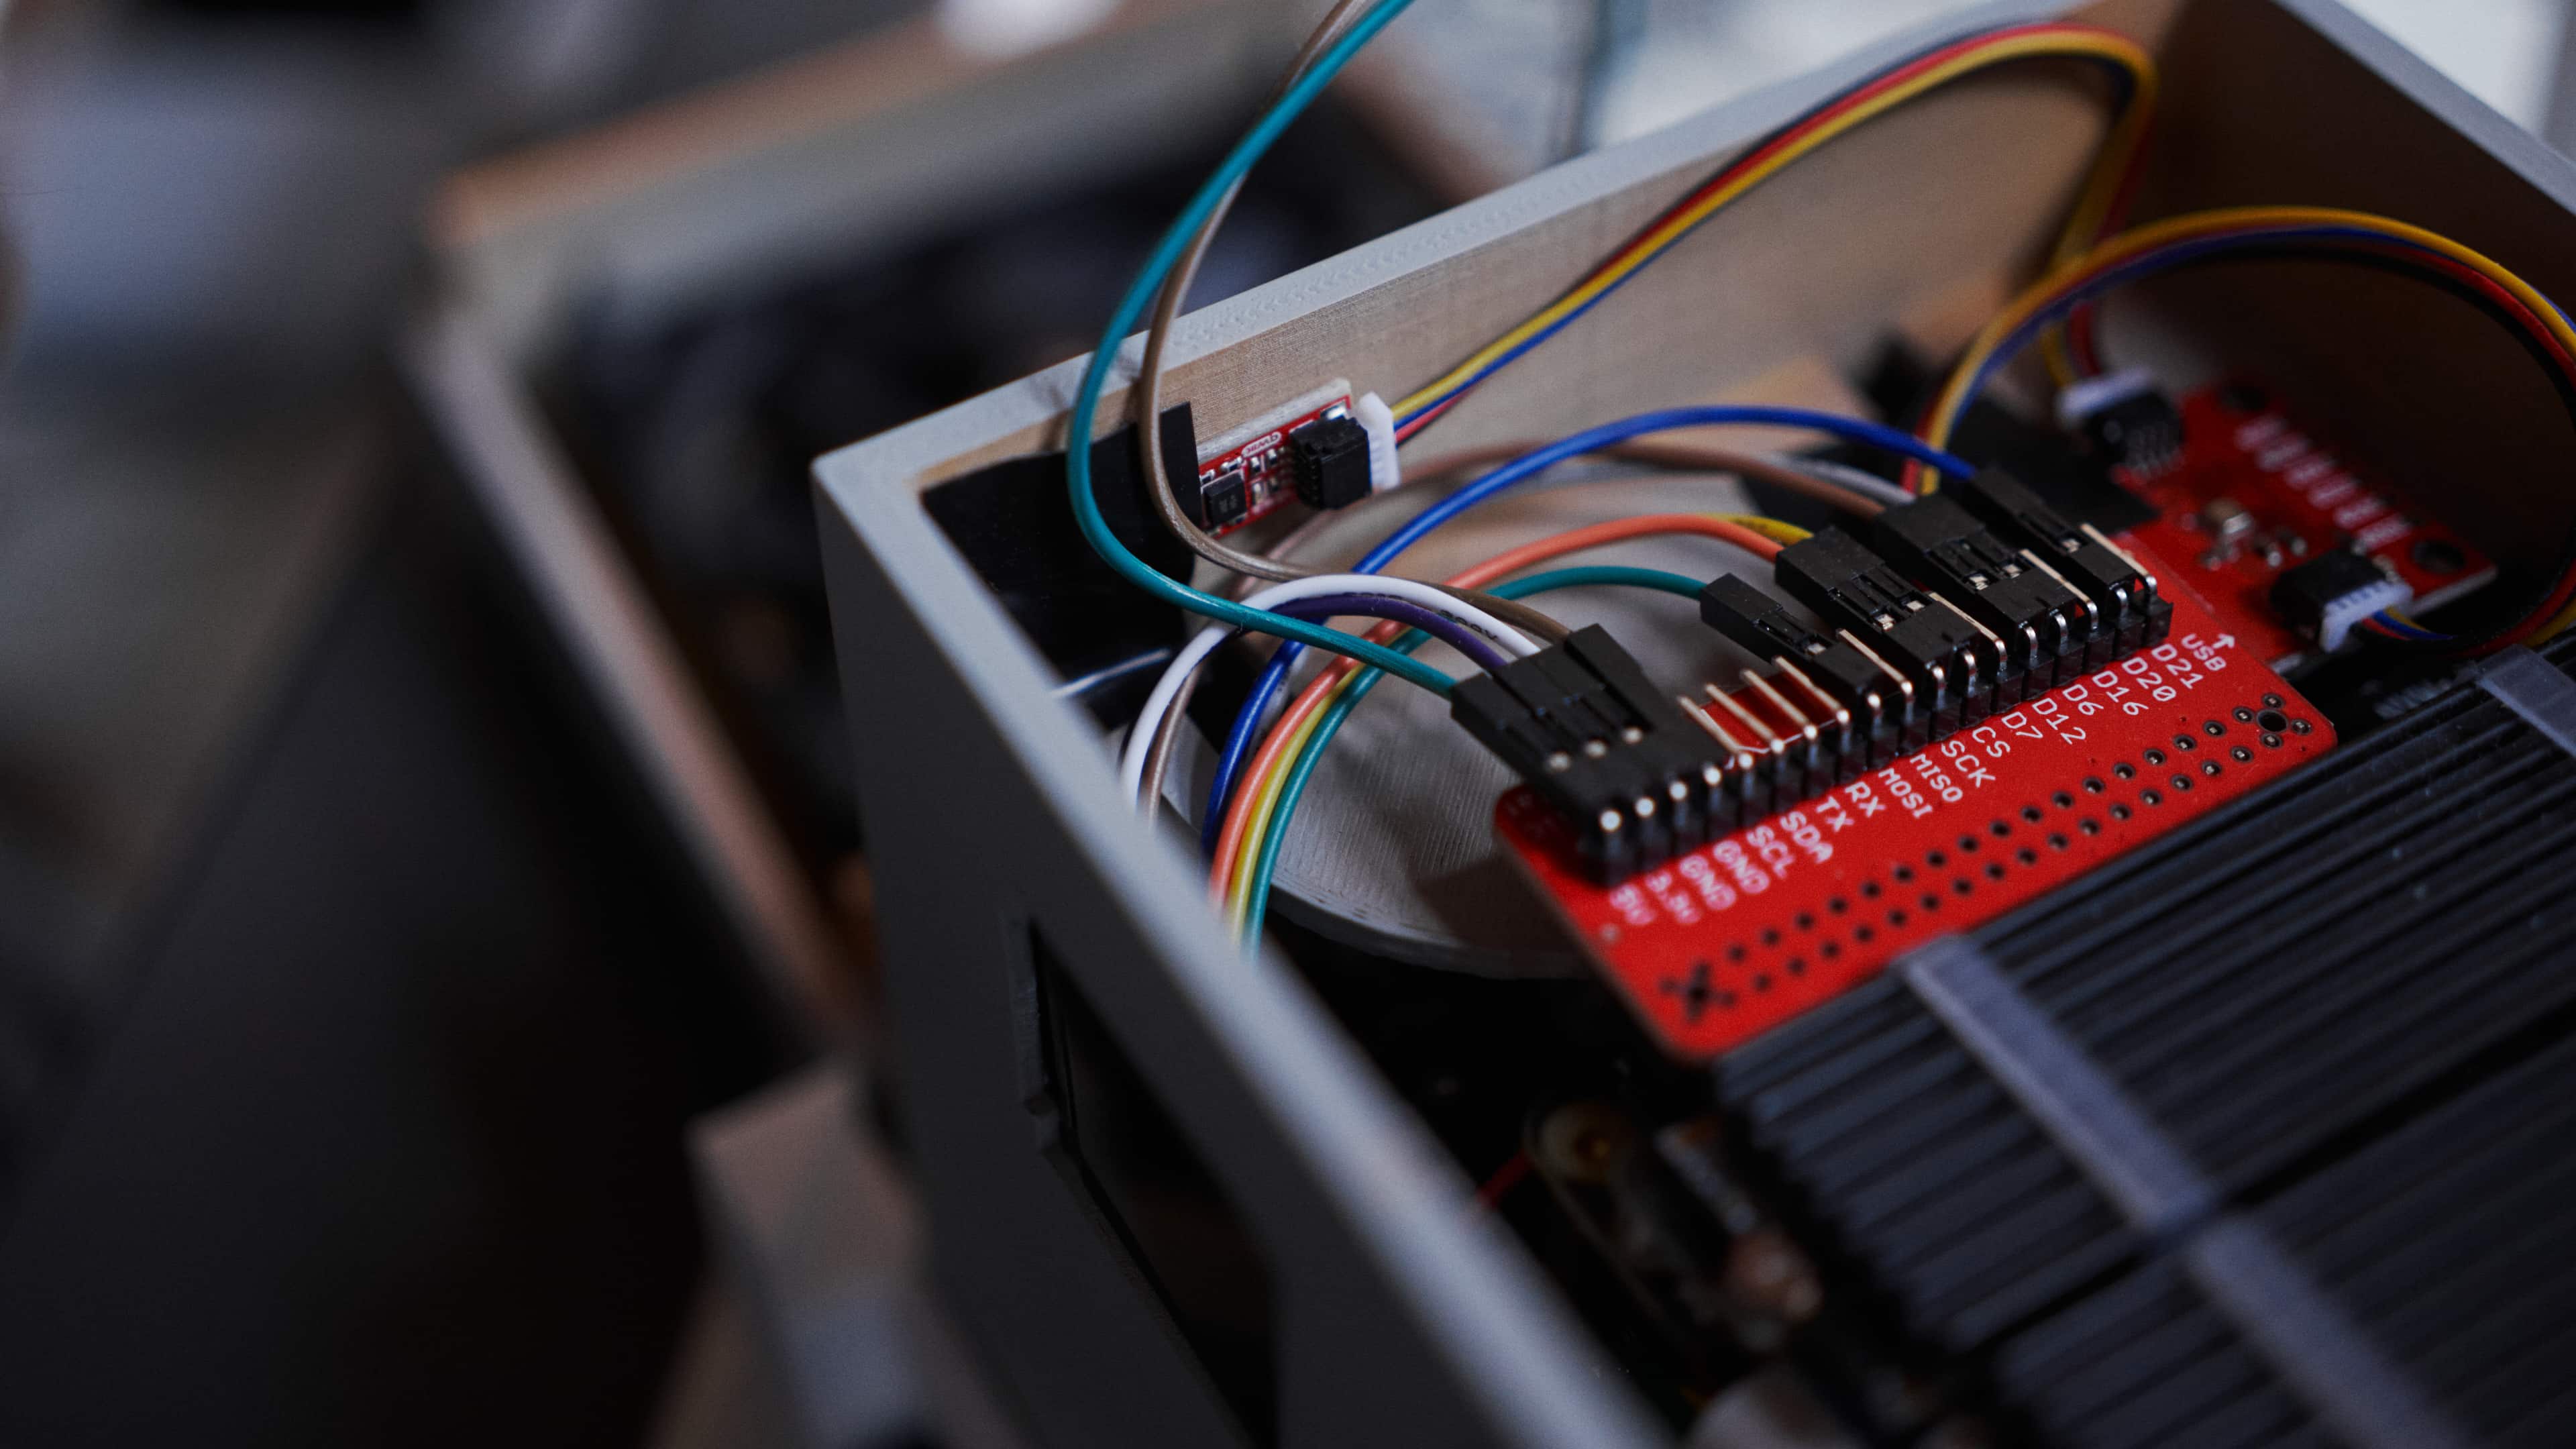

Enjoyed this? Support me via Monero, Bitcoin or Ethereum! More info.